원문 : http://www.rastertek.com/dx11tut14.html
Tutorial 14: Direct Sound
![]()
이번 강좌는 DirectX 11에서 Direct 사운드 사용의 기초와 .wav 오디오 파일을 로드하는 방법에 대해 살펴볼 것입니다. 이번 강좌는 저번 DirectX 11 강좌에 기초합니다. 이번 강좌의 코드부분을 보기 앞서 DirectX 11에서 Direct 사운드에 관한 여러 기본들과 사운드 포맷에 대한 비트를 살펴보겠습니다.
여러분이 알아야 할 첫번쨰는 DirectX 11에서 Direct 사운드 API는 여전히 DirectX 8의 것과 같다는 것입니다. 유일한 큰 차이는 최신 Windows OS에서는 하드웨어 사운드 혼합이 일반적으로 사용할 수 없다는 것입니다. 그 이유는 보안과 이제 모든 하드웨어 호출은 보안 레이어를 거쳐가야하는 OS의 일관성 때문입니다. 예전 사운드 카드들은 매우 빠른 DMA(direct memory access)를 지원하였지만 새 Windows 보안 모델에서는 동작하지 않습니다. 그래서 이제 모든 사운드 혼합은 소프트웨어 레벨에서 수행되며 그러한 이유로 하드웨어 가속이 아닌 것은 이 API로 직접 이용할 수 있습니다.
Direct 사운드의 장점은 여러분이 원하는 어떤 오디오 포맷이든 간에 재생할 수 있다는 것입니다. 이번 강좌에서 .wav 오디오 포맷을 사용하지만 .wav 코드를 .mp3나 원하는 다른 것들으로 교체할 수 있습니다. 심지어 여러분이 만든 오디오 포맷도 사용할 수 있습니다. Direct 사운드는 사용하기 매우 쉬워서 원하는 플레이백 포맷(.wav)의 사운드 버퍼를 만들고 오디오 포맷을 버퍼의 포맷에 복사하면 재생할 준비가 됩니다. 보다시피 많은 어플리케이션이 Direct 사운드를 사용하는 이유는 이런 간단함 때문입니다.
기억하실 것은 Direct 사운드는 두 종류의 버퍼 primary와 secondary 버퍼를 사용합니다. primary 버퍼는 여러분의 기본 사운드 카드, USB 헤드셋 등등의 메인 사운드 메모리 버퍼입니다. Secondary 버퍼들은 메모리에서 여러분이 만드는 버퍼이며 여러분의 사운드가 로드되는 곳입니다. secondary 버퍼를 재생할때 Direct 사운드 API는 사운드를 primary 버퍼로 혼합을 처리하고 사운드를 재생합니다. 여러 secondary 버퍼들을 동시에 재생한다면 한꺼번에 혼합하여 primary 버퍼에서 재생합니다. 또한 모든 버퍼들은 순환적이어서 반복재생하도록 설정할 수 있습니다.
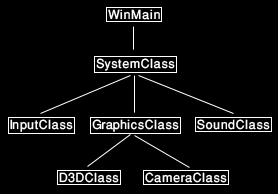
강좌를 시작하기 위해 먼저 갱신된 프레임워크를 볼 것입니다. 유일한 새로운 클래스는 모든 DirectSound와 .wav 기능을 가지는 SoundClass입니다. 이번 강좌를 간단히 하기 위해 다른 클래스들은 지웠습니다.
Soundclass.h
SoundClass는 DirectSound기능과 .wav 오디오를 로딩하고 재생하는 기능을 캡슐화 합니다.
///////////////////////////////////////////////////////////////////////////////
// Filename: soundclass.h
///////////////////////////////////////////////////////////////////////////////
#ifndef _SOUNDCLASS_H_
#define _SOUNDCLASS_H_
다음 라이브러리들과 헤더들은 컴파일하는데 필요합니다.
/////////////
// LINKING //
/////////////
#pragma comment(lib, "dsound.lib")
#pragma comment(lib, "dxguid.lib")
#pragma comment(lib, "winmm.lib")


//////////////
// INCLUDES //
//////////////
#include <windows.h>
#include <mmsystem.h>
#include <dsound.h>
#include <stdio.h>


///////////////////////////////////////////////////////////////////////////////
// Class name: SoundClass
///////////////////////////////////////////////////////////////////////////////
class SoundClass
{
private:
여기에 사용된 WaveHeaderType 구조체는 .wav 파일 포맷에 대한 것입니다. .wav파일을 로딩할때 .wav 오디오 데이터로딩에 필요한 정보를 알기 위해 먼저 이 헤더를 읽습니다. 여러분이 다른 포맷을 사용중이라면 여러분의 오디오 포맷에 필요대로 이 헤더를 교체하셔도 됩니다.
	struct WaveHeaderType
	{
		char chunkId[4];
		unsigned long chunkSize;
		char format[4];
		char subChunkId[4];
		unsigned long subChunkSize;
		unsigned short audioFormat;
		unsigned short numChannels;
		unsigned long sampleRate;
		unsigned long bytesPerSecond;
		unsigned short blockAlign;
		unsigned short bitsPerSample;
		char dataChunkId[4];
		unsigned long dataSize;
	};

public:
	SoundClass();
	SoundClass(const SoundClass&);
	~SoundClass();
Initialize와 Shutdown 이번 강좌에 필요한 모든 것을 처리합니다. Initialize 함수는 DirectSound를 초기화하고 .wav 오디오 파일을 로드할 것이며 그리고는 한번 재생합니다. Shutdown은 .wav 파일을 해제하고 DirectSound를 정리할 것입니다.
	bool Initialize(HWND);
	void Shutdown();

private:
	bool InitializeDirectSound(HWND);
	void ShutdownDirectSound();

	bool LoadWaveFile(char*, IDirectSoundBuffer8**);
	void ShutdownWaveFile(IDirectSoundBuffer8**);

	bool PlayWaveFile();

private:
	IDirectSound8* m_DirectSound;
	IDirectSoundBuffer* m_primaryBuffer;
이번 강좌는 사운드를 1개만 로드하기 때문에 secondary 버퍼를 하나만 가집니다.
	IDirectSoundBuffer8* m_secondaryBuffer1;
};

#endif
Soundclass.cpp
///////////////////////////////////////////////////////////////////////////////
// Filename: soundclass.cpp
///////////////////////////////////////////////////////////////////////////////
#include "soundclass.h"
생성자에서 사운드 클래스 내부에서 사용되는 private 멤버 변수를 초기화합니다.
SoundClass::SoundClass()
{
	m_DirectSound = 0;
	m_primaryBuffer = 0;
	m_secondaryBuffer1 = 0;
}


SoundClass::SoundClass(const SoundClass& other)
{
}


SoundClass::~SoundClass()
{
}


bool SoundClass::Initialize(HWND hwnd)
{
	bool result;
먼저 DirectSound API와 primary 버퍼를 초기화합니다. 초기화하고 나면 .wav 오디오 파일을 로드하고 오디오 파일 정보로 secondary를 초기화하는 LoadWaveFile 함수를 호출합니다. 로딩이 끝나면 .wav파일을 한번 재생하는 PlayWaveFile을 호출합니다.
	// Initialize direct sound and the primary sound buffer.
	result = InitializeDirectSound(hwnd);
	if(!result)
	{
		return false;
	}

	// Load a wave audio file onto a secondary buffer.
	result = LoadWaveFile("../Engine/data/sound01.wav", &m_secondaryBuffer1);
	if(!result)
	{
		return false;
	}

	// Play the wave file now that it has been loaded.
	result = PlayWaveFile();
	if(!result)
	{
		return false;
	}

	return true;
}
Shutdown 함수는 먼저 .wav 파일 오디오 데이터를 가지고 있는 secondary 버퍼를 ShutdownWaveFile 함수를 사용하여 해제합니다. 그리고는 ShutdownDirectSound를 호출하여 primary와 DirectSound 인터페이스를 해제합니다.
void SoundClass::Shutdown()
{
	// Release the secondary buffer.
	ShutdownWaveFile(&m_secondaryBuffer1);

	// Shutdown the Direct Sound API.
	ShutdownDirectSound();

	return;
}
InitializeDirectSound는 DirectSound와 기본 primary 사운드 버퍼에 대한 인터페이스 포인터를 얻는 것을 처리합니다. 시스템에 모든 사운드 장치에 대해 요청하여 특정 장치에 대한 primary 사운드 버퍼의 포인터를 얻을 수 있지만 이번 강좌는 간단함을 유지하기 위해 기본 사운드 장치에 대한 primary 버퍼의 포인터만 구했습니다.
bool SoundClass::InitializeDirectSound(HWND hwnd)
{
	HRESULT result;
	DSBUFFERDESC bufferDesc;
	WAVEFORMATEX waveFormat;


	// Initialize the direct sound interface pointer for the default sound device.
	result = DirectSoundCreate8(NULL, &m_DirectSound, NULL);
	if(FAILED(result))
	{
		return false;
	}

	// Set the cooperative level to priority so the format of the primary sound buffer can be modified.
	result = m_DirectSound->SetCooperativeLevel(hwnd, DSSCL_PRIORITY);
	if(FAILED(result))
	{
		return false;
	}
primary 버퍼에 원하는 접근 방법의 description을 설정해야 합니다. dwFlags는 이 구조체의 중요한 부분입니다. 이번 강좌의 경우 primary 버퍼 description의 dwFlags을 볼륨 조절 기능으로 설정할 것입니다. 다른 기능들도 설정 가능하지만 지금은 간단함을 위해 그냥 두겠습니다.
	// Setup the primary buffer description.
	bufferDesc.dwSize = sizeof(DSBUFFERDESC);
	bufferDesc.dwFlags = DSBCAPS_PRIMARYBUFFER | DSBCAPS_CTRLVOLUME;
	bufferDesc.dwBufferBytes = 0;
	bufferDesc.dwReserved = 0;
	bufferDesc.lpwfxFormat = NULL;
	bufferDesc.guid3DAlgorithm = GUID_NULL;

	// Get control of the primary sound buffer on the default sound device.
	result = m_DirectSound->CreateSoundBuffer(&bufferDesc, &m_primaryBuffer, NULL);
	if(FAILED(result))
	{
		return false;
	}
이제 기본 사운드 장치의 primary 버퍼의 제어권을 얻었으니 포맷을 원했던 오디오 파일 포맷으로 변경해봅시다. 저는 여기서 고음질의 사운드를 원하니 압축되지 않은 CD 오디오 음질로 설정할 것입니다.
	// Setup the format of the primary sound bufffer.
	// In this case it is a .WAV file recorded at 44,100 samples per second in 16-bit stereo (cd audio format).
	waveFormat.wFormatTag = WAVE_FORMAT_PCM;
	waveFormat.nSamplesPerSec = 44100;
	waveFormat.wBitsPerSample = 16;
	waveFormat.nChannels = 2;
	waveFormat.nBlockAlign = (waveFormat.wBitsPerSample / 8) * waveFormat.nChannels;
	waveFormat.nAvgBytesPerSec = waveFormat.nSamplesPerSec * waveFormat.nBlockAlign;
	waveFormat.cbSize = 0;

	// Set the primary buffer to be the wave format specified.
	result = m_primaryBuffer->SetFormat(&waveFormat);
	if(FAILED(result))
	{
		return false;
	}

	return true;
}
ShutdownDirectSound 함수는 primary 버퍼와 DirectSound 인터페이스 해제를 처리합니다.
void SoundClass::ShutdownDirectSound()
{
	// Release the primary sound buffer pointer.
	if(m_primaryBuffer)
	{
		m_primaryBuffer->Release();
		m_primaryBuffer = 0;
	}

	// Release the direct sound interface pointer.
	if(m_DirectSound)
	{
		m_DirectSound->Release();
		m_DirectSound = 0;
	}

	return;
}
LoadWaveFile 함수는 .wav 오디오 파일을 로딩하고 데이터를 새 secondary 버퍼에 복사하는 것을 처리하는 함수입니다. 여러분이 다른 포맷을 원하면 이 함수를 고치거나 비슷한 함수를 작성하시면 됩니다.
bool SoundClass::LoadWaveFile(char* filename, IDirectSoundBuffer8** secondaryBuffer)
{
	int error;
	FILE* filePtr;
	unsigned int count;
	WaveHeaderType waveFileHeader;
	WAVEFORMATEX waveFormat;
	DSBUFFERDESC bufferDesc;
	HRESULT result;
	IDirectSoundBuffer* tempBuffer;
	unsigned char* waveData;
	unsigned char *bufferPtr;
	unsigned long bufferSize;
먼저 .wav파일을 열고 파일의 헤더를 읽습니다. 헤더는 오디오 파일의 모든 정보를 포함할 것이며 그래서 오디오 데이터를 수용하기 위한 secondary 버퍼를 생성하는데 그 정보를 사용할 수 있습니다. 또 오디오 파일은 데이터가 어디서 시작하는지 얼마나 큰지를 알려 줍니다. 제가 오디오 파일이 변질되지는 않았는지 적절한 wave파일 포맷으로 RIFF, WAVE, fmt, data, WAVE_FORMAT_PCM 태그들을 포함하는지 확실히 하기위해 필요한 모든 태그들을 체크하는 것을 아시게 될 것입니다. 또 44.1KHz 스테레오 16비트 오디오 파일인지 확인하기 위해 다른 것들도 체크합니다. 만약 모노에 22.1KHz, 8비트 또는 다른 포맷이면 우라기 원하는 정확한 포맷만을 로딩중인지 확인작업을 실패할 것입니다.
	// Open the wave file in binary.
	error = fopen_s(&filePtr, filename, "rb");
	if(error != 0)
	{
		return false;
	}

	// Read in the wave file header.
	count = fread(&waveFileHeader, sizeof(waveFileHeader), 1, filePtr);
	if(count != 1)
	{
		return false;
	}

	// Check that the chunk ID is the RIFF format.
	if((waveFileHeader.chunkId[0] != 'R') || (waveFileHeader.chunkId[1] != 'I') ||
	   (waveFileHeader.chunkId[2] != 'F') || (waveFileHeader.chunkId[3] != 'F'))
	{
		return false;
	}

	// Check that the file format is the WAVE format.
	if((waveFileHeader.format[0] != 'W') || (waveFileHeader.format[1] != 'A') ||
	   (waveFileHeader.format[2] != 'V') || (waveFileHeader.format[3] != 'E'))
	{
		return false;
	}

	// Check that the sub chunk ID is the fmt format.
	if((waveFileHeader.subChunkId[0] != 'f') || (waveFileHeader.subChunkId[1] != 'm') ||
	   (waveFileHeader.subChunkId[2] != 't') || (waveFileHeader.subChunkId[3] != ' '))
	{
		return false;
	}

	// Check that the audio format is WAVE_FORMAT_PCM.
	if(waveFileHeader.audioFormat != WAVE_FORMAT_PCM)
	{
		return false;
	}

	// Check that the wave file was recorded in stereo format.
	if(waveFileHeader.numChannels != 2)
	{
		return false;
	}

	// Check that the wave file was recorded at a sample rate of 44.1 KHz.
	if(waveFileHeader.sampleRate != 44100)
	{
		return false;
	}

	// Ensure that the wave file was recorded in 16 bit format.
	if(waveFileHeader.bitsPerSample != 16)
	{
		return false;
	}

	// Check for the data chunk header.
	if((waveFileHeader.dataChunkId[0] != 'd') || (waveFileHeader.dataChunkId[1] != 'a') ||
	   (waveFileHeader.dataChunkId[2] != 't') || (waveFileHeader.dataChunkId[3] != 'a'))
	{
		return false;
	}
wave 헤더가 확인되었으니 오디오 데이터를 로드되는 secondary 버퍼를 설정할 수 있습니다. 먼저 primary 버퍼에 대해 했던 것처럼 wave 포맷과 secondary 버퍼의 description을 설정해야 합니다. 그래도 primary 버퍼가 아닌 secondary니까 dwFlags와 dwBufferBytes에서 차이가 조금 있습니다.
	// Set the wave format of secondary buffer that this wave file will be loaded onto.
	waveFormat.wFormatTag = WAVE_FORMAT_PCM;
	waveFormat.nSamplesPerSec = 44100;
	waveFormat.wBitsPerSample = 16;
	waveFormat.nChannels = 2;
	waveFormat.nBlockAlign = (waveFormat.wBitsPerSample / 8) * waveFormat.nChannels;
	waveFormat.nAvgBytesPerSec = waveFormat.nSamplesPerSec * waveFormat.nBlockAlign;
	waveFormat.cbSize = 0;

	// Set the buffer description of the secondary sound buffer that the wave file will be loaded onto.
	bufferDesc.dwSize = sizeof(DSBUFFERDESC);
	bufferDesc.dwFlags = DSBCAPS_CTRLVOLUME;
	bufferDesc.dwBufferBytes = waveFileHeader.dataSize;
	bufferDesc.dwReserved = 0;
	bufferDesc.lpwfxFormat = &waveFormat;
	bufferDesc.guid3DAlgorithm = GUID_NULL;
secondary 버퍼 생성 방법은 상당히 이상합니다. 첫번째로 secondary버퍼에 대해 설정한 사운드 버퍼 description으로 임시 IDirectSoundBuffer를 만듭니다. 성공하면 그 임시 버퍼를 사용하여 IID_IDirectSoundBuffer8 파라미터로 QueryInterface를 호출하여 IDirectSoundBuffer8 secondary 버퍼를 만들 수 있습니다. 성공하면 임시 버퍼를 해제하며 secondary 버퍼의 사용준비가 완료됩니다.
	// Create a temporary sound buffer with the specific buffer settings.
	result = m_DirectSound->CreateSoundBuffer(&bufferDesc, &tempBuffer, NULL);
	if(FAILED(result))
	{
		return false;
	}

	// Test the buffer format against the direct sound 8 interface and create the secondary buffer.
	result = tempBuffer->QueryInterface(IID_IDirectSoundBuffer8, (void**)&*secondaryBuffer);
	if(FAILED(result))
	{
		return false;
	}

	// Release the temporary buffer.
	tempBuffer->Release();
	tempBuffer = 0;
secondary 버퍼가 준비되었으니 오디오 파일로부터 wave 데이터를 로드할 수 있습니다. 먼저 메모리에 로드하므로 필요하면 데이터를 체크하거나 수정할 수 있습니다. 데이터가 메모리로 읽고나면 secondary 버퍼를 잠그고 데이터를 memcpy를 이용하여 복사하고 잠금을 풉니다. 이 secondary 버퍼는 사용할 준비가 되었습니다. 주의하실게 secondary 버퍼를 잠글때 실제 포인터 두개와 위치 두개를 받는다는 것입니다. 그 이유는 버퍼가 순환적이기 때문인데 만약 버퍼 중간에서 쓰기 시작하면 버퍼 범위 밖을 쓰지 않기 때문에 그 점에서의 버퍼 사이즈가 필요할 것입니다. 이런 점은 오디오 재생같은 것에 유용합니다. 이번 강좌에서 버퍼를 오디오 파일과 같은 사이즈로 만들며 간단히 하기 위해 버퍼의 시작에서 부터 씁니다.
	// Move to the beginning of the wave data which starts at the end of the data chunk header.
	fseek(filePtr, sizeof(WaveHeaderType), SEEK_SET);

	// Create a temporary buffer to hold the wave file data.
	waveData = new unsigned char[waveFileHeader.dataSize];
	if(!waveData)
	{
		return false;
	}

	// Read in the wave file data into the newly created buffer.
	count = fread(waveData, 1, waveFileHeader.dataSize, filePtr);
	if(count != waveFileHeader.dataSize)
	{
		return false;
	}

	// Close the file once done reading.
	error = fclose(filePtr);
	if(error != 0)
	{
		return false;
	}

	// Lock the secondary buffer to write wave data into it.
	result = (*secondaryBuffer)->Lock(0, waveFileHeader.dataSize, (void**)&bufferPtr, (DWORD*)&bufferSize, NULL, 0, 0);
	if(FAILED(result))
	{
		return false;
	}

	// Copy the wave data into the buffer.
	memcpy(bufferPtr, waveData, waveFileHeader.dataSize);

	// Unlock the secondary buffer after the data has been written to it.
	result = (*secondaryBuffer)->Unlock((void*)bufferPtr, bufferSize, NULL, 0);
	if(FAILED(result))
	{
		return false;
	}

	// Release the wave data since it was copied into the secondary buffer.
	delete [] waveData;
	waveData = 0;

	return true;
}
ShutdownWaveFile은 그냥 secondary 버퍼의 해제를 합니다.
void SoundClass::ShutdownWaveFile(IDirectSoundBuffer8** secondaryBuffer)
{
	// Release the secondary sound buffer.
	if(*secondaryBuffer)
	{
		(*secondaryBuffer)->Release();
		*secondaryBuffer = 0;
	}

	return;
}
PlayWaveFile 함수는 secondary 버퍼에 저장된 오디오 파일을 재생할 것입니다. Play 함수를 사용하는 순간 자동적으로 오디오를 primary 버퍼로 혼합하고 이미 되어있으면 재생을 시작할 것입니다. 또 재생 시작 위치를 secondary 사운드 버퍼의 시작으로 설정하며 그 외에는 마지막에 재생을 멈춘 곳에서부터 재생될 것입니다. 그리고 버퍼의 설정을 사운드를 조절할 수 있게 했기때문에 여기서 볼륨을 최대로 설정합니다.
bool SoundClass::PlayWaveFile()
{
	HRESULT result;


	// Set position at the beginning of the sound buffer.
	result = m_secondaryBuffer1->SetCurrentPosition(0);
	if(FAILED(result))
	{
		return false;
	}

	// Set volume of the buffer to 100%.
	result = m_secondaryBuffer1->SetVolume(DSBVOLUME_MAX);
	if(FAILED(result))
	{
		return false;
	}

	// Play the contents of the secondary sound buffer.
	result = m_secondaryBuffer1->Play(0, 0, 0);
	if(FAILED(result))
	{
		return false;
	}

	return true;
}
Systemclass.h
////////////////////////////////////////////////////////////////////////////////
// Filename: systemclass.h
////////////////////////////////////////////////////////////////////////////////
#ifndef _SYSTEMCLASS_H_
#define _SYSTEMCLASS_H_


///////////////////////////////
// PRE-PROCESSING DIRECTIVES //
///////////////////////////////
#define WIN32_LEAN_AND_MEAN


//////////////
// INCLUDES //
//////////////
#include <windows.h>


///////////////////////
// MY CLASS INCLUDES //
///////////////////////
#include "inputclass.h"
#include "graphicsclass.h"
여기 새 SoundClass 헤더를 인클루드 합니다.
#include "soundclass.h"


////////////////////////////////////////////////////////////////////////////////
// Class name: SystemClass
////////////////////////////////////////////////////////////////////////////////
class SystemClass
{
public:
	SystemClass();
	SystemClass(const SystemClass&);
	~SystemClass();

	bool Initialize();
	void Shutdown();
	void Run();

	LRESULT CALLBACK MessageHandler(HWND, UINT, WPARAM, LPARAM);

private:
	void Frame();
	void InitializeWindows(int&, int&);
	void ShutdownWindows();

private:
	LPCWSTR m_applicationName;
	HINSTANCE m_hinstance;
	HWND m_hwnd;

	InputClass* m_Input;
	GraphicsClass* m_Graphics;
SoundClass 객체를 위한 새 private 변수를 만듭니다.
	SoundClass* m_Sound;
};


/////////////////////////
// FUNCTION PROTOTYPES //
/////////////////////////
static LRESULT CALLBACK WndProc(HWND, UINT, WPARAM, LPARAM);


/////////////
// GLOBALS //
/////////////
static SystemClass* ApplicationHandle = 0;


#endif
Systemclass.cpp
이전 강좌 이후 달라진 함수만 살펴보겠습니다.
////////////////////////////////////////////////////////////////////////////////
// Filename: systemclass.cpp
////////////////////////////////////////////////////////////////////////////////
#include "systemclass.h"


SystemClass::SystemClass()
{
	m_Input = 0;
	m_Graphics = 0;
생성자에서 새 SoundClass 객체를 null로 초기화합니다.
	m_Sound = 0;
}


bool SystemClass::Initialize()
{
	int screenWidth, screenHeight;
	bool result;


	// Initialize the width and height of the screen to zero before sending the variables into the function.
	screenWidth = 0;
	screenHeight = 0;

	// Initialize the windows api.
	InitializeWindows(screenWidth, screenHeight);

	// Create the input object.  This object will be used to handle reading the keyboard input from the user.
	m_Input = new InputClass;
	if(!m_Input)
	{
		return false;
	}

	// Initialize the input object.
	result = m_Input->Initialize(m_hinstance, m_hwnd, screenWidth, screenHeight);
	if(!result)
	{
		MessageBox(m_hwnd, L"Could not initialize the input object.", L"Error", MB_OK);
		return false;
	}

	// Create the graphics object.  This object will handle rendering all the graphics for this application.
	m_Graphics = new GraphicsClass;
	if(!m_Graphics)
	{
		return false;
	}

	// Initialize the graphics object.
	result = m_Graphics->Initialize(screenWidth, screenHeight, m_hwnd);
	if(!result)
	{
		return false;
	}
여기는 SoundClass를 생성하고 사용할 수 있게 초기화하는 곳입니다. 이번 강좌에서는 초기화에서 wave 파일 재생을 할 것입니다.
	// Create the sound object.
	m_Sound = new SoundClass;
	if(!m_Sound)
	{
		return false;
	}

	// Initialize the sound object.
	result = m_Sound->Initialize(m_hwnd);
	if(!result)
	{
		MessageBox(m_hwnd, L"Could not initialize Direct Sound.", L"Error", MB_OK);
		return false;
	}

	return true;
}


void SystemClass::Shutdown()
{
SystemClass::Shutdown에서 SoundClass 객체를 정리하고 해제합니다.
	// Release the sound object.
	if(m_Sound)
	{
		m_Sound->Shutdown();
		delete m_Sound;
		m_Sound = 0;
	}

	// Release the graphics object.
	if(m_Graphics)
	{
		m_Graphics->Shutdown();
		delete m_Graphics;
		m_Graphics = 0;
	}

	// Release the input object.
	if(m_Input)
	{
		m_Input->Shutdown();
		delete m_Input;
		m_Input = 0;
	}

	// Shutdown the window.
	ShutdownWindows();

	return;
}
요약
이제 엔진은 Direct 사운드의 기초를 지원합니다. 프로그램을 시작하면 그저 단일 wave 파일을 재생합니다.
연습하기
1. 코드를 컴파일 해보고 스테레오 사운드로 wave 파일을 재생하는지 확인해 보세요. esc키로 윈도우를 종료하세요.
2. sound01.wav파일을 여러분만의 44.1KHz 16bit 2channel 오디오 wave 파일로 교체하고 프로그램을 다시 실행해 보세요.
3. wave파일 두개를 로드하도록 프로그램을 자시 작성하고 동시에 재생해보세요.
4. 한번만 재생하지말고 계속 반복하도록 바꿔보세요.
'프로그래밍 > directx' 카테고리의 다른 글
| DirectX 11 Tutorials - 16 : 절두체(화면영역) 고르기 (0) | 2016.06.26 |
|---|---|
| DirectX 11 Tutorials - 15 : FPS, CPU 사용량 그리고 타이머 (1) | 2016.06.23 |
| DirectX 11 Tutorials - 13 : Direct 입력 (2) | 2016.06.18 |
| DirectX 11 Tutorials - 12 : 폰트 엔진 (0) | 2016.06.15 |
| DirectX 11 Tutorials - 11 : 2D 렌더링 (0) | 2016.06.12 |