728x90

원문 : http://www.rastertek.com/dx11tut09.html


Tutorial 9: Ambient Lighting


이번 강좌는 HLSL로 DirectX 11에서 주변광 조명처리를 해볼 것입니다.


예를 이용하여 주변광을 설명할 것입니다. 여러분이 한 방에 있다고 상상해 보세요. 그리고 유일한 광원은 창문으로 들어오는 햇빛만 있습니다. 햇빛은 직접적으로 방안의 여러 표면들에 닿지않습니다만 방안 모든 물체는 광자들이 수없이 튕겨 일정량 비춰집니다. 햇빛이 직접 비추지 않는 표면위 조명 효과를 주변광이라고 부릅니다.


주변 조명을 시뮬레이션 하기 위해 간단한 식을 사용합니다. 픽셀 쉐이더의 시작에서 각 픽셀을 주변광의 값으로 설정합니다. 그 이후 모든 연산은 그 주변색에 더해지는 것 뿐입니다. 이 방식으로 주변 색상값을 이용하여 모든 물체가 최소한으로 보이게 합니다.


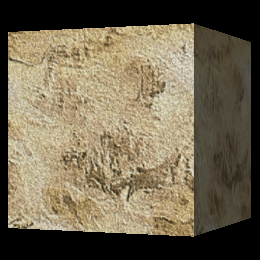
주변 조명은 3D 씬에 더욱더 현실감을 더합니다. 예를 들어 다음 그림은 X축 +방향으로 분산 조명만 적용되어있습니다.


위 이미지는 현실적으로 보이지 않습니다. 왜냐하면 주변광은 항상 빛이 아주 조금만 비춰도 물체에 적절한 형태를 어디선든 주기 때문입니다. 이제 15% 주변 흰색광을 똑같은 씬에 추가하였더니 다음과 같은 이미지를 얻었습니다.


이제 조금 더 현실적으로 보입니다.


이제 주변 조명을 적용한 코드 변화를 살펴보겠습니다. 이번 강좌는 저번 분산 조명을 사용한 강좌에 기반합니다. 이제 몇몇 변화와 주변광 요소를 추가 할 것입니다.


Light.vs


라이트 쉐이더는 이전 강좌 그대로 분산 조명 쉐이더입니다. 버텍스 쉐이더는 바뀐게 없고 픽셀 쉐이더만 수정되었습니다.


////////////////////////////////////////////////////////////////////////////////
// Filename: light.vs
////////////////////////////////////////////////////////////////////////////////


/////////////
// GLOBALS //
/////////////
cbuffer MatrixBuffer
{
    matrix worldMatrix;
    matrix viewMatrix;
    matrix projectionMatrix;
};


//////////////
// TYPEDEFS //
//////////////
struct VertexInputType
{
    float4 position : POSITION;
    float2 tex : TEXCOORD0;
    float3 normal : NORMAL;
};

struct PixelInputType
{
    float4 position : SV_POSITION;
    float2 tex : TEXCOORD0;
    float3 normal : NORMAL;
};


////////////////////////////////////////////////////////////////////////////////
// Vertex Shader
////////////////////////////////////////////////////////////////////////////////
PixelInputType LightVertexShader(VertexInputType input)
{
    PixelInputType output;
    

    // Change the position vector to be 4 units for proper matrix calculations.
    input.position.w = 1.0f;

    // Calculate the position of the vertex against the world, view, and projection matrices.
    output.position = mul(input.position, worldMatrix);
    output.position = mul(output.position, viewMatrix);
    output.position = mul(output.position, projectionMatrix);
    
    // Store the texture coordinates for the pixel shader.
    output.tex = input.tex;
    
    // Calculate the normal vector against the world matrix only.
    output.normal = mul(input.normal, (float3x3)worldMatrix);
	
    // Normalize the normal vector.
    output.normal = normalize(output.normal);

    return output;
}


Light.ps


////////////////////////////////////////////////////////////////////////////////
// Filename: light.ps
////////////////////////////////////////////////////////////////////////////////


/////////////
// GLOBALS //
/////////////
Texture2D shaderTexture;
SamplerState SampleType;


라이트 상수 버퍼에 float4형 주변광 색상값 변수가 추가되었습니다. 주변광 색상을 외부 클래스에서 쉐이더로 설정할 수 있습니다.


cbuffer LightBuffer
{
    float4 ambientColor;
    float4 diffuseColor;
    float3 lightDirection;
    float padding;
};


//////////////
// TYPEDEFS //
//////////////
struct PixelInputType
{
    float4 position : SV_POSITION;
    float2 tex : TEXCOORD0;
    float3 normal : NORMAL;
};


////////////////////////////////////////////////////////////////////////////////
// Pixel Shader
////////////////////////////////////////////////////////////////////////////////
float4 LightPixelShader(PixelInputType input) : SV_TARGET
{
    float4 textureColor;
    float3 lightDir;
    float lightIntensity;
    float4 color;


    // Sample the pixel color from the texture using the sampler at this texture coordinate location.
    textureColor = shaderTexture.Sample(SampleType, input.tex);


output 색상값을 기본적으로 ambient color(걍 앞으로 원어로 쓰겠습니다.)으로 설정하였습니다. 모든 픽셀은 최소한 ambient color 값으로 비춰집니다. (ambient color 값에따라 최소한으로 보입니다.)


    // Set the default output color to the ambient light value for all pixels.
    color = ambientColor;

    // Invert the light direction for calculations.
    lightDir = -lightDirection;

    // Calculate the amount of light on this pixel.
    lightIntensity = saturate(dot(input.normal, lightDir));


빛 방향 벡터와 법선 벡터의 내적이 0보다 큰지 확인합니다. 크면 diffuse color를 ambient color에 더합니다. 0보다 작으면 diffuse color를 더할 필요가 없습니다. 그 이유는 0보다 작으면 diffuse color가 음수가 되어 ambient color 값을 빼버리기까지 하기 때문입니다.


    if(lightIntensity > 0.0f)
    {
        // Determine the final diffuse color based on the diffuse color and the amount of light intensity.
        color += (diffuseColor * lightIntensity);
    }


ambient과 diffuse의 합은 1보다 클 수 있기때문에 마지막 색깔의 범위를 확실하게 합니다. (saturate 함수는 0보다 작으면 0으로 1보다 크면 1로 합니다.)


    // Saturate the final light color.
    color = saturate(color);

    // Multiply the texture pixel and the final diffuse color to get the final pixel color result.
    color = color * textureColor;

    return color;
}


Lightshaderclass.h


////////////////////////////////////////////////////////////////////////////////
// Filename: lightshaderclass.h
////////////////////////////////////////////////////////////////////////////////
#ifndef _LIGHTSHADERCLASS_H_
#define _LIGHTSHADERCLASS_H_


//////////////
// INCLUDES //
//////////////
#include <d3d11.h>
#include <d3dx10math.h>
#include <d3dx11async.h>
#include <fstream>
using namespace std;


////////////////////////////////////////////////////////////////////////////////
// Class name: LightShaderClass
////////////////////////////////////////////////////////////////////////////////
class LightShaderClass
{
private:
	struct MatrixBufferType
	{
		D3DXMATRIX world;
		D3DXMATRIX view;
		D3DXMATRIX projection;
	};


LightBufferType에 ambient color 요소가 추가되었습니다.


	struct LightBufferType
	{
		D3DXVECTOR4 ambientColor;
		D3DXVECTOR4 diffuseColor;
		D3DXVECTOR3 lightDirection;
		float padding;
	};

public:
	LightShaderClass();
	LightShaderClass(const LightShaderClass&);
	~LightShaderClass();

	bool Initialize(ID3D11Device*, HWND);
	void Shutdown();
	bool Render(ID3D11DeviceContext*, int, D3DXMATRIX, D3DXMATRIX, D3DXMATRIX, ID3D11ShaderResourceView*, D3DXVECTOR3, D3DXVECTOR4, D3DXVECTOR4);

private:
	bool InitializeShader(ID3D11Device*, HWND, WCHAR*, WCHAR*);
	void ShutdownShader();
	void OutputShaderErrorMessage(ID3D10Blob*, HWND, WCHAR*);

	bool SetShaderParameters(ID3D11DeviceContext*, D3DXMATRIX, D3DXMATRIX, D3DXMATRIX, ID3D11ShaderResourceView*, D3DXVECTOR3, D3DXVECTOR4, D3DXVECTOR4);
	void RenderShader(ID3D11DeviceContext*, int);

private:
	ID3D11VertexShader* m_vertexShader;
	ID3D11PixelShader* m_pixelShader;
	ID3D11InputLayout* m_layout;
	ID3D11SamplerState* m_sampleState;
	ID3D11Buffer* m_matrixBuffer;
	ID3D11Buffer* m_lightBuffer;
};

#endif


Lightshaderclass.cpp


////////////////////////////////////////////////////////////////////////////////
// Filename: lightshaderclass.cpp
////////////////////////////////////////////////////////////////////////////////
#include "lightshaderclass.h"


LightShaderClass::LightShaderClass()
{
	m_vertexShader = 0;
	m_pixelShader = 0;
	m_layout = 0;
	m_sampleState = 0;
	m_matrixBuffer = 0;
	m_lightBuffer = 0;
}


LightShaderClass::LightShaderClass(const LightShaderClass& other)
{
}


LightShaderClass::~LightShaderClass()
{
}


bool LightShaderClass::Initialize(ID3D11Device* device, HWND hwnd)
{
	bool result;


	// Initialize the vertex and pixel shaders.
	result = InitializeShader(device, hwnd, L"../Engine/light.vs", L"../Engine/light.ps");
	if(!result)
	{
		return false;
	}

	return true;
}


void LightShaderClass::Shutdown()
{
	// Shutdown the vertex and pixel shaders as well as the related objects.
	ShutdownShader();

	return;
}


Render() 함수는 이제 쉐이더에 설정할 ambient color 값도 받습니다.


bool LightShaderClass::Render(ID3D11DeviceContext* deviceContext, int indexCount, D3DXMATRIX worldMatrix, D3DXMATRIX viewMatrix, 
			      D3DXMATRIX projectionMatrix, ID3D11ShaderResourceView* texture, D3DXVECTOR3 lightDirection, D3DXVECTOR4 ambientColor,
			      D3DXVECTOR4 diffuseColor)
{
	bool result;


	// Set the shader parameters that it will use for rendering.
	result = SetShaderParameters(deviceContext, worldMatrix, viewMatrix, projectionMatrix, texture, lightDirection, ambientColor, diffuseColor);
	if(!result)
	{
		return false;
	}

	// Now render the prepared buffers with the shader.
	RenderShader(deviceContext, indexCount);

	return true;
}


bool LightShaderClass::InitializeShader(ID3D11Device* device, HWND hwnd, WCHAR* vsFilename, WCHAR* psFilename)
{
	HRESULT result;
	ID3D10Blob* errorMessage;
	ID3D10Blob* vertexShaderBuffer;
	ID3D10Blob* pixelShaderBuffer;
	D3D11_INPUT_ELEMENT_DESC polygonLayout[3];
	unsigned int numElements;
	D3D11_SAMPLER_DESC samplerDesc;
	D3D11_BUFFER_DESC matrixBufferDesc;
	D3D11_BUFFER_DESC lightBufferDesc;


	// Initialize the pointers this function will use to null.
	errorMessage = 0;
	vertexShaderBuffer = 0;
	pixelShaderBuffer = 0;

	// Compile the vertex shader code.
	result = D3DX11CompileFromFile(vsFilename, NULL, NULL, "LightVertexShader", "vs_5_0", D3D10_SHADER_ENABLE_STRICTNESS, 0, NULL, 
				       &vertexShaderBuffer, &errorMessage, NULL);
	if(FAILED(result))
	{
		// If the shader failed to compile it should have writen something to the error message.
		if(errorMessage)
		{
			OutputShaderErrorMessage(errorMessage, hwnd, vsFilename);
		}
		// If there was nothing in the error message then it simply could not find the shader file itself.
		else
		{
			MessageBox(hwnd, vsFilename, L"Missing Shader File", MB_OK);
		}

		return false;
	}

	// Compile the pixel shader code.
	result = D3DX11CompileFromFile(psFilename, NULL, NULL, "LightPixelShader", "ps_5_0", D3D10_SHADER_ENABLE_STRICTNESS, 0, NULL, 
				       &pixelShaderBuffer, &errorMessage, NULL);
	if(FAILED(result))
	{
		// If the shader failed to compile it should have writen something to the error message.
		if(errorMessage)
		{
			OutputShaderErrorMessage(errorMessage, hwnd, psFilename);
		}
		// If there was nothing in the error message then it simply could not find the file itself.
		else
		{
			MessageBox(hwnd, psFilename, L"Missing Shader File", MB_OK);
		}

		return false;
	}

	// Create the vertex shader from the buffer.
	result = device->CreateVertexShader(vertexShaderBuffer->GetBufferPointer(), vertexShaderBuffer->GetBufferSize(), NULL, &m_vertexShader);
	if(FAILED(result))
	{
		return false;
	}

	// Create the pixel shader from the buffer.
	result = device->CreatePixelShader(pixelShaderBuffer->GetBufferPointer(), pixelShaderBuffer->GetBufferSize(), NULL, &m_pixelShader);
	if(FAILED(result))
	{
		return false;
	}

	// Create the vertex input layout description.
	// This setup needs to match the VertexType stucture in the ModelClass and in the shader.
	polygonLayout[0].SemanticName = "POSITION";
	polygonLayout[0].SemanticIndex = 0;
	polygonLayout[0].Format = DXGI_FORMAT_R32G32B32_FLOAT;
	polygonLayout[0].InputSlot = 0;
	polygonLayout[0].AlignedByteOffset = 0;
	polygonLayout[0].InputSlotClass = D3D11_INPUT_PER_VERTEX_DATA;
	polygonLayout[0].InstanceDataStepRate = 0;

	polygonLayout[1].SemanticName = "TEXCOORD";
	polygonLayout[1].SemanticIndex = 0;
	polygonLayout[1].Format = DXGI_FORMAT_R32G32_FLOAT;
	polygonLayout[1].InputSlot = 0;
	polygonLayout[1].AlignedByteOffset = D3D11_APPEND_ALIGNED_ELEMENT;
	polygonLayout[1].InputSlotClass = D3D11_INPUT_PER_VERTEX_DATA;
	polygonLayout[1].InstanceDataStepRate = 0;

	polygonLayout[2].SemanticName = "NORMAL";
	polygonLayout[2].SemanticIndex = 0;
	polygonLayout[2].Format = DXGI_FORMAT_R32G32B32_FLOAT;
	polygonLayout[2].InputSlot = 0;
	polygonLayout[2].AlignedByteOffset = D3D11_APPEND_ALIGNED_ELEMENT;
	polygonLayout[2].InputSlotClass = D3D11_INPUT_PER_VERTEX_DATA;
	polygonLayout[2].InstanceDataStepRate = 0;

	// Get a count of the elements in the layout.
	numElements = sizeof(polygonLayout) / sizeof(polygonLayout[0]);

	// Create the vertex input layout.
	result = device->CreateInputLayout(polygonLayout, numElements, vertexShaderBuffer->GetBufferPointer(), vertexShaderBuffer->GetBufferSize(), 
					   &m_layout);
	if(FAILED(result))
	{
		return false;
	}

	// Release the vertex shader buffer and pixel shader buffer since they are no longer needed.
	vertexShaderBuffer->Release();
	vertexShaderBuffer = 0;

	pixelShaderBuffer->Release();
	pixelShaderBuffer = 0;

	// Create a texture sampler state description.
	samplerDesc.Filter = D3D11_FILTER_MIN_MAG_MIP_LINEAR;
	samplerDesc.AddressU = D3D11_TEXTURE_ADDRESS_WRAP;
	samplerDesc.AddressV = D3D11_TEXTURE_ADDRESS_WRAP;
	samplerDesc.AddressW = D3D11_TEXTURE_ADDRESS_WRAP;
	samplerDesc.MipLODBias = 0.0f;
	samplerDesc.MaxAnisotropy = 1;
	samplerDesc.ComparisonFunc = D3D11_COMPARISON_ALWAYS;
	samplerDesc.BorderColor[0] = 0;
	samplerDesc.BorderColor[1] = 0;
	samplerDesc.BorderColor[2] = 0;
	samplerDesc.BorderColor[3] = 0;
	samplerDesc.MinLOD = 0;
	samplerDesc.MaxLOD = D3D11_FLOAT32_MAX;

	// Create the texture sampler state.
	result = device->CreateSamplerState(&samplerDesc, &m_sampleState);
	if(FAILED(result))
	{
		return false;
	}

	// Setup the description of the dynamic matrix constant buffer that is in the vertex shader.
	matrixBufferDesc.Usage = D3D11_USAGE_DYNAMIC;
	matrixBufferDesc.ByteWidth = sizeof(MatrixBufferType);
	matrixBufferDesc.BindFlags = D3D11_BIND_CONSTANT_BUFFER;
	matrixBufferDesc.CPUAccessFlags = D3D11_CPU_ACCESS_WRITE;
	matrixBufferDesc.MiscFlags = 0;
	matrixBufferDesc.StructureByteStride = 0;

	// Create the constant buffer pointer so we can access the vertex shader constant buffer from within this class.
	result = device->CreateBuffer(&matrixBufferDesc, NULL, &m_matrixBuffer);
	if(FAILED(result))
	{
		return false;
	}

	// Setup the description of the light dynamic constant buffer that is in the pixel shader.
	// Note that ByteWidth always needs to be a multiple of 16 if using D3D11_BIND_CONSTANT_BUFFER or CreateBuffer will fail.
	lightBufferDesc.Usage = D3D11_USAGE_DYNAMIC;
	lightBufferDesc.ByteWidth = sizeof(LightBufferType);
	lightBufferDesc.BindFlags = D3D11_BIND_CONSTANT_BUFFER;
	lightBufferDesc.CPUAccessFlags = D3D11_CPU_ACCESS_WRITE;
	lightBufferDesc.MiscFlags = 0;
	lightBufferDesc.StructureByteStride = 0;

	// Create the constant buffer pointer so we can access the vertex shader constant buffer from within this class.
	result = device->CreateBuffer(&lightBufferDesc, NULL, &m_lightBuffer);
	if(FAILED(result))
	{
		return false;
	}

	return true;
}


void LightShaderClass::ShutdownShader()
{
	// Release the light constant buffer.
	if(m_lightBuffer)
	{
		m_lightBuffer->Release();
		m_lightBuffer = 0;
	}

	// Release the matrix constant buffer.
	if(m_matrixBuffer)
	{
		m_matrixBuffer->Release();
		m_matrixBuffer = 0;
	}

	// Release the sampler state.
	if(m_sampleState)
	{
		m_sampleState->Release();
		m_sampleState = 0;
	}

	// Release the layout.
	if(m_layout)
	{
		m_layout->Release();
		m_layout = 0;
	}

	// Release the pixel shader.
	if(m_pixelShader)
	{
		m_pixelShader->Release();
		m_pixelShader = 0;
	}

	// Release the vertex shader.
	if(m_vertexShader)
	{
		m_vertexShader->Release();
		m_vertexShader = 0;
	}

	return;
}


void LightShaderClass::OutputShaderErrorMessage(ID3D10Blob* errorMessage, HWND hwnd, WCHAR* shaderFilename)
{
	char* compileErrors;
	unsigned long bufferSize, i;
	ofstream fout;


	// Get a pointer to the error message text buffer.
	compileErrors = (char*)(errorMessage->GetBufferPointer());

	// Get the length of the message.
	bufferSize = errorMessage->GetBufferSize();

	// Open a file to write the error message to.
	fout.open("shader-error.txt");

	// Write out the error message.
	for(i=0; i<bufferSize; i++)
	{
		fout << compileErrors[i];
	}

	// Close the file.
	fout.close();

	// Release the error message.
	errorMessage->Release();
	errorMessage = 0;

	// Pop a message up on the screen to notify the user to check the text file for compile errors.
	MessageBox(hwnd, L"Error compiling shader.  Check shader-error.txt for message.", shaderFilename, MB_OK);

	return;
}


SetShaderParameters() 함수도 이제 ambient color 값을 받습니다.


bool LightShaderClass::SetShaderParameters(ID3D11DeviceContext* deviceContext, D3DXMATRIX worldMatrix, D3DXMATRIX viewMatrix, 
					   D3DXMATRIX projectionMatrix, ID3D11ShaderResourceView* texture, D3DXVECTOR3 lightDirection, 
					   D3DXVECTOR4 ambientColor, D3DXVECTOR4 diffuseColor)
{
	HRESULT result;
	D3D11_MAPPED_SUBRESOURCE mappedResource;
	unsigned int bufferNumber;
	MatrixBufferType* dataPtr;
	LightBufferType* dataPtr2;


	// Transpose the matrices to prepare them for the shader.
	D3DXMatrixTranspose(&worldMatrix, &worldMatrix);
	D3DXMatrixTranspose(&viewMatrix, &viewMatrix);
	D3DXMatrixTranspose(&projectionMatrix, &projectionMatrix);

	// Lock the constant buffer so it can be written to.
	result = deviceContext->Map(m_matrixBuffer, 0, D3D11_MAP_WRITE_DISCARD, 0, &mappedResource);
	if(FAILED(result))
	{
		return false;
	}

	// Get a pointer to the data in the constant buffer.
	dataPtr = (MatrixBufferType*)mappedResource.pData;

	// Copy the matrices into the constant buffer.
	dataPtr->world = worldMatrix;
	dataPtr->view = viewMatrix;
	dataPtr->projection = projectionMatrix;

	// Unlock the constant buffer.
	deviceContext->Unmap(m_matrixBuffer, 0);

	// Set the position of the constant buffer in the vertex shader.
	bufferNumber = 0;

	// Now set the constant buffer in the vertex shader with the updated values.
	deviceContext->VSSetConstantBuffers(bufferNumber, 1, &m_matrixBuffer);

	// Set shader texture resource in the pixel shader.
	deviceContext->PSSetShaderResources(0, 1, &texture);

	// Lock the light constant buffer so it can be written to.
	result = deviceContext->Map(m_lightBuffer, 0, D3D11_MAP_WRITE_DISCARD, 0, &mappedResource);
	if(FAILED(result))
	{
		return false;
	}

	// Get a pointer to the data in the constant buffer.
	dataPtr2 = (LightBufferType*)mappedResource.pData;


ambient light color는 light buffer에 맵핑되고 픽셀 쉐이더에 상수로써 설정됩니다.


	// Copy the lighting variables into the constant buffer.
	dataPtr2->ambientColor = ambientColor;
	dataPtr2->diffuseColor = diffuseColor;
	dataPtr2->lightDirection = lightDirection;
	dataPtr2->padding = 0.0f;

	// Unlock the constant buffer.
	deviceContext->Unmap(m_lightBuffer, 0);

	// Set the position of the light constant buffer in the pixel shader.
	bufferNumber = 0;

	// Finally set the light constant buffer in the pixel shader with the updated values.
	deviceContext->PSSetConstantBuffers(bufferNumber, 1, &m_lightBuffer);

	return true;
}


void LightShaderClass::RenderShader(ID3D11DeviceContext* deviceContext, int indexCount)
{
	// Set the vertex input layout.
	deviceContext->IASetInputLayout(m_layout);

	// Set the vertex and pixel shaders that will be used to render this triangle.
	deviceContext->VSSetShader(m_vertexShader, NULL, 0);
	deviceContext->PSSetShader(m_pixelShader, NULL, 0);

	// Set the sampler state in the pixel shader.
	deviceContext->PSSetSamplers(0, 1, &m_sampleState);

	// Render the triangle.
	deviceContext->DrawIndexed(indexCount, 0, 0);

	return;
}


Lightclass.h


LightClass는 ambient 요소와 관련 함수들을 추가로 가집니다.


////////////////////////////////////////////////////////////////////////////////
// Filename: lightclass.h
////////////////////////////////////////////////////////////////////////////////
#ifndef _LIGHTCLASS_H_
#define _LIGHTCLASS_H_


//////////////
// INCLUDES //
//////////////
#include <d3dx10math.h>


////////////////////////////////////////////////////////////////////////////////
// Class name: LightClass
////////////////////////////////////////////////////////////////////////////////
class LightClass
{
public:
	LightClass();
	LightClass(const LightClass&);
	~LightClass();

	void SetAmbientColor(float, float, float, float);
	void SetDiffuseColor(float, float, float, float);
	void SetDirection(float, float, float);

	D3DXVECTOR4 GetAmbientColor();
	D3DXVECTOR4 GetDiffuseColor();
	D3DXVECTOR3 GetDirection();

private:
	D3DXVECTOR4 m_ambientColor;
	D3DXVECTOR4 m_diffuseColor;
	D3DXVECTOR3 m_direction;
};

#endif


Lightclass.cpp


////////////////////////////////////////////////////////////////////////////////
// Filename: lightclass.cpp
////////////////////////////////////////////////////////////////////////////////
#include "lightclass.h"


LightClass::LightClass()
{
}


LightClass::LightClass(const LightClass& other)
{
}


LightClass::~LightClass()
{
}


void LightClass::SetAmbientColor(float red, float green, float blue, float alpha)
{
	m_ambientColor = D3DXVECTOR4(red, green, blue, alpha);
	return;
}


void LightClass::SetDiffuseColor(float red, float green, float blue, float alpha)
{
	m_diffuseColor = D3DXVECTOR4(red, green, blue, alpha);
	return;
}


void LightClass::SetDirection(float x, float y, float z)
{
	m_direction = D3DXVECTOR3(x, y, z);
	return;
}


D3DXVECTOR4 LightClass::GetAmbientColor()
{
	return m_ambientColor;
}


D3DXVECTOR4 LightClass::GetDiffuseColor()
{
	return m_diffuseColor;
}


D3DXVECTOR3 LightClass::GetDirection()
{
	return m_direction;
}


Graphicsclass.h


Graphicsclass 헤더는 바뀐게 없습니다.


////////////////////////////////////////////////////////////////////////////////
// Filename: graphicsclass.h
////////////////////////////////////////////////////////////////////////////////
#ifndef _GRAPHICSCLASS_H_
#define _GRAPHICSCLASS_H_


///////////////////////
// MY CLASS INCLUDES //
///////////////////////
#include "d3dclass.h"
#include "cameraclass.h"
#include "modelclass.h"
#include "lightshaderclass.h"
#include "lightclass.h"


/////////////
// GLOBALS //
/////////////
const bool FULL_SCREEN = true;
const bool VSYNC_ENABLED = true;
const float SCREEN_DEPTH = 1000.0f;
const float SCREEN_NEAR = 0.1f;


////////////////////////////////////////////////////////////////////////////////
// Class name: GraphicsClass
////////////////////////////////////////////////////////////////////////////////
class GraphicsClass
{
public:
	GraphicsClass();
	GraphicsClass(const GraphicsClass&);
	~GraphicsClass();

	bool Initialize(int, int, HWND);
	void Shutdown();
	bool Frame();

private:
	bool Render(float);

private:
	D3DClass* m_D3D;
	CameraClass* m_Camera;
	ModelClass* m_Model;
	LightShaderClass* m_LightShader;
	LightClass* m_Light;
};

#endif


Graphicsclass.cpp


////////////////////////////////////////////////////////////////////////////////
// Filename: graphicsclass.cpp
////////////////////////////////////////////////////////////////////////////////
#include "graphicsclass.h"


GraphicsClass::GraphicsClass()
{
	m_D3D = 0;
	m_Camera = 0;
	m_Model = 0;
	m_LightShader = 0;
	m_Light = 0;
}


GraphicsClass::GraphicsClass(const GraphicsClass& other)
{
}


GraphicsClass::~GraphicsClass()
{
}


bool GraphicsClass::Initialize(int screenWidth, int screenHeight, HWND hwnd)
{
	bool result;


	// Create the Direct3D object.
	m_D3D = new D3DClass;
	if(!m_D3D)
	{
		return false;
	}

	// Initialize the Direct3D object.
	result = m_D3D->Initialize(screenWidth, screenHeight, VSYNC_ENABLED, hwnd, FULL_SCREEN, SCREEN_DEPTH, SCREEN_NEAR);
	if(!result)
	{
		MessageBox(hwnd, L"Could not initialize Direct3D.", L"Error", MB_OK);
		return false;
	}

	// Create the camera object.
	m_Camera = new CameraClass;
	if(!m_Camera)
	{
		return false;
	}

	// Set the initial position of the camera.
	m_Camera->SetPosition(0.0f, 0.0f, -10.0f);
	
	// Create the model object.
	m_Model = new ModelClass;
	if(!m_Model)
	{
		return false;
	}

	// Initialize the model object.
	result = m_Model->Initialize(m_D3D->GetDevice(), "../Engine/data/cube.txt", L"../Engine/data/seafloor.dds");
	if(!result)
	{
		MessageBox(hwnd, L"Could not initialize the model object.", L"Error", MB_OK);
		return false;
	}

	// Create the light shader object.
	m_LightShader = new LightShaderClass;
	if(!m_LightShader)
	{
		return false;
	}

	// Initialize the light shader object.
	result = m_LightShader->Initialize(m_D3D->GetDevice(), hwnd);
	if(!result)
	{
		MessageBox(hwnd, L"Could not initialize the light shader object.", L"Error", MB_OK);
		return false;
	}

	// Create the light object.
	m_Light = new LightClass;
	if(!m_Light)
	{
		return false;
	}


ambient light의 강도를 15% 백색광으로 설정합니다. 또 빛 방향도 x축 +방향으로 바꾸어 큐브에 ambient 조명효과를 직접적으로 볼 수 있습니다.


	// Initialize the light object.
	m_Light->SetAmbientColor(0.15f, 0.15f, 0.15f, 1.0f);
	m_Light->SetDiffuseColor(1.0f, 1.0f, 1.0f, 1.0f);
	m_Light->SetDirection(1.0f, 0.0f, 0.0f);

	return true;
}


void GraphicsClass::Shutdown()
{
	// Release the light object.
	if(m_Light)
	{
		delete m_Light;
		m_Light = 0;
	}

	// Release the light shader object.
	if(m_LightShader)
	{
		m_LightShader->Shutdown();
		delete m_LightShader;
		m_LightShader = 0;
	}

	// Release the model object.
	if(m_Model)
	{
		m_Model->Shutdown();
		delete m_Model;
		m_Model = 0;
	}

	// Release the camera object.
	if(m_Camera)
	{
		delete m_Camera;
		m_Camera = 0;
	}

	// Release the D3D object.
	if(m_D3D)
	{
		m_D3D->Shutdown();
		delete m_D3D;
		m_D3D = 0;
	}

	return;
}


bool GraphicsClass::Frame()
{
	bool result;
	static float rotation = 0.0f;


회전속도도 반으로 줄여 효과를 더 잘 볼 수 있습니다.


	// Update the rotation variable each frame.
	rotation += (float)D3DX_PI * 0.005f;
	if(rotation > 360.0f)
	{
		rotation -= 360.0f;
	}
	
	// Render the graphics scene.
	result = Render(rotation);
	if(!result)
	{
		return false;
	}

	return true;
}


bool GraphicsClass::Render(float rotation)
{
	D3DXMATRIX worldMatrix, viewMatrix, projectionMatrix;
	bool result;


	// Clear the buffers to begin the scene.
	m_D3D->BeginScene(0.0f, 0.0f, 0.0f, 1.0f);

	// Generate the view matrix based on the camera's position.
	m_Camera->Render();

	// Get the world, view, and projection matrices from the camera and d3d objects.
	m_Camera->GetViewMatrix(viewMatrix);
	m_D3D->GetWorldMatrix(worldMatrix);
	m_D3D->GetProjectionMatrix(projectionMatrix);

	// Rotate the world matrix by the rotation value so that the triangle will spin.
	D3DXMatrixRotationY(&worldMatrix, rotation);

	// Put the model vertex and index buffers on the graphics pipeline to prepare them for drawing.
	m_Model->Render(m_D3D->GetDeviceContext());


light 쉐이더는 이제 빛의 ambient색상도 입력으로 받습니다.


	// Render the model using the light shader.
	result = m_LightShader->Render(m_D3D->GetDeviceContext(), m_Model->GetIndexCount(), worldMatrix, viewMatrix, projectionMatrix, 
				       m_Model->GetTexture(), m_Light->GetDirection(), m_Light->GetAmbientColor(), m_Light->GetDiffuseColor());
	if(!result)
	{
		return false;
	}

	// Present the rendered scene to the screen.
	m_D3D->EndScene();

	return true;
}


Summary


더 사실적인 조명효과를 주기위해 ambient lighting의 추가로 모든 면이 최소한으로 비춰집니다.


연습하기


1. 재컴파일후 어두운면도 보이는 회전하는 큐브를 확인 해 보세요.


2. ambient light 값을 (0.0f, 0.0f, 0.0f, 1.0f)로 바꾸어 diffuse light만 다시 확인 해 보세요.


3. color = color * textureColor 픽셀쉐이더에서 이 부분을 주석처리하고 순수 조명효과만 확인 해 보세요.

728x90
728x90

원문 : http://www.rastertek.com/dx11tut08.html


Tutorial 8: Loading Maya 2011 Models


이번 강좌는 마야 2011에서 정적 3D 모델을 어떻게 불러올지를 설명할 것입니다. 이번 강좌는 마야에 초점이 맞추어져 있지만 이를 이용하여 다른 많은 3D 모델링 소프트웨어 패키지에 적용할 수 있다는거 아시죠?


이전 강좌에서 우리의 독자 모델 포맷을 만들고 그 포맷을 이요하여 3D 모델을 렌더링해 보았습니다. 이제 다음 목표는 마야 2011 모델을 우리의 독자 포맷으로 변환하여 렌더링하는 것입니다. 이미 인터넷상에 많은 강좌들이 있어서 마야에서 3D 모델을 많드는 것은 설명하지 않습니다. 그래서 텍스쳐가 적용된 삼각형으로 이루어진 3D 모델을 가지고 있는 시점에서 시작할 것입니다.


우리가 이번에 사용할 마야 포맷은 .OBJ 포맷인데 초보자들이 시작하기에 좋고 읽기도 쉽습니다.


여러분의 모델을 .obj 포맷으로 내보내기위해 마야에서 OBJ 익스포터를 활성화해야합니다. "Window"에 "Settings/Preferences"에 "Plug-in Manager"를 누르세요. objExport.mll까지 스크롤을 내리고 "Loaded"와 "Auto load" 둘다 선택하세요. 그리고 이제 모델을 내보내기 위해 "File"에 "Export All"을 누르세요. "Files of type:"에서 밑으로 내리다 보면 "OBJexport"가 있으니 선택하세요. 파일 이름을 입력하고 "Export All"를 누르면 .obj라는 확장자의 텍스트파일이 생성됩니다. 파일을 보기위해 파일에 마우스 오른쪽 버튼을 눌러 "열기"를 누른 뒤 메모장, notepad++, 워드 패드등 아무 에디터로 여세요. 그럼 다음과 같은 텍스트를 보게 될 것입니다.


Cube.obj


# This file uses centimeters as units for non-parametric coordinates.

mtllib cube.mtl
g default
v -0.500000 -0.500000 0.500000
v 0.500000 -0.500000 0.500000
v -0.500000 0.500000 0.500000
v 0.500000 0.500000 0.500000
v -0.500000 0.500000 -0.500000
v 0.500000 0.500000 -0.500000
v -0.500000 -0.500000 -0.500000
v 0.500000 -0.500000 -0.500000
vt 0.001992 0.001992
vt 0.998008 0.001992
vt 0.001992 0.998008
vt 0.998008 0.998008
vt 0.001992 0.001992
vt 0.998008 0.001992
vt 0.001992 0.998008
vt 0.998008 0.998008
vt 0.001992 0.001992
vt 0.998008 0.001992
vt 0.001992 0.998008
vt 0.998008 0.998008
vt 0.001992 0.001992
vt 0.998008 0.001992
vt 0.001992 0.998008
vt 0.998008 0.998008
vt 0.001992 0.001992
vt 0.998008 0.001992
vt 0.001992 0.998008
vt 0.998008 0.998008
vt 0.001992 0.998008
vt 0.998008 0.001992
vt 0.001992 0.001992
vn 0.000000 0.000000 1.000000
vn 0.000000 1.000000 0.000000
vn 0.000000 0.000000 -1.000000
vn 0.000000 -1.000000 0.000000
vn 1.000000 0.000000 0.000000
vn -1.000000 0.000000 0.000000
s 1
g pCube1
usemtl file1SG
f 1/1/1 2/2/2 3/3/3
f 3/3/3 2/2/2 4/4/4
s 2
f 3/13/5 4/14/6 5/15/7
f 5/15/7 4/14/6 6/16/8
s 3
f 5/21/9 6/22/10 7/23/11
f 7/23/11 6/22/10 8/24/12
s 4
f 7/17/13 8/18/14 1/19/15
f 1/19/15 8/18/14 2/20/16
s 5
f 2/5/17 8/6/18 4/7/19
f 4/7/19 8/6/18 6/8/20
s 6
f 7/9/21 1/10/22 5/11/23
f 5/11/23 1/10/22 3/12/24


위 .OBJ파일은 3D 큐브를 표현합니다. 8개의 정점을 가지고 24개의 텍스쳐 좌표와 법선 벡터를 가지며 총 12개의 삼각형면으로 구성된 6개의 사각형면이 있습니다. 파일을 변환하면서 "V", "VT", "VN", "F"로 시작하는줄 외의 줄은 무시하여도 됩니다. 나머지 정보는 .obj파일을 우리의 포맷으로 변환하는데 필요없을 것입니다. 이제 각 라인이 의미를 살펴보겠습니다.


1. "V"줄은 정점에 대한 줄입니다. 큐브는 8개의 꼭지점 즉 8개의 정점으로 구성됩니다. 각줄은 X, Y, Z 좌표값이 들어갑니다.


2. "VT"줄은 텍스쳐 좌표에 대한 줄입니다. 큐브는 24개의 텍스쳐 좌표를 가지는데 큐브 모델의 모든 삼각형 정점에 대해 기록하였기 때문에 중복이 있습니다. 각줄은 TU, TV 좌표값이 들어갑니다.


3. "VN"줄은 법선 벡터에 대한 줄입니다. 큐브는 24개의 법선 벡터를 가지는데 텍셀좌표랑 동일하게 모든 삼각형 정점에 대해 기록하였기 때문에 중복이 있습니다. 각줄은 NX, NY, NZ 좌표값이 들어갑니다.


4. "F"줄은 큐브 모델의 각 삼각형(면)에 대한 줄입니다. 나열된 값은 정점, 텍스쳐 좌표, 법선 벡터의 인덱스입니다. 각 면의 포맷은 다음과 같습니다.


f Vertex1/Texture1/Normal1 Vertex2/Texture2/Normal2 Vertex3/Texture3/Normal3


그래서 "f 3/13/5 4/14/6 5/15/7"라인을 해석하면 "Vertex3/Texture13/Normal5 Vertex4/Texture14/Normal6 Vertex5/Texture15/Normal7"입니다.


.obj파일에 나열된 데이터의 방식은 매우 중요합니다. 예를들어 파일의 첫번째 정점은 면 목록에서 Vertex1에 대응합니다. 텍스쳐 좌표와 법선 벡터도 동일합니다.


.obj파일에 면 목록을 보면 각 라인의 세 인덱스 그룹이 삼각형 하나를 이룬다는 것을 아실겁니다. 그리고 이번 큐브 모델의 경우 총 12 삼각형면이 면당 2개의 삼각형을 가진 6개의 사각형면을 이룹니다.


오른손 좌표에서 왼손 좌표로 변환


기본적으로 마야 2011은 오른손 좌표계이며 .obj파일도 오른손 좌표로 내보냅니다. 데이터를 DirectX 11이 기본으로 하는 왼손 좌표계로 변환하기위해 다음의 것들을 해야 합니다.


1. 정점의 Z부호를 반전합니다. 이런 코드를 보게 되실 것입니다 : vertices[vertexIndex].z = vertices[vertexIndex].z * -1.0f;


2. 텍스쳐 좌표 TV를 반전합니다. 이런 코드를 보게 되실 것입니다 : texcoords[texcoordIndex].y = 1.0f - texcoords[texcoordIndex].y;

(반전한다고 했지만 부호반전이 아닌 OpenGL에서 텍스쳐 좌표는 좌측하단이 (0,0)이라 이런 코드를 사용한 것 같다. ex) opengl (0.0f, 0.7f) == directx (0.0f, 0.3f) )


3. 법선 벡터의 NZ부호를 반전합니다. 이런 코드를 보게 되실 것입니다 : normals[normalIndex].z = normals[normalIndex].z * -1.0f;


4. 그리는 방식을 시계 반대방향에서 시계 방향으로 바꿉니다. 저는 코드에서 간단하게 재배열하는 대신 인덱스를 반대로 읽어들였습니다.


fin >> faces[faceIndex].vIndex3 >> input2 >> faces[faceIndex].tIndex3 >> input2 >> faces[faceIndex].nIndex3;
fin >> faces[faceIndex].vIndex2 >> input2 >> faces[faceIndex].tIndex2 >> input2 >> faces[faceIndex].nIndex2;
fin >> faces[faceIndex].vIndex1 >> input2 >> faces[faceIndex].tIndex1 >> input2 >> faces[faceIndex].nIndex1;


위 4개 작업을 완료하면 DirectX 11이 제대로 렌더링하도록 모델 데이터가 준비될 것입니다.


Main.cpp


마야 2011 .obj파일을 우리의 DirectX 11 포맷으로 변환하는 프로그램은 상당히 간단하고 main.cpp에 다 들어가 있습니다. 커맨드창을 열고 프로그램을 실행시켜 .obj 파일 이름을 입력하세요. 파일 이름을 입력하면 파일을 열고 데이터 개수를 읽고 데이터를 읽어드릴 구조체를 생성합니다. 그 후에 구조체로 데이터를 읽고 왼손 좌표계로 변환합니다. 모든 동작이 완료되면 데이터를 model.txt에 씁니다. 결과 파일의 이름을 변경할 수 있고 이전 강좌에서의 3D 모델 프로젝트를 이용하여 DirectX 11에서 렌더링하는데 사용할 수 있습니다.


////////////////////////////////////////////////////////////////////////////////
// Filename: main.cpp
////////////////////////////////////////////////////////////////////////////////


//////////////
// INCLUDES //
//////////////
#include <iostream>
#include <fstream>
using namespace std;


//////////////
// TYPEDEFS //
//////////////
typedef struct
{
	float x, y, z;
}VertexType;

typedef struct
{
	int vIndex1, vIndex2, vIndex3;
	int tIndex1, tIndex2, tIndex3;
	int nIndex1, nIndex2, nIndex3;
}FaceType;


/////////////////////////
// FUNCTION PROTOTYPES //
/////////////////////////
void GetModelFilename(char*);
bool ReadFileCounts(char*, int&, int&, int&, int&);
bool LoadDataStructures(char*, int, int, int, int);


//////////////////
// MAIN PROGRAM //
//////////////////
int main()
{
	bool result;
	char filename[256];
	int vertexCount, textureCount, normalCount, faceCount;
	char garbage;


	// Read in the name of the model file.
	GetModelFilename(filename);

	// Read in the number of vertices, tex coords, normals, and faces so that the data structures can be initialized with the exact sizes needed.
	result = ReadFileCounts(filename, vertexCount, textureCount, normalCount, faceCount);
	if(!result)
	{
		return -1;
	}

	// Display the counts to the screen for information purposes.
	cout << endl;
	cout << "Vertices: " << vertexCount << endl;
	cout << "UVs:      " << textureCount << endl;
	cout << "Normals:  " << normalCount << endl;
	cout << "Faces:    " << faceCount << endl;

	// Now read the data from the file into the data structures and then output it in our model format.
	result = LoadDataStructures(filename, vertexCount, textureCount, normalCount, faceCount);
	if(!result)
	{
		return -1;
	}

	// Notify the user the model has been converted.
	cout << "\nFile has been converted." << endl;
	cout << "\nDo you wish to exit (y/n)? ";
	cin >> garbage;

	return 0;
}


void GetModelFilename(char* filename)
{
	bool done;
	ifstream fin;


	// Loop until we have a file name.
	done = false;
	while(!done)
	{
		// Ask the user for the filename.
		cout << "Enter model filename: ";

		// Read in the filename.
		cin >> filename;

		// Attempt to open the file.
		fin.open(filename);

		if(fin.good())
		{
			// If the file exists and there are no problems then exit since we have the file name.
			done = true;
		}
		else
		{
			// If the file does not exist or there was an issue opening it then notify the user and repeat the process.
			fin.clear();
			cout << endl;
			cout << "File " << filename << " could not be opened." << endl << endl;
		}
	}

	return;
}


bool ReadFileCounts(char* filename, int& vertexCount, int& textureCount, int& normalCount, int& faceCount)
{
	ifstream fin;
	char input;


	// Initialize the counts.
	vertexCount = 0;
	textureCount = 0;
	normalCount = 0;
	faceCount = 0;

	// Open the file.
	fin.open(filename);

	// Check if it was successful in opening the file.
	if(fin.fail() == true)
	{
		return false;
	}

	// Read from the file and continue to read until the end of the file is reached.
	fin.get(input);
	while(!fin.eof())
	{
		// If the line starts with 'v' then count either the vertex, the texture coordinates, or the normal vector.
		if(input == 'v')
		{
			fin.get(input);
			if(input == ' ') { vertexCount++; }
			if(input == 't') { textureCount++; }
			if(input == 'n') { normalCount++; }
		}

		// If the line starts with 'f' then increment the face count.
		if(input == 'f')
		{
			fin.get(input);
			if(input == ' ') { faceCount++; }
		}
		
		// Otherwise read in the remainder of the line.
		while(input != '\n')
		{
			fin.get(input);
		}

		// Start reading the beginning of the next line.
		fin.get(input);
	}

	// Close the file.
	fin.close();

	return true;
}


bool LoadDataStructures(char* filename, int vertexCount, int textureCount, int normalCount, int faceCount)
{
	VertexType *vertices, *texcoords, *normals;
	FaceType *faces;
	ifstream fin;
	int vertexIndex, texcoordIndex, normalIndex, faceIndex, vIndex, tIndex, nIndex;
	char input, input2;
	ofstream fout;


	// Initialize the four data structures.
	vertices = new VertexType[vertexCount];
	if(!vertices)
	{
		return false;
	}

	texcoords = new VertexType[textureCount];
	if(!texcoords)
	{
		return false;
	}

	normals = new VertexType[normalCount];
	if(!normals)
	{
		return false;
	}

	faces = new FaceType[faceCount];
	if(!faces)
	{
		return false;
	}

	// Initialize the indexes.
	vertexIndex = 0;
	texcoordIndex = 0;
	normalIndex = 0;
	faceIndex = 0;

	// Open the file.
	fin.open(filename);

	// Check if it was successful in opening the file.
	if(fin.fail() == true)
	{
		return false;
	}

	// Read in the vertices, texture coordinates, and normals into the data structures.
	// Important: Also convert to left hand coordinate system since Maya uses right hand coordinate system.
	fin.get(input);
	while(!fin.eof())
	{
		if(input == 'v')
		{
			fin.get(input);

			// Read in the vertices.
			if(input == ' ') 
			{ 
				fin >> vertices[vertexIndex].x >> vertices[vertexIndex].y >> vertices[vertexIndex].z;

				// Invert the Z vertex to change to left hand system.
				vertices[vertexIndex].z = vertices[vertexIndex].z * -1.0f;
				vertexIndex++; 
			}

			// Read in the texture uv coordinates.
			if(input == 't') 
			{ 
				fin >> texcoords[texcoordIndex].x >> texcoords[texcoordIndex].y;

				// Invert the V texture coordinates to left hand system.
				texcoords[texcoordIndex].y = 1.0f - texcoords[texcoordIndex].y;
				texcoordIndex++; 
			}

			// Read in the normals.
			if(input == 'n') 
			{ 
				fin >> normals[normalIndex].x >> normals[normalIndex].y >> normals[normalIndex].z;

				// Invert the Z normal to change to left hand system.
				normals[normalIndex].z = normals[normalIndex].z * -1.0f;
				normalIndex++; 
			}
		}

		// Read in the faces.
		if(input == 'f') 
		{
			fin.get(input);
			if(input == ' ')
			{
				// Read the face data in backwards to convert it to a left hand system from right hand system.
				fin >> faces[faceIndex].vIndex3 >> input2 >> faces[faceIndex].tIndex3 >> input2 >> faces[faceIndex].nIndex3
				    >> faces[faceIndex].vIndex2 >> input2 >> faces[faceIndex].tIndex2 >> input2 >> faces[faceIndex].nIndex2
				    >> faces[faceIndex].vIndex1 >> input2 >> faces[faceIndex].tIndex1 >> input2 >> faces[faceIndex].nIndex1;
				faceIndex++;
			}
		}

		// Read in the remainder of the line.
		while(input != '\n')
		{
			fin.get(input);
		}

		// Start reading the beginning of the next line.
		fin.get(input);
	}

	// Close the file.
	fin.close();

	// Open the output file.
	fout.open("model.txt");
	
	// Write out the file header that our model format uses.
	fout << "Vertex Count: " << (faceCount * 3) << endl;
	fout << endl;
	fout << "Data:" << endl;
	fout << endl;

	// Now loop through all the faces and output the three vertices for each face.
	for(int i=0; i<faceIndex; i++)
	{
		vIndex = faces[i].vIndex1 - 1;
		tIndex = faces[i].tIndex1 - 1;
		nIndex = faces[i].nIndex1 - 1;

		fout << vertices[vIndex].x << ' ' << vertices[vIndex].y << ' ' << vertices[vIndex].z << ' '
		     << texcoords[tIndex].x << ' ' << texcoords[tIndex].y << ' '
		     << normals[nIndex].x << ' ' << normals[nIndex].y << ' ' << normals[nIndex].z << endl;

		vIndex = faces[i].vIndex2 - 1;
		tIndex = faces[i].tIndex2 - 1;
		nIndex = faces[i].nIndex2 - 1;

		fout << vertices[vIndex].x << ' ' << vertices[vIndex].y << ' ' << vertices[vIndex].z << ' '
		     << texcoords[tIndex].x << ' ' << texcoords[tIndex].y << ' '
		     << normals[nIndex].x << ' ' << normals[nIndex].y << ' ' << normals[nIndex].z << endl;

		vIndex = faces[i].vIndex3 - 1;
		tIndex = faces[i].tIndex3 - 1;
		nIndex = faces[i].nIndex3 - 1;

		fout << vertices[vIndex].x << ' ' << vertices[vIndex].y << ' ' << vertices[vIndex].z << ' '
		     << texcoords[tIndex].x << ' ' << texcoords[tIndex].y << ' '
		     << normals[nIndex].x << ' ' << normals[nIndex].y << ' ' << normals[nIndex].z << endl;
	}

	// Close the output file.
	fout.close();

	// Release the four data structures.
	if(vertices)
	{
		delete [] vertices;
		vertices = 0;
	}
	if(texcoords)
	{
		delete [] texcoords;
		texcoords = 0;
	}
	if(normals)
	{
		delete [] normals;
		normals = 0;
	}
	if(faces)
	{
		delete [] faces;
		faces = 0;
	}

	return true;
}


요약


우리는 이제 마야 2011 .obj 파일을 우리의 독자 모델 포맷으로 변환할 수 있습니다!


연습하기


1. 프로그램을 컴파일하고 위 .obj 모델 파일을 변환해 보세요.


2. 마야 2011 모델을 만들어 보고(가지고 있는 거 있으시면 그거 쓰시면 됩니다.) .obj 포맷으로 내보낸 뒤 변환프로그램으로 변환해 보세요.


3. 코드를 변형해서 다른 모델 포맷을 변환해 보세요.

728x90
728x90

원문 : http://www.rastertek.com/dx11tut07.html


Tutorial 7: 3D Model Rendering


이번 강좌는 HLSL을 이용하여 DirectX 11에서 어떻게 3D 모델을 렌더링하는지를 포함합니다.


이전 강좌에서 이미 3D 모델을 렌더링 해 보았지만 달랑 삼각형 하나라 별로 흥미롭지 못했습니다. 그래서 이번에는 더 복잡한 오브젝트를 렌더링하기 위해 한 발짝 더 움직여 볼 것입니다. 이번 오브젝트는 바로 큐브(정육면체)입니다. 복잡한 모델을 어떻게 렌더링할지 논의하기 전에 먼저 모델 포맷에 대해 알아볼 것입니다.


시중에 3D 모델을 만들수 있는 많은 툴들이 있습니다. 마야나 3D Stuio Max가 대표적인 3D 모델링 프로그램입니다. 또 기능은 저 두개에 비해 적지만 우리가 필요한 만큼의 기능을 갖춘 다른 툴들도 있습니다.


어느 툴을 사용하는지에 상관없이 대부분 만든 3D 모델을 많은 다른 포맷들로 변환하여 저장할 수 있습니다. 제가 제안하는 것은 독자적 모델 포맷을 만들고 다른 대표 포맷에서 독자적 포맷으로 변환시키는 "파서(parser)"를 작성하는 것입니다. 그 이유는 여러분이 사용하는 3D 모델링 패키지는 시간이 지나면 바뀌고 그 모델 포맷도 맞추어 바뀝니다. 그리고 여러분은 아마도 3D 모델링 패키지를 여러개 사용중이실 것이고 따라서 여러 다른 포맷들을 가지실 겁니다. 그래서 만약 여러분이 독자 포맷을 가지며 다른 포맷을 독자 포맷으로 변환하여 쓴다면 여러분의 코드는 바뀌지 않을 것입니다. 파서 프로그램만 수정해주면 됩니다. 뿐만 아니라 대부분의 3D 모델링 패키지들은 해당 프로그램에만 유용하고 여러분의 포맷에 필요치 않은 자질구레한 부분도 포맷에 들어가기 때문이기도 합니다.


독자 포맷을 만드는 것에 대한 중요한 점은 필요한 모든 것을 포함시킬 수 있고 사용하기 편리합니다. 또 애니메이션 데이터를 가지는 혹은 정적인 것을 가지는 등과 같은 다른 특성의 오브젝트들에 대해 다른 포맷을 만드는 것을 생각해 볼수도 있습니다.


제가 만들 모델 포맷은 매우 기초적입니다. 모델의 각 정점을 가지는 라인을 포함할 것입니다. 각 라인은 법선 벡터, 텍셀 좌표, 위치 벡터 등을 가진 코드에서 버텍스 포맷(쉐이더에서 VertexType)과 일치해야 합니다. 이 포맷은 맨 위에 정점 개수를 가지고 있어 첫 라인을 읽고 Data부분을 읽기전에 필요한 메모리를 확보할 수 있습니다. 또 이 포맷은 모든 3줄마다 삼각형(맨 위에서부터 3줄씩)을 이루어야 하며, 모델 포맷의 정점들은 시계방향으로 표현되야 합니다. 여기 우리가 렌더링할 큐브의 모델 파일이 있습니다.


Cube.txt


Vertex Count: 36

Data:

-1.0  1.0 -1.0 0.0 0.0  0.0  0.0 -1.0
 1.0  1.0 -1.0 1.0 0.0  0.0  0.0 -1.0
-1.0 -1.0 -1.0 0.0 1.0  0.0  0.0 -1.0
-1.0 -1.0 -1.0 0.0 1.0  0.0  0.0 -1.0
 1.0  1.0 -1.0 1.0 0.0  0.0  0.0 -1.0
 1.0 -1.0 -1.0 1.0 1.0  0.0  0.0 -1.0
 1.0  1.0 -1.0 0.0 0.0  1.0  0.0  0.0
 1.0  1.0  1.0 1.0 0.0  1.0  0.0  0.0
 1.0 -1.0 -1.0 0.0 1.0  1.0  0.0  0.0
 1.0 -1.0 -1.0 0.0 1.0  1.0  0.0  0.0
 1.0  1.0  1.0 1.0 0.0  1.0  0.0  0.0
 1.0 -1.0  1.0 1.0 1.0  1.0  0.0  0.0
 1.0  1.0  1.0 0.0 0.0  0.0  0.0  1.0
-1.0  1.0  1.0 1.0 0.0  0.0  0.0  1.0
 1.0 -1.0  1.0 0.0 1.0  0.0  0.0  1.0
 1.0 -1.0  1.0 0.0 1.0  0.0  0.0  1.0
-1.0  1.0  1.0 1.0 0.0  0.0  0.0  1.0
-1.0 -1.0  1.0 1.0 1.0  0.0  0.0  1.0
-1.0  1.0  1.0 0.0 0.0 -1.0  0.0  0.0
-1.0  1.0 -1.0 1.0 0.0 -1.0  0.0  0.0
-1.0 -1.0  1.0 0.0 1.0 -1.0  0.0  0.0
-1.0 -1.0  1.0 0.0 1.0 -1.0  0.0  0.0
-1.0  1.0 -1.0 1.0 0.0 -1.0  0.0  0.0
-1.0 -1.0 -1.0 1.0 1.0 -1.0  0.0  0.0
-1.0  1.0  1.0 0.0 0.0  0.0  1.0  0.0
 1.0  1.0  1.0 1.0 0.0  0.0  1.0  0.0
-1.0  1.0 -1.0 0.0 1.0  0.0  1.0  0.0
-1.0  1.0 -1.0 0.0 1.0  0.0  1.0  0.0
 1.0  1.0  1.0 1.0 0.0  0.0  1.0  0.0
 1.0  1.0 -1.0 1.0 1.0  0.0  1.0  0.0
-1.0 -1.0 -1.0 0.0 0.0  0.0 -1.0  0.0
 1.0 -1.0 -1.0 1.0 0.0  0.0 -1.0  0.0
-1.0 -1.0  1.0 0.0 1.0  0.0 -1.0  0.0
-1.0 -1.0  1.0 0.0 1.0  0.0 -1.0  0.0
 1.0 -1.0 -1.0 1.0 0.0  0.0 -1.0  0.0
 1.0 -1.0  1.0 1.0 1.0  0.0 -1.0  0.0


보다시피 36줄의 x, y, z, tu, tv, nx, ny, nz(위치 벡터, 텍셀 좌표, 법선 벡터) 데이터가 있습니다. 매 3줄이 삼각형을 구성하여 총 12개의 삼각형이 큐브를 형성합니다. 포맷은 매우 직관적이고 바로 버텍스 버퍼로 읽어들일 수 있으며 어떠한 수정없이 렌더링할 수 있습니다.


그런데 하나 조심할 점은 몇몇 3D 모델링 프로그램은 데이터를 다른방식으로 내보내는데 예컨데 왼손좌표계나 오른손좌표계가 있습니다. 기본적으로 DirectX 11은 왼손좌표계(보통 수학에서의 좌표와 Z축이 반대)이며 모델 데이터도 이와 맞추어야 합니다. 이 차이를 주의하여 여러분의 파싱 프로그램이 데이터를 올바른 포맷/방식으로 변환되는지 확실히 하시기 바랍니다.


Modelclass.h


이번 강좌를 위해 우리가 할 것은 ModelClass가 우리의 텍스트 모델 파일로부터 3D 모델을 렌더링하도록 조금 수정하는 것입니다.


////////////////////////////////////////////////////////////////////////////////
// Filename: modelclass.h
////////////////////////////////////////////////////////////////////////////////
#ifndef _MODELCLASS_H_
#define _MODELCLASS_H_


//////////////
// INCLUDES //
//////////////
#include <d3d11.h>
#include <d3dx10math.h>


모델 텍스트 파일에서 읽는 것을 처리하기 위해 fstream 라이브러리를 인클루드하였습니다.


#include <fstream>
using namespace std;


///////////////////////
// MY CLASS INCLUDES //
///////////////////////
#include "textureclass.h"


////////////////////////////////////////////////////////////////////////////////
// Class name: ModelClass
////////////////////////////////////////////////////////////////////////////////
class ModelClass
{
private:
	struct VertexType
	{
		D3DXVECTOR3 position;
		D3DXVECTOR2 texture;
		D3DXVECTOR3 normal;
	};


다음은 모델 포맷을 표현할 새 구조체의 추가입니다. ModelType이라 부르는 이 구조체는 모델 파일 포맷과 같이 위치, 텍스쳐, 법선 벡터를 포함합니다.


	struct ModelType
	{
		float x, y, z;
		float tu, tv;
		float nx, ny, nz;
	};

public:
	ModelClass();
	ModelClass(const ModelClass&);
	~ModelClass();


Initialize() 함수는 로딩될 모델의 파일 이름 문자열을 입력으로 받습니다.


	bool Initialize(ID3D11Device*, char*, WCHAR*);
	void Shutdown();
	void Render(ID3D11DeviceContext*);

	int GetIndexCount();
	ID3D11ShaderResourceView* GetTexture();


private:
	bool InitializeBuffers(ID3D11Device*);
	void ShutdownBuffers();
	void RenderBuffers(ID3D11DeviceContext*);

	bool LoadTexture(ID3D11Device*, WCHAR*);
	void ReleaseTexture();


또 텍스트 파일로부터 모델 데이터를 로딩하고 언로딩하는 함수 두개를 추가하였습니다.


	bool LoadModel(char*);
	void ReleaseModel();

private:
	ID3D11Buffer *m_vertexBuffer, *m_indexBuffer;
	int m_vertexCount, m_indexCount;
	TextureClass* m_Texture;


마지막으로 ModelType 구조체의 배열이 될 m_model이라 하는 private 멤버가 추가되었습니다. 이 변수는 모델 데이터를 버텍스 버퍼로 읽어들이기 전에 먼저 읽고 유지하는데 사용될 것입니다.


	ModelType* m_model;
};

#endif


Modelclass.cpp


////////////////////////////////////////////////////////////////////////////////
// Filename: modelclass.cpp
////////////////////////////////////////////////////////////////////////////////
#include "modelclass.h"


ModelClass::ModelClass()
{
	m_vertexBuffer = 0;
	m_indexBuffer = 0;
	m_Texture = 0;


생성자에서 새 모델 구조체를 null로 설정합니다.


	m_model = 0;
}


ModelClass::ModelClass(const ModelClass& other)
{
}


ModelClass::~ModelClass()
{
}


Initialize() 함수는 로딩될 모델의 파일 이름을 입력으로 받습니다.


bool ModelClass::Initialize(ID3D11Device* device, char* modelFilename, WCHAR* textureFilename)
{
	bool result;


Initialize() 함수에서 이제 LoadModel() 함수를 가장먼저 호출합니다. 파일 이름에서 모델 데이터를 로딩하여 m_model 배열에 제공할 것입니다. 이 배열이 채워지면 배열을 이용하여 버텍스, 인덱스 버퍼를 생성할 수 있습니다. 이제 InitializeBuffers() 함수는 이 모델 데이터에 의존하기 때문에 함수가 올바르게 호출되었는지 확실히 해야합니다.


	// Load in the model data,
	result = LoadModel(modelFilename);
	if(!result)
	{
		return false;
	}

	// Initialize the vertex and index buffers.
	result = InitializeBuffers(device);
	if(!result)
	{
		return false;
	}

	// Load the texture for this model.
	result = LoadTexture(device, textureFilename);
	if(!result)
	{
		return false;
	}

	return true;
}


void ModelClass::Shutdown()
{
	// Release the model texture.
	ReleaseTexture();

	// Shutdown the vertex and index buffers.
	ShutdownBuffers();


Shutdown() 함수에서는 다 쓴 m_model 배열 데이터를 지우기 위해 ReleaseModel() 호출을 추가합니다.


	// Release the model data.
	ReleaseModel();

	return;
}


void ModelClass::Render(ID3D11DeviceContext* deviceContext)
{
	// Put the vertex and index buffers on the graphics pipeline to prepare them for drawing.
	RenderBuffers(deviceContext);

	return;
}


int ModelClass::GetIndexCount()
{
	return m_indexCount;
}


ID3D11ShaderResourceView* ModelClass::GetTexture()
{
	return m_Texture->GetTexture();
}


bool ModelClass::InitializeBuffers(ID3D11Device* device)
{
	VertexType* vertices;
	unsigned long* indices;
	D3D11_BUFFER_DESC vertexBufferDesc, indexBufferDesc;
	D3D11_SUBRESOURCE_DATA vertexData, indexData;
	HRESULT result;
	int i;


우리는 더 이상 손수 버텍스, 인덱스 카운트를 설정하지 않아도 됩니다. 대신에 ModelClass::LoadModel() 함수만 있으면 만사 OK.


	// Create the vertex array.
	vertices = new VertexType[m_vertexCount];
	if(!vertices)
	{
		return false;
	}

	// Create the index array.
	indices = new unsigned long[m_indexCount];
	if(!indices)
	{
		return false;
	}


버텍스, 인덱스 배열 로딩 부분은 조금 바뀌었습니다. 직접 값을 설정하는 대신 m_model 배열에서 모든 요소를 돌며 데이터를 정점 배열로 복사합니다. 인덱스 배열은 만들기 쉽습니다. 우리가 로딩한 정점의 배열 위치가 곧 인덱스 숫자와 같습니다.


	// Load the vertex array and index array with data.
	for(i=0; i<m_vertexCount; i++)
	{
		vertices[i].position = D3DXVECTOR3(m_model[i].x, m_model[i].y, m_model[i].z);
		vertices[i].texture = D3DXVECTOR2(m_model[i].tu, m_model[i].tv);
		vertices[i].normal = D3DXVECTOR3(m_model[i].nx, m_model[i].ny, m_model[i].nz);

		indices[i] = i;
	}

	// Set up the description of the static vertex buffer.
	vertexBufferDesc.Usage = D3D11_USAGE_DEFAULT;
	vertexBufferDesc.ByteWidth = sizeof(VertexType) * m_vertexCount;
	vertexBufferDesc.BindFlags = D3D11_BIND_VERTEX_BUFFER;
	vertexBufferDesc.CPUAccessFlags = 0;
	vertexBufferDesc.MiscFlags = 0;
	vertexBufferDesc.StructureByteStride = 0;

	// Give the subresource structure a pointer to the vertex data.
	vertexData.pSysMem = vertices;
	vertexData.SysMemPitch = 0;
	vertexData.SysMemSlicePitch = 0;

	// Now create the vertex buffer.
	result = device->CreateBuffer(&vertexBufferDesc, &vertexData, &m_vertexBuffer);
	if(FAILED(result))
	{
		return false;
	}

	// Set up the description of the static index buffer.
	indexBufferDesc.Usage = D3D11_USAGE_DEFAULT;
	indexBufferDesc.ByteWidth = sizeof(unsigned long) * m_indexCount;
	indexBufferDesc.BindFlags = D3D11_BIND_INDEX_BUFFER;
	indexBufferDesc.CPUAccessFlags = 0;
	indexBufferDesc.MiscFlags = 0;
	indexBufferDesc.StructureByteStride = 0;

	// Give the subresource structure a pointer to the index data.
	indexData.pSysMem = indices;
	indexData.SysMemPitch = 0;
	indexData.SysMemSlicePitch = 0;

	// Create the index buffer.
	result = device->CreateBuffer(&indexBufferDesc, &indexData, &m_indexBuffer);
	if(FAILED(result))
	{
		return false;
	}

	// Release the arrays now that the vertex and index buffers have been created and loaded.
	delete [] vertices;
	vertices = 0;

	delete [] indices;
	indices = 0;

	return true;
}


void ModelClass::ShutdownBuffers()
{
	// Release the index buffer.
	if(m_indexBuffer)
	{
		m_indexBuffer->Release();
		m_indexBuffer = 0;
	}

	// Release the vertex buffer.
	if(m_vertexBuffer)
	{
		m_vertexBuffer->Release();
		m_vertexBuffer = 0;
	}

	return;
}


void ModelClass::RenderBuffers(ID3D11DeviceContext* deviceContext)
{
	unsigned int stride;
	unsigned int offset;


	// Set vertex buffer stride and offset.
	stride = sizeof(VertexType); 
	offset = 0;
    
	// Set the vertex buffer to active in the input assembler so it can be rendered.
	deviceContext->IASetVertexBuffers(0, 1, &m_vertexBuffer, &stride, &offset);

	// Set the index buffer to active in the input assembler so it can be rendered.
	deviceContext->IASetIndexBuffer(m_indexBuffer, DXGI_FORMAT_R32_UINT, 0);

	// Set the type of primitive that should be rendered from this vertex buffer, in this case triangles.
	deviceContext->IASetPrimitiveTopology(D3D11_PRIMITIVE_TOPOLOGY_TRIANGLELIST);

	return;
}


bool ModelClass::LoadTexture(ID3D11Device* device, WCHAR* filename)
{
	bool result;


	// Create the texture object.
	m_Texture = new TextureClass;
	if(!m_Texture)
	{
		return false;
	}

	// Initialize the texture object.
	result = m_Texture->Initialize(device, filename);
	if(!result)
	{
		return false;
	}

	return true;
}


void ModelClass::ReleaseTexture()
{
	// Release the texture object.
	if(m_Texture)
	{
		m_Texture->Shutdown();
		delete m_Texture;
		m_Texture = 0;
	}

	return;
}


이것이 바로 텍스트 파일에서 m_model 배열 변수로 모델 데이터를 로딩하는 LoadModel() 함수입니다. 먼저 텍스트 파일을 열고 정점 개수를 읽습니다. 정점 개수를 읽은 후 ModelType 배열을 생성하고 각 라인을 배열로 읽어들입니다. 정점, 인덱스 수가 이 함수에서 설정됩니다.


bool ModelClass::LoadModel(char* filename)
{
	ifstream fin;
	char input;
	int i;


	// Open the model file.
	fin.open(filename);
	
	// If it could not open the file then exit.
	if(fin.fail())
	{
		return false;
	}

	// Read up to the value of vertex count.
	fin.get(input);
	while(input != ':')
	{
		fin.get(input);
	}

	// Read in the vertex count.
	fin >> m_vertexCount;

	// Set the number of indices to be the same as the vertex count.
	m_indexCount = m_vertexCount;

	// Create the model using the vertex count that was read in.
	m_model = new ModelType[m_vertexCount];
	if(!m_model)
	{
		return false;
	}

	// Read up to the beginning of the data.
	fin.get(input);
	while(input != ':')
	{
		fin.get(input);
	}
	fin.get(input);
	fin.get(input);

	// Read in the vertex data.
	for(i=0; i<m_vertexCount; i++)
	{
		fin >> m_model[i].x >> m_model[i].y >> m_model[i].z;
		fin >> m_model[i].tu >> m_model[i].tv;
		fin >> m_model[i].nx >> m_model[i].ny >> m_model[i].nz;
	}

	// Close the model file.
	fin.close();

	return true;
}


ReleaseModel() 함수는 모델 데이터 배열 제거를 처리합니다.


void ModelClass::ReleaseModel()
{
	if(m_model)
	{
		delete [] m_model;
		m_model = 0;
	}

	return;
}


Graphicsclass.h


GraphicsClass의 헤더는 전 강좌에서 변한 게 없습니다.


////////////////////////////////////////////////////////////////////////////////
// Filename: graphicsclass.h
////////////////////////////////////////////////////////////////////////////////
#ifndef _GRAPHICSCLASS_H_
#define _GRAPHICSCLASS_H_


///////////////////////
// MY CLASS INCLUDES //
///////////////////////
#include "d3dclass.h"
#include "cameraclass.h"
#include "modelclass.h"
#include "lightshaderclass.h"
#include "lightclass.h"


/////////////
// GLOBALS //
/////////////
const bool FULL_SCREEN = true;
const bool VSYNC_ENABLED = true;
const float SCREEN_DEPTH = 1000.0f;
const float SCREEN_NEAR = 0.1f;


////////////////////////////////////////////////////////////////////////////////
// Class name: GraphicsClass
////////////////////////////////////////////////////////////////////////////////
class GraphicsClass
{
public:
	GraphicsClass();
	GraphicsClass(const GraphicsClass&);
	~GraphicsClass();

	bool Initialize(int, int, HWND);
	void Shutdown();
	bool Frame();

private:
	bool Render(float);

private:
	D3DClass* m_D3D;
	CameraClass* m_Camera;
	ModelClass* m_Model;
	LightShaderClass* m_LightShader;
	LightClass* m_Light;
};

#endif


Graphicsclass.cpp


////////////////////////////////////////////////////////////////////////////////
// Filename: graphicsclass.cpp
////////////////////////////////////////////////////////////////////////////////
#include "graphicsclass.h"


GraphicsClass::GraphicsClass()
{
	m_D3D = 0;
	m_Camera = 0;
	m_Model = 0;
	m_LightShader = 0;
	m_Light = 0;
}


GraphicsClass::GraphicsClass(const GraphicsClass& other)
{
}


GraphicsClass::~GraphicsClass()
{
}


bool GraphicsClass::Initialize(int screenWidth, int screenHeight, HWND hwnd)
{
	bool result;


	// Create the Direct3D object.
	m_D3D = new D3DClass;
	if(!m_D3D)
	{
		return false;
	}

	// Initialize the Direct3D object.
	result = m_D3D->Initialize(screenWidth, screenHeight, VSYNC_ENABLED, hwnd, FULL_SCREEN, SCREEN_DEPTH, SCREEN_NEAR);
	if(!result)
	{
		MessageBox(hwnd, L"Could not initialize Direct3D.", L"Error", MB_OK);
		return false;
	}

	// Create the camera object.
	m_Camera = new CameraClass;
	if(!m_Camera)
	{
		return false;
	}

	// Set the initial position of the camera.
	m_Camera->SetPosition(0.0f, 0.0f, -10.0f);
	
	// Create the model object.
	m_Model = new ModelClass;
	if(!m_Model)
	{
		return false;
	}


모델 initialization() 함수는 로딩하는 모델 파일의 이름을 받습니다. 이번 강좌에서 우리는 cube.txt파일을 사용할 것입니다.


	// Initialize the model object.
	result = m_Model->Initialize(m_D3D->GetDevice(), "../Engine/data/cube.txt", L"../Engine/data/seafloor.dds");
	if(!result)
	{
		MessageBox(hwnd, L"Could not initialize the model object.", L"Error", MB_OK);
		return false;
	}

	// Create the light shader object.
	m_LightShader = new LightShaderClass;
	if(!m_LightShader)
	{
		return false;
	}

	// Initialize the light shader object.
	result = m_LightShader->Initialize(m_D3D->GetDevice(), hwnd);
	if(!result)
	{
		MessageBox(hwnd, L"Could not initialize the light shader object.", L"Error", MB_OK);
		return false;
	}

	// Create the light object.
	m_Light = new LightClass;
	if(!m_Light)
	{
		return false;
	}


이번 강좌에는 분산광 색상을 흰색으로 바꾸었습니다.


	// Initialize the light object.
	m_Light->SetDiffuseColor(1.0f, 1.0f, 1.0f, 1.0f);
	m_Light->SetDirection(0.0f, 0.0f, 1.0f);

	return true;
}


void GraphicsClass::Shutdown()
{
	// Release the light object.
	if(m_Light)
	{
		delete m_Light;
		m_Light = 0;
	}

	// Release the light shader object.
	if(m_LightShader)
	{
		m_LightShader->Shutdown();
		delete m_LightShader;
		m_LightShader = 0;
	}

	// Release the model object.
	if(m_Model)
	{
		m_Model->Shutdown();
		delete m_Model;
		m_Model = 0;
	}

	// Release the camera object.
	if(m_Camera)
	{
		delete m_Camera;
		m_Camera = 0;
	}

	// Release the D3D object.
	if(m_D3D)
	{
		m_D3D->Shutdown();
		delete m_D3D;
		m_D3D = 0;
	}

	return;
}


bool GraphicsClass::Frame()
{
	bool result;
	static float rotation = 0.0f;


	// Update the rotation variable each frame.
	rotation += (float)D3DX_PI * 0.01f;
	if(rotation > 360.0f)
	{
		rotation -= 360.0f;
	}
	
	// Render the graphics scene.
	result = Render(rotation);
	if(!result)
	{
		return false;
	}

	return true;
}


bool GraphicsClass::Render(float rotation)
{
	D3DXMATRIX worldMatrix, viewMatrix, projectionMatrix;
	bool result;


	// Clear the buffers to begin the scene.
	m_D3D->BeginScene(0.0f, 0.0f, 0.0f, 1.0f);

	// Generate the view matrix based on the camera's position.
	m_Camera->Render();

	// Get the world, view, and projection matrices from the camera and d3d objects.
	m_Camera->GetViewMatrix(viewMatrix);
	m_D3D->GetWorldMatrix(worldMatrix);
	m_D3D->GetProjectionMatrix(projectionMatrix);

	// Rotate the world matrix by the rotation value so that the triangle will spin.
	D3DXMatrixRotationY(&worldMatrix, rotation);

	// Put the model vertex and index buffers on the graphics pipeline to prepare them for drawing.
	m_Model->Render(m_D3D->GetDeviceContext());

	// Render the model using the light shader.
	result = m_LightShader->Render(m_D3D->GetDeviceContext(), m_Model->GetIndexCount(), worldMatrix, viewMatrix, projectionMatrix, 
				       m_Model->GetTexture(), m_Light->GetDirection(), m_Light->GetDiffuseColor());
	if(!result)
	{
		return false;
	}

	// Present the rendered scene to the screen.
	m_D3D->EndScene();

	return true;
}


요약


ModelClass에 변화로 이제 3D 모델을 로딩하고 렌더링할 수 있습니다. 여기서 사용된 포맷은 기본적인 움직이지 않는 오브젝트를 위함이지만 모델 포맷이 어떻게 동작하는지를 이해하는데에는 좋은 시작입니다.


연습하기


1. 코드를 재컴파일 하고 프로그램을 실행해 보세요. 여러분은 같은 텍스쳐에 회전하는 큐브르르 확인하실 수 있습니다. Esc키로 종료하세요.


2. 괜찮은 3D 모델링 패키지(왠만하면 공짜이길..)를 찾고 간단한 모델을 만든 뒤 파일로 내보내세요. 포맷을 한번 살펴보세요.


3. 다른 포맷의 모델을 이번 강좌에서 사용된 포맷으로 변환하는 간단한 파서 프로그램을 작성해 보세요. 그리고 여러분의 모델로 cube.txt를 대체하고 실행 해 보세요.

728x90
728x90

원문 : http://www.rastertek.com/dx11tut06.html


Tutorial 6: Diffuse Lighting


이번 강좌에서는 분산 조명과 DirectX 11을 이용하여 3D 물체를 어떻게 비추는지를 설명할 것입니다. 저번 강좌의 코드에 이어서 고쳐나가보도록 하겠습니다.


우리가 도입할 "분산 조명"은 방향 조명이라고 부릅니다. 방향성이 있는 빛은 마치 태양이 우리 지구를 비추는것과 비슷하게 느껴집니다. 광원이 굉장히 멀리 있어서 방향에 근거하여 물체에 비추는 빛의 양을 알 수 있는 빛을 보내고 있습니다. (태양에서 빛이 온다는 것이 명확하다.) 그와 달리 "주변광"(곧 보게 될)은 물체의 표면을 비추지 않고 직접적으로 닿지도 않습니다.


저는 조명효과를 방향 조명으로 시작하기로 맘을 먹었습니다. 시각적으로 디버깅이 쉽기 때문입니다. 또 빛의 방향만 알면 되기 때문에 다른 타입의 주변광들 예컨데 스포트라이트나 포인트 라이트 보다 공식이 간단한 이유도 있습니다.


DirectX 11에서 분산 조명의 시행은 버텍스, 픽셀 쉐이더만 있으면 만사 오키무띠 입니다. 분산광은 우리가 비출 폴리곤에 대한 빛의 방향과 법선 벡터만 알면 됩니다. (미리 얘기하자면 법선 벡터와 빛의 방향 벡터의 내적을 이용한 코사인값을 얻어서 "램버트 코사인 법칙"에 따라 픽셀 색상 감쇠.) 방향은 단일 벡터이고 법선 벡터는 폴리곤을 구성하는 정점 3개를 이용하여 어느 폴리곤이든 계산할 수 있습니다. 이번 강좌에서는 조명 방정식에서 분산광의 색상도 넣어보겠습니다.


Framework


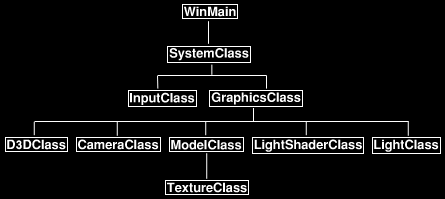
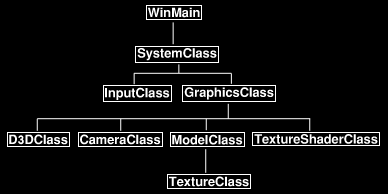
이번 강좌에는 씬에서 광원을 표현할 새로운 LightClass 클래스를 만들 것입니다. LightClass는 빛의 색상과 방향외 다른 어떤것도 하지 않을 것입니다. 또 TextureShaderClass(쉐이더좀 내버려 둬)를 지우고 모델에 빛을 입히는 작업을 처리할 LightShaderClass로 대체할 것입니다. 새로 추가된 클래스를 포함하여 프레임워크는 다음과 같이 될 것입니다.


먼저 HLSL 라이트 쉐이더부터 살펴보겠습니다. 라이트 쉐이더는 이전 강좌의 텍스쳐 쉐이더를 업데이트한 버전입니다.


Light.vs


////////////////////////////////////////////////////////////////////////////////
// Filename: light.vs
////////////////////////////////////////////////////////////////////////////////


/////////////
// GLOBALS //
/////////////
cbuffer MatrixBuffer
{
    matrix worldMatrix;
    matrix viewMatrix;
    matrix projectionMatrix;
};


두 구조체에 float3형 법선 벡터가 추가되었습니다. 법선 벡터는 법선 벡터는 빛의 방향 벡터 사이각을 이용하여 빛의 양을 계산하는데 사용됩니다.


//////////////
// TYPEDEFS //
//////////////
struct VertexInputType
{
    float4 position : POSITION;
    float2 tex : TEXCOORD0;
    float3 normal : NORMAL;
};

struct PixelInputType
{
    float4 position : SV_POSITION;
    float2 tex : TEXCOORD0;
    float3 normal : NORMAL;
};


////////////////////////////////////////////////////////////////////////////////
// Vertex Shader
////////////////////////////////////////////////////////////////////////////////
PixelInputType LightVertexShader(VertexInputType input)
{
    PixelInputType output;
    

    // Change the position vector to be 4 units for proper matrix calculations.
    input.position.w = 1.0f;

    // Calculate the position of the vertex against the world, view, and projection matrices.
    output.position = mul(input.position, worldMatrix);
    output.position = mul(output.position, viewMatrix);
    output.position = mul(output.position, projectionMatrix);
    
    // Store the texture coordinates for the pixel shader.
    output.tex = input.tex;


정점에 대한 법선 벡터는 월드 좌표에서 계산되고 픽셀 쉐이더로 보내기 전에 정규화(해당 방향에대한 단위벡터로 만든다.) 합니다.


    // Calculate the normal vector against the world matrix only.
    output.normal = mul(input.normal, (float3x3)worldMatrix);
	
    // Normalize the normal vector.
    output.normal = normalize(output.normal);

    return output;
}


Light.ps


////////////////////////////////////////////////////////////////////////////////
// Filename: light.ps
////////////////////////////////////////////////////////////////////////////////


/////////////
// GLOBALS //
/////////////
Texture2D shaderTexture;
SamplerState SampleType;


LightBuffer안에 빛의 분산 방향과 색상을 가지는 변수 두개가 있습니다. 이 두 변수는 LightClass 객체의 변수로부터 설정됩니다.


cbuffer LightBuffer
{
    float4 diffuseColor;
    float3 lightDirection;
    float padding;
};


//////////////
// TYPEDEFS //
//////////////
struct PixelInputType
{
    float4 position : SV_POSITION;
    float2 tex : TEXCOORD0;
    float3 normal : NORMAL;
};


////////////////////////////////////////////////////////////////////////////////
// Pixel Shader
////////////////////////////////////////////////////////////////////////////////
float4 LightPixelShader(PixelInputType input) : SV_TARGET
{
    float4 textureColor;
    float3 lightDir;
    float lightIntensity;
    float4 color;


    // Sample the pixel color from the texture using the sampler at this texture coordinate location.
    textureColor = shaderTexture.Sample(SampleType, input.tex);


아까 얘기한 조명 방정식이 시행되는 곳입니다. 빛 세기 값이 삼각형의 법선 벡터와 빛의 방향 벡터의 내적으로 계산됩니다.


    // Invert the light direction for calculations.
    lightDir = -lightDirection;

    // Calculate the amount of light on this pixel.
    // saturate() 함수는 입력값의 범위를 0~1로 한다.
    lightIntensity = saturate(dot(input.normal, lightDir));


마지막으로 결과 색상을 구하기 위해 빛의 분산값을 텍스쳐 픽셀 값이랑 결합합니다.


    // Determine the final amount of diffuse color based on the diffuse color combined with the light intensity.
    color = saturate(diffuseColor * lightIntensity);

    // Multiply the texture pixel and the final diffuse color to get the final pixel color result.
    color = color * textureColor;

    return color;
}


Lightshaderclass.h


새 LightShaderClass는 이전 강좌의 TextureShaderClass를 조명 부분을 포함하기 위해 아주 쬐끔 수정된 것입니다.


////////////////////////////////////////////////////////////////////////////////
// Filename: lightshaderclass.h
////////////////////////////////////////////////////////////////////////////////
#ifndef _LIGHTSHADERCLASS_H_
#define _LIGHTSHADERCLASS_H_


//////////////
// INCLUDES //
//////////////
#include <d3d11.h>
#include <d3dx10math.h>
#include <d3dx11async.h>
#include <fstream>
using namespace std;


////////////////////////////////////////////////////////////////////////////////
// Class name: LightShaderClass
////////////////////////////////////////////////////////////////////////////////
class LightShaderClass
{
private:
	struct MatrixBufferType
	{
		D3DXMATRIX world;
		D3DXMATRIX view;
		D3DXMATRIX projection;
	};


LightBufferType 구조체는 조명 정보를 가지는데 사용됩니다. 이 typedef은 픽셀 쉐이더의 LightBuffer와 같습니다. 버퍼를 16의 배수로 하기위해 padding 변수를 추가한 것을 주의하시기 바랍니다. 이 추가 float 변수가 없으면 구조체 크기가 28바이트인데 CreateBuffer()를 호출할때 버퍼사이즈가 16의 배수가 아니면 실패하기 때문입니다.


* 참조 : https://msdn.microsoft.com/en-us/library/windows/desktop/ff476501(v=vs.85).aspx


	struct LightBufferType
	{
		D3DXVECTOR4 diffuseColor;
		D3DXVECTOR3 lightDirection;
		float padding;  // Added extra padding so structure is a multiple of 16 for CreateBuffer function requirements.
	};

public:
	LightShaderClass();
	LightShaderClass(const LightShaderClass&);
	~LightShaderClass();

	bool Initialize(ID3D11Device*, HWND);
	void Shutdown();
	bool Render(ID3D11DeviceContext*, int, D3DXMATRIX, D3DXMATRIX, D3DXMATRIX, ID3D11ShaderResourceView*, D3DXVECTOR3, D3DXVECTOR4);

private:
	bool InitializeShader(ID3D11Device*, HWND, WCHAR*, WCHAR*);
	void ShutdownShader();
	void OutputShaderErrorMessage(ID3D10Blob*, HWND, WCHAR*);

	bool SetShaderParameters(ID3D11DeviceContext*, D3DXMATRIX, D3DXMATRIX, D3DXMATRIX, ID3D11ShaderResourceView*, D3DXVECTOR3, D3DXVECTOR4);
	void RenderShader(ID3D11DeviceContext*, int);

private:
	ID3D11VertexShader* m_vertexShader;
	ID3D11PixelShader* m_pixelShader;
	ID3D11InputLayout* m_layout;
	ID3D11SamplerState* m_sampleState;
	ID3D11Buffer* m_matrixBuffer;


여기 조명 정보(색상, 방향)를 위한 새 private 상수 버퍼가 생겼습니다. 라이트 버퍼는 이 클래스에서 전역 라이트 변수를 HLSL 픽셀 쉐이더로 설정하여 보내는데 사용될 것입니다.


	ID3D11Buffer* m_lightBuffer;
};

#endif


Lightshaderclass.cpp


////////////////////////////////////////////////////////////////////////////////
// Filename: lightshaderclass.cpp
////////////////////////////////////////////////////////////////////////////////
#include "lightshaderclass.h"


LightShaderClass::LightShaderClass()
{
	m_vertexShader = 0;
	m_pixelShader = 0;
	m_layout = 0;
	m_sampleState = 0;
	m_matrixBuffer = 0;


클래스 생성자에서 라이트 상수 버퍼를 null로 설정합니다.


	m_lightBuffer = 0;
}


LightShaderClass::LightShaderClass(const LightShaderClass& other)
{
}


LightShaderClass::~LightShaderClass()
{
}


bool LightShaderClass::Initialize(ID3D11Device* device, HWND hwnd)
{
	bool result;


light.vs, lights.ps 쉐이더 파일은 쉐이더 초기화 함수의 입력으로 사용됩니다.


	// Initialize the vertex and pixel shaders.
	result = InitializeShader(device, hwnd, L"../Engine/light.vs", L"../Engine/light.ps");
	if(!result)
	{
		return false;
	}

	return true;
}


void LightShaderClass::Shutdown()
{
	// Shutdown the vertex and pixel shaders as well as the related objects.
	ShutdownShader();

	return;
}


Render() 함수는 이제 lightDirection과 diffuseColor도 추가로 입력받습니다. 그리고 이 변수를 SetShaderParameters() 함수로 보내지고 결국 쉐이더 내부에 설정됩니다.


bool LightShaderClass::Render(ID3D11DeviceContext* deviceContext, int indexCount, D3DXMATRIX worldMatrix, D3DXMATRIX viewMatrix, 
			      D3DXMATRIX projectionMatrix, ID3D11ShaderResourceView* texture, D3DXVECTOR3 lightDirection, D3DXVECTOR4 diffuseColor)
{
	bool result;


	// Set the shader parameters that it will use for rendering.
	result = SetShaderParameters(deviceContext, worldMatrix, viewMatrix, projectionMatrix, texture, lightDirection, diffuseColor);
	if(!result)
	{
		return false;
	}

	// Now render the prepared buffers with the shader.
	RenderShader(deviceContext, indexCount);

	return true;
}


bool LightShaderClass::InitializeShader(ID3D11Device* device, HWND hwnd, WCHAR* vsFilename, WCHAR* psFilename)
{
	HRESULT result;
	ID3D10Blob* errorMessage;
	ID3D10Blob* vertexShaderBuffer;
	ID3D10Blob* pixelShaderBuffer;


polygonLayout은 이제 요소개수가 2개 -> 3개로 바뀌었습니다. 법선 벡터가 추가되어서 그거에 맞추기 위함입니다.


	D3D11_INPUT_ELEMENT_DESC polygonLayout[3];
	unsigned int numElements;
	D3D11_SAMPLER_DESC samplerDesc;
	D3D11_BUFFER_DESC matrixBufferDesc;


또 라이트 상수 버퍼를 위한 새로운 description 변수를 추가하였습니다.


	D3D11_BUFFER_DESC lightBufferDesc;


	// Initialize the pointers this function will use to null.
	errorMessage = 0;
	vertexShaderBuffer = 0;
	pixelShaderBuffer = 0;


새 라이트 버텍스 쉐이더를 로딩합니다.


	// Compile the vertex shader code.
	result = D3DX11CompileFromFile(vsFilename, NULL, NULL, "LightVertexShader", "vs_5_0", D3D10_SHADER_ENABLE_STRICTNESS, 0, NULL, 
				       &vertexShaderBuffer, &errorMessage, NULL);
	if(FAILED(result))
	{
		// If the shader failed to compile it should have writen something to the error message.
		if(errorMessage)
		{
			OutputShaderErrorMessage(errorMessage, hwnd, vsFilename);
		}
		// If there was nothing in the error message then it simply could not find the shader file itself.
		else
		{
			MessageBox(hwnd, vsFilename, L"Missing Shader File", MB_OK);
		}

		return false;
	}


새 라이트 픽셀 쉐이더를 로딩합니다.


	// Compile the pixel shader code.
	result = D3DX11CompileFromFile(psFilename, NULL, NULL, "LightPixelShader", "ps_5_0", D3D10_SHADER_ENABLE_STRICTNESS, 0, NULL, 
				       &pixelShaderBuffer, &errorMessage, NULL);
	if(FAILED(result))
	{
		// If the shader failed to compile it should have writen something to the error message.
		if(errorMessage)
		{
			OutputShaderErrorMessage(errorMessage, hwnd, psFilename);
		}
		// If there was nothing in the error message then it simply could not find the file itself.
		else
		{
			MessageBox(hwnd, psFilename, L"Missing Shader File", MB_OK);
		}

		return false;
	}

	// Create the vertex shader from the buffer.
	result = device->CreateVertexShader(vertexShaderBuffer->GetBufferPointer(), vertexShaderBuffer->GetBufferSize(), NULL, &m_vertexShader);
	if(FAILED(result))
	{
		return false;
	}

	// Create the pixel shader from the buffer.
	result = device->CreatePixelShader(pixelShaderBuffer->GetBufferPointer(), pixelShaderBuffer->GetBufferSize(), NULL, &m_pixelShader);
	if(FAILED(result))
	{
		return false;
	}

	// Create the vertex input layout description.
	// This setup needs to match the VertexType stucture in the ModelClass and in the shader.
	polygonLayout[0].SemanticName = "POSITION";
	polygonLayout[0].SemanticIndex = 0;
	polygonLayout[0].Format = DXGI_FORMAT_R32G32B32_FLOAT;
	polygonLayout[0].InputSlot = 0;
	polygonLayout[0].AlignedByteOffset = 0;
	polygonLayout[0].InputSlotClass = D3D11_INPUT_PER_VERTEX_DATA;
	polygonLayout[0].InstanceDataStepRate = 0;

	polygonLayout[1].SemanticName = "TEXCOORD";
	polygonLayout[1].SemanticIndex = 0;
	polygonLayout[1].Format = DXGI_FORMAT_R32G32_FLOAT;
	polygonLayout[1].InputSlot = 0;
	polygonLayout[1].AlignedByteOffset = D3D11_APPEND_ALIGNED_ELEMENT;
	polygonLayout[1].InputSlotClass = D3D11_INPUT_PER_VERTEX_DATA;
	polygonLayout[1].InstanceDataStepRate = 0;


쉐이더 초기화에 가장 큰 변화중 하나는 바로 여기 polygonLayou에 있습니다. 조명 계산에 사용할 법선 벡터를 새번째 요소로 추가하였습니다. 시맨틱 이름은 NORMAL이고 포맷은 법선 벡터의 x, y, z 3개의 실수(float; 4바이트)를 처리하는 DXGI_FORMAT_R32G32B32_FLOAT 입니다. 이제 이 레이아웃은 HLSL 버텍스 쉐이더의 입력 타입과 일치할 것입니다.


	polygonLayout[2].SemanticName = "NORMAL";
	polygonLayout[2].SemanticIndex = 0;
	polygonLayout[2].Format = DXGI_FORMAT_R32G32B32_FLOAT;
	polygonLayout[2].InputSlot = 0;
	polygonLayout[2].AlignedByteOffset = D3D11_APPEND_ALIGNED_ELEMENT;
	polygonLayout[2].InputSlotClass = D3D11_INPUT_PER_VERTEX_DATA;
	polygonLayout[2].InstanceDataStepRate = 0;

	// Get a count of the elements in the layout.
	numElements = sizeof(polygonLayout) / sizeof(polygonLayout[0]);

	// Create the vertex input layout.
	result = device->CreateInputLayout(polygonLayout, numElements, vertexShaderBuffer->GetBufferPointer(), vertexShaderBuffer->GetBufferSize(), 
					   &m_layout);
	if(FAILED(result))
	{
		return false;
	}

	// Release the vertex shader buffer and pixel shader buffer since they are no longer needed.
	vertexShaderBuffer->Release();
	vertexShaderBuffer = 0;

	pixelShaderBuffer->Release();
	pixelShaderBuffer = 0;

	// Create a texture sampler state description.
	samplerDesc.Filter = D3D11_FILTER_MIN_MAG_MIP_LINEAR;
	samplerDesc.AddressU = D3D11_TEXTURE_ADDRESS_WRAP;
	samplerDesc.AddressV = D3D11_TEXTURE_ADDRESS_WRAP;
	samplerDesc.AddressW = D3D11_TEXTURE_ADDRESS_WRAP;
	samplerDesc.MipLODBias = 0.0f;
	samplerDesc.MaxAnisotropy = 1;
	samplerDesc.ComparisonFunc = D3D11_COMPARISON_ALWAYS;
	samplerDesc.BorderColor[0] = 0;
	samplerDesc.BorderColor[1] = 0;
	samplerDesc.BorderColor[2] = 0;
	samplerDesc.BorderColor[3] = 0;
	samplerDesc.MinLOD = 0;
	samplerDesc.MaxLOD = D3D11_FLOAT32_MAX;

	// Create the texture sampler state.
	result = device->CreateSamplerState(&samplerDesc, &m_sampleState);
	if(FAILED(result))
	{
		return false;
	}

	// Setup the description of the dynamic matrix constant buffer that is in the vertex shader.
	matrixBufferDesc.Usage = D3D11_USAGE_DYNAMIC;
	matrixBufferDesc.ByteWidth = sizeof(MatrixBufferType);
	matrixBufferDesc.BindFlags = D3D11_BIND_CONSTANT_BUFFER;
	matrixBufferDesc.CPUAccessFlags = D3D11_CPU_ACCESS_WRITE;
	matrixBufferDesc.MiscFlags = 0;
	matrixBufferDesc.StructureByteStride = 0;

	// Create the constant buffer pointer so we can access the vertex shader constant buffer from within this class.
	result = device->CreateBuffer(&matrixBufferDesc, NULL, &m_matrixBuffer);
	if(FAILED(result))
	{
		return false;
	}


여기 빛의 분산과 방향을 처리할 라이트 상수 버퍼 description를 설정합니다.  여기서 상수 버퍼 사이즈에 주의해야 하는데 사이즈가 16의 배수가 아니면 맞추도록 추가적인메모리공간을 넣어야 합니다. 안그럼 CreateBuffer() 함수가 실패합니다. 이변 강좌의 경우 상수 버퍼 크기가 28인데 4바이트 padding 변수를 합하여 32바이트를 만들었습니다.


	// Setup the description of the light dynamic constant buffer that is in the pixel shader.
	// Note that ByteWidth always needs to be a multiple of 16 if using D3D11_BIND_CONSTANT_BUFFER or CreateBuffer will fail.
	lightBufferDesc.Usage = D3D11_USAGE_DYNAMIC;
	lightBufferDesc.ByteWidth = sizeof(LightBufferType);
	lightBufferDesc.BindFlags = D3D11_BIND_CONSTANT_BUFFER;
	lightBufferDesc.CPUAccessFlags = D3D11_CPU_ACCESS_WRITE;
	lightBufferDesc.MiscFlags = 0;
	lightBufferDesc.StructureByteStride = 0;

	// Create the constant buffer pointer so we can access the vertex shader constant buffer from within this class.
	result = device->CreateBuffer(&lightBufferDesc, NULL, &m_lightBuffer);
	if(FAILED(result))
	{
		return false;
	}

	return true;
}


void LightShaderClass::ShutdownShader()
{


새 라이트 상수 버퍼는 ShutdownShader() 함수에서 해제됩니다.


	// Release the light constant buffer.
	if(m_lightBuffer)
	{
		m_lightBuffer->Release();
		m_lightBuffer = 0;
	}

	// Release the matrix constant buffer.
	if(m_matrixBuffer)
	{
		m_matrixBuffer->Release();
		m_matrixBuffer = 0;
	}

	// Release the sampler state.
	if(m_sampleState)
	{
		m_sampleState->Release();
		m_sampleState = 0;
	}

	// Release the layout.
	if(m_layout)
	{
		m_layout->Release();
		m_layout = 0;
	}

	// Release the pixel shader.
	if(m_pixelShader)
	{
		m_pixelShader->Release();
		m_pixelShader = 0;
	}

	// Release the vertex shader.
	if(m_vertexShader)
	{
		m_vertexShader->Release();
		m_vertexShader = 0;
	}

	return;
}


void LightShaderClass::OutputShaderErrorMessage(ID3D10Blob* errorMessage, HWND hwnd, WCHAR* shaderFilename)
{
	char* compileErrors;
	unsigned long bufferSize, i;
	ofstream fout;


	// Get a pointer to the error message text buffer.
	compileErrors = (char*)(errorMessage->GetBufferPointer());

	// Get the length of the message.
	bufferSize = errorMessage->GetBufferSize();

	// Open a file to write the error message to.
	fout.open("shader-error.txt");

	// Write out the error message.
	for(i=0; i<bufferSize; i++)
	{
		fout << compileErrors[i];
	}

	// Close the file.
	fout.close();

	// Release the error message.
	errorMessage->Release();
	errorMessage = 0;

	// Pop a message up on the screen to notify the user to check the text file for compile errors.
	MessageBox(hwnd, L"Error compiling shader.  Check shader-error.txt for message.", shaderFilename, MB_OK);

	return;
}


SetShaderParameters() 함수는 lgihtDirection과 diffuseColore를 입력받도록 바뀌었습니다.


bool LightShaderClass::SetShaderParameters(ID3D11DeviceContext* deviceContext, D3DXMATRIX worldMatrix, D3DXMATRIX viewMatrix, 
					   D3DXMATRIX projectionMatrix, ID3D11ShaderResourceView* texture, D3DXVECTOR3 lightDirection, 
					   D3DXVECTOR4 diffuseColor)
{
	HRESULT result;
	D3D11_MAPPED_SUBRESOURCE mappedResource;
	unsigned int bufferNumber;
	MatrixBufferType* dataPtr;
	LightBufferType* dataPtr2;


	// Transpose the matrices to prepare them for the shader.
	D3DXMatrixTranspose(&worldMatrix, &worldMatrix);
	D3DXMatrixTranspose(&viewMatrix, &viewMatrix);
	D3DXMatrixTranspose(&projectionMatrix, &projectionMatrix);

	// Lock the constant buffer so it can be written to.
	result = deviceContext->Map(m_matrixBuffer, 0, D3D11_MAP_WRITE_DISCARD, 0, &mappedResource);
	if(FAILED(result))
	{
		return false;
	}

	// Get a pointer to the data in the constant buffer.
	dataPtr = (MatrixBufferType*)mappedResource.pData;

	// Copy the matrices into the constant buffer.
	dataPtr->world = worldMatrix;
	dataPtr->view = viewMatrix;
	dataPtr->projection = projectionMatrix;

	// Unlock the constant buffer.
	deviceContext->Unmap(m_matrixBuffer, 0);

	// Set the position of the constant buffer in the vertex shader.
	bufferNumber = 0;

	// Now set the constant buffer in the vertex shader with the updated values.
	deviceContext->VSSetConstantBuffers(bufferNumber, 1, &m_matrixBuffer);

	// Set shader texture resource in the pixel shader.
	deviceContext->PSSetShaderResources(0, 1, &texture);


라이트 상수 버퍼는 행렬 상수 버퍼와 동일한 방법으로 설정됩니다. 먼저 버퍼를 락하고 포인터를 얻습니다. 그리고 그 포인터를 이용하여 분산색상과 빛 방향을 설정합니다. 데이터가 설정되고 나면 버퍼의 락을 풀고 픽셀 쉐이더에 넣습니다. 여기서 주의할 점은 VSSetConstantBuffers() 함수가 아니라 PSSetConstantBuffers() 함수 입니다. 설정하는 곳이 픽셀 쉐이더이기 때문입니다.


	// Lock the light constant buffer so it can be written to.
	result = deviceContext->Map(m_lightBuffer, 0, D3D11_MAP_WRITE_DISCARD, 0, &mappedResource);
	if(FAILED(result))
	{
		return false;
	}

	// Get a pointer to the data in the constant buffer.
	dataPtr2 = (LightBufferType*)mappedResource.pData;

	// Copy the lighting variables into the constant buffer.
	dataPtr2->diffuseColor = diffuseColor;
	dataPtr2->lightDirection = lightDirection;
	dataPtr2->padding = 0.0f;

	// Unlock the constant buffer.
	deviceContext->Unmap(m_lightBuffer, 0);

	// Set the position of the light constant buffer in the pixel shader.
	bufferNumber = 0;

	// Finally set the light constant buffer in the pixel shader with the updated values.
	deviceContext->PSSetConstantBuffers(bufferNumber, 1, &m_lightBuffer);

	return true;
}


void LightShaderClass::RenderShader(ID3D11DeviceContext* deviceContext, int indexCount)
{
	// Set the vertex input layout.
	deviceContext->IASetInputLayout(m_layout);

	// Set the vertex and pixel shaders that will be used to render this triangle.
	deviceContext->VSSetShader(m_vertexShader, NULL, 0);
	deviceContext->PSSetShader(m_pixelShader, NULL, 0);

	// Set the sampler state in the pixel shader.
	deviceContext->PSSetSamplers(0, 1, &m_sampleState);

	// Render the triangle.
	deviceContext->DrawIndexed(indexCount, 0, 0);

	return;
}


Modelclass.h


ModelClass는 조명 처리를 위해 조금 수정되었습니다.


////////////////////////////////////////////////////////////////////////////////
// Filename: modelclass.h
////////////////////////////////////////////////////////////////////////////////
#ifndef _MODELCLASS_H_
#define _MODELCLASS_H_


//////////////
// INCLUDES //
//////////////
#include <d3d11.h>
#include <d3dx10math.h>


///////////////////////
// MY CLASS INCLUDES //
///////////////////////
#include "textureclass.h"


////////////////////////////////////////////////////////////////////////////////
// Class name: ModelClass
////////////////////////////////////////////////////////////////////////////////
class ModelClass
{
private:


VertexType 구조체에 법선 벡터 변수가 추가되었습니다.


	struct VertexType
	{
		D3DXVECTOR3 position;
		D3DXVECTOR2 texture;
		D3DXVECTOR3 normal;
	};

public:
	ModelClass();
	ModelClass(const ModelClass&);
	~ModelClass();

	bool Initialize(ID3D11Device*, WCHAR*);
	void Shutdown();
	void Render(ID3D11DeviceContext*);

	int GetIndexCount();
	ID3D11ShaderResourceView* GetTexture();


private:
	bool InitializeBuffers(ID3D11Device*);
	void ShutdownBuffers();
	void RenderBuffers(ID3D11DeviceContext*);

	bool LoadTexture(ID3D11Device*, WCHAR*);
	void ReleaseTexture();

private:
	ID3D11Buffer *m_vertexBuffer, *m_indexBuffer;
	int m_vertexCount, m_indexCount;
	TextureClass* m_Texture;
};

#endif


Modelclass.cpp


////////////////////////////////////////////////////////////////////////////////
// Filename: modelclass.cpp
////////////////////////////////////////////////////////////////////////////////
#include "modelclass.h"


ModelClass::ModelClass()
{
	m_vertexBuffer = 0;
	m_indexBuffer = 0;
	m_Texture = 0;
}


ModelClass::ModelClass(const ModelClass& other)
{
}


ModelClass::~ModelClass()
{
}


bool ModelClass::Initialize(ID3D11Device* device, WCHAR* textureFilename)
{
	bool result;


	// Initialize the vertex and index buffers.
	result = InitializeBuffers(device);
	if(!result)
	{
		return false;
	}

	// Load the texture for this model.
	result = LoadTexture(device, textureFilename);
	if(!result)
	{
		return false;
	}

	return true;
}


void ModelClass::Shutdown()
{
	// Release the model texture.
	ReleaseTexture();

	// Shutdown the vertex and index buffers.
	ShutdownBuffers();

	return;
}


void ModelClass::Render(ID3D11DeviceContext* deviceContext)
{
	// Put the vertex and index buffers on the graphics pipeline to prepare them for drawing.
	RenderBuffers(deviceContext);

	return;
}


int ModelClass::GetIndexCount()
{
	return m_indexCount;
}


ID3D11ShaderResourceView* ModelClass::GetTexture()
{
	return m_Texture->GetTexture();
}


bool ModelClass::InitializeBuffers(ID3D11Device* device)
{
	VertexType* vertices;
	unsigned long* indices;
	D3D11_BUFFER_DESC vertexBufferDesc, indexBufferDesc;
	D3D11_SUBRESOURCE_DATA vertexData, indexData;
	HRESULT result;


	// Set the number of vertices in the vertex array.
	m_vertexCount = 3;

	// Set the number of indices in the index array.
	m_indexCount = 3;

	// Create the vertex array.
	vertices = new VertexType[m_vertexCount];
	if(!vertices)
	{
		return false;
	}

	// Create the index array.
	indices = new unsigned long[m_indexCount];
	if(!indices)
	{
		return false;
	}


InitializeBuffers() 함수에서 유일한 변화는 여기 정점 설정입니다. 각 정점은 조명 계산에 관련된 법선을 가집니다. 법선은 폴리곤의 면이 보는 정확한 방향이 계산될 수 있도록 폴리곤의 면에 직각을 이룹니다. 간단하게 각 정점의 z요소를 -1.0f로 즉 카메라를 향하도록 Z축을 따르게 설정합니다.


	// Load the vertex array with data.
	vertices[0].position = D3DXVECTOR3(-1.0f, -1.0f, 0.0f);  // Bottom left.
	vertices[0].texture = D3DXVECTOR2(0.0f, 1.0f);
	vertices[0].normal = D3DXVECTOR3(0.0f, 0.0f, -1.0f);

	vertices[1].position = D3DXVECTOR3(0.0f, 1.0f, 0.0f);  // Top middle.
	vertices[1].texture = D3DXVECTOR2(0.5f, 0.0f);
	vertices[1].normal = D3DXVECTOR3(0.0f, 0.0f, -1.0f);

	vertices[2].position = D3DXVECTOR3(1.0f, -1.0f, 0.0f);  // Bottom right.
	vertices[2].texture = D3DXVECTOR2(1.0f, 1.0f);
	vertices[2].normal = D3DXVECTOR3(0.0f, 0.0f, -1.0f);

	// Load the index array with data.
	indices[0] = 0;  // Bottom left.
	indices[1] = 1;  // Top middle.
	indices[2] = 2;  // Bottom right.

	// Set up the description of the static vertex buffer.
	vertexBufferDesc.Usage = D3D11_USAGE_DEFAULT;
	vertexBufferDesc.ByteWidth = sizeof(VertexType) * m_vertexCount;
	vertexBufferDesc.BindFlags = D3D11_BIND_VERTEX_BUFFER;
	vertexBufferDesc.CPUAccessFlags = 0;
	vertexBufferDesc.MiscFlags = 0;
	vertexBufferDesc.StructureByteStride = 0;

	// Give the subresource structure a pointer to the vertex data.
	vertexData.pSysMem = vertices;
	vertexData.SysMemPitch = 0;
	vertexData.SysMemSlicePitch = 0;

	// Now create the vertex buffer.
	result = device->CreateBuffer(&vertexBufferDesc, &vertexData, &m_vertexBuffer);
	if(FAILED(result))
	{
		return false;
	}

	// Set up the description of the static index buffer.
	indexBufferDesc.Usage = D3D11_USAGE_DEFAULT;
	indexBufferDesc.ByteWidth = sizeof(unsigned long) * m_indexCount;
	indexBufferDesc.BindFlags = D3D11_BIND_INDEX_BUFFER;
	indexBufferDesc.CPUAccessFlags = 0;
	indexBufferDesc.MiscFlags = 0;
	indexBufferDesc.StructureByteStride = 0;

	// Give the subresource structure a pointer to the index data.
	indexData.pSysMem = indices;
	indexData.SysMemPitch = 0;
	indexData.SysMemSlicePitch = 0;

	// Create the index buffer.
	result = device->CreateBuffer(&indexBufferDesc, &indexData, &m_indexBuffer);
	if(FAILED(result))
	{
		return false;
	}

	// Release the arrays now that the vertex and index buffers have been created and loaded.
	delete [] vertices;
	vertices = 0;

	delete [] indices;
	indices = 0;

	return true;
}


void ModelClass::ShutdownBuffers()
{
	// Release the index buffer.
	if(m_indexBuffer)
	{
		m_indexBuffer->Release();
		m_indexBuffer = 0;
	}

	// Release the vertex buffer.
	if(m_vertexBuffer)
	{
		m_vertexBuffer->Release();
		m_vertexBuffer = 0;
	}

	return;
}


void ModelClass::RenderBuffers(ID3D11DeviceContext* deviceContext)
{
	unsigned int stride;
	unsigned int offset;


	// Set vertex buffer stride and offset.
	stride = sizeof(VertexType); 
	offset = 0;
    
	// Set the vertex buffer to active in the input assembler so it can be rendered.
	deviceContext->IASetVertexBuffers(0, 1, &m_vertexBuffer, &stride, &offset);

	// Set the index buffer to active in the input assembler so it can be rendered.
	deviceContext->IASetIndexBuffer(m_indexBuffer, DXGI_FORMAT_R32_UINT, 0);

	// Set the type of primitive that should be rendered from this vertex buffer, in this case triangles.
	deviceContext->IASetPrimitiveTopology(D3D11_PRIMITIVE_TOPOLOGY_TRIANGLELIST);

	return;
}


bool ModelClass::LoadTexture(ID3D11Device* device, WCHAR* filename)
{
	bool result;


	// Create the texture object.
	m_Texture = new TextureClass;
	if(!m_Texture)
	{
		return false;
	}

	// Initialize the texture object.
	result = m_Texture->Initialize(device, filename);
	if(!result)
	{
		return false;
	}

	return true;
}


void ModelClass::ReleaseTexture()
{
	// Release the texture object.
	if(m_Texture)
	{
		m_Texture->Shutdown();
		delete m_Texture;
		m_Texture = 0;
	}

	return;
}


Lightclass.h


이제 아주 간단한 light 클래스를 살펴보죠. 이 클래스의 목적은 빛의 방향과 색상을 유지하는것이 다 입니다.


////////////////////////////////////////////////////////////////////////////////
// Filename: lightclass.h
////////////////////////////////////////////////////////////////////////////////
#ifndef _LIGHTCLASS_H_
#define _LIGHTCLASS_H_


//////////////
// INCLUDES //
//////////////
#include <d3dx10math.h>


////////////////////////////////////////////////////////////////////////////////
// Class name: LightClass
////////////////////////////////////////////////////////////////////////////////
class LightClass
{
public:
	LightClass();
	LightClass(const LightClass&);
	~LightClass();

	void SetDiffuseColor(float, float, float, float);
	void SetDirection(float, float, float);

	D3DXVECTOR4 GetDiffuseColor();
	D3DXVECTOR3 GetDirection();

private:
	D3DXVECTOR4 m_diffuseColor;
	D3DXVECTOR3 m_direction;
};

#endif


Lightclass.cpp


////////////////////////////////////////////////////////////////////////////////
// Filename: lightclass.cpp
////////////////////////////////////////////////////////////////////////////////
#include "lightclass.h"


LightClass::LightClass()
{
}


LightClass::LightClass(const LightClass& other)
{
}


LightClass::~LightClass()
{
}


void LightClass::SetDiffuseColor(float red, float green, float blue, float alpha)
{
	m_diffuseColor = D3DXVECTOR4(red, green, blue, alpha);
	return;
}


void LightClass::SetDirection(float x, float y, float z)
{
	m_direction = D3DXVECTOR3(x, y, z);
	return;
}


D3DXVECTOR4 LightClass::GetDiffuseColor()
{
	return m_diffuseColor;
}


D3DXVECTOR3 LightClass::GetDirection()
{
	return m_direction;
}


Graphicsclass.h


////////////////////////////////////////////////////////////////////////////////
// Filename: graphicsclass.h
////////////////////////////////////////////////////////////////////////////////
#ifndef _GRAPHICSCLASS_H_
#define _GRAPHICSCLASS_H_


///////////////////////
// MY CLASS INCLUDES //
///////////////////////
#include "d3dclass.h"
#include "cameraclass.h"
#include "modelclass.h"


GraphicsClass는 새로운 클래스 LightShaderClass와 LightClass를 위한 헤더를 인클루드합니다.


#include "lightshaderclass.h"
#include "lightclass.h"


/////////////
// GLOBALS //
/////////////
const bool FULL_SCREEN = true;
const bool VSYNC_ENABLED = true;
const float SCREEN_DEPTH = 1000.0f;
const float SCREEN_NEAR = 0.1f;


////////////////////////////////////////////////////////////////////////////////
// Class name: GraphicsClass
////////////////////////////////////////////////////////////////////////////////
class GraphicsClass
{
public:
	GraphicsClass();
	GraphicsClass(const GraphicsClass&);
	~GraphicsClass();

	bool Initialize(int, int, HWND);
	void Shutdown();
	bool Frame();

private:


Render() 함수는 입력으로 float 하나를 받도록 바뀌었습니다.


	bool Render(float);

private:
	D3DClass* m_D3D;
	CameraClass* m_Camera;
	ModelClass* m_Model;


라이트 쉐이더와 라이트 객체를 위한 새 private 속성 멤버 두개가 추가되었습니다.


	LightShaderClass* m_LightShader;
	LightClass* m_Light;
};

#endif


Graphicsclass.cpp


////////////////////////////////////////////////////////////////////////////////
// Filename: graphicsclass.cpp
////////////////////////////////////////////////////////////////////////////////
#include "graphicsclass.h"


GraphicsClass::GraphicsClass()
{
	m_D3D = 0;
	m_Camera = 0;
	m_Model = 0;


라이트 쉐이더와 라이트 객체는 생성자에서 null로 초기화 됩니다.


	m_LightShader = 0;
	m_Light = 0;
}


GraphicsClass::GraphicsClass(const GraphicsClass& other)
{
}


GraphicsClass::~GraphicsClass()
{
}


bool GraphicsClass::Initialize(int screenWidth, int screenHeight, HWND hwnd)
{
	bool result;


	// Create the Direct3D object.
	m_D3D = new D3DClass;
	if(!m_D3D)
	{
		return false;
	}

	// Initialize the Direct3D object.
	result = m_D3D->Initialize(screenWidth, screenHeight, VSYNC_ENABLED, hwnd, FULL_SCREEN, SCREEN_DEPTH, SCREEN_NEAR);
	if(!result)
	{
		MessageBox(hwnd, L"Could not initialize Direct3D.", L"Error", MB_OK);
		return false;
	}

	// Create the camera object.
	m_Camera = new CameraClass;
	if(!m_Camera)
	{
		return false;
	}

	// Set the initial position of the camera.
	m_Camera->SetPosition(0.0f, 0.0f, -10.0f);
	
	// Create the model object.
	m_Model = new ModelClass;
	if(!m_Model)
	{
		return false;
	}

	// Initialize the model object.
	result = m_Model->Initialize(m_D3D->GetDevice(), L"../Engine/data/seafloor.dds");
	if(!result)
	{
		MessageBox(hwnd, L"Could not initialize the model object.", L"Error", MB_OK);
		return false;
	}


라이트 쉐이더 객체는 여기서 생성되고 초기화 됩니다.


	// Create the light shader object.
	m_LightShader = new LightShaderClass;
	if(!m_LightShader)
	{
		return false;
	}

	// Initialize the light shader object.
	result = m_LightShader->Initialize(m_D3D->GetDevice(), hwnd);
	if(!result)
	{
		MessageBox(hwnd, L"Could not initialize the light shader object.", L"Error", MB_OK);
		return false;
	}


라이트 객체는 여기서 생성됩니다.


	// Create the light object.
	m_Light = new LightClass;
	if(!m_Light)
	{
		return false;
	}


빛 색상은 보라색으로 설정하고 빛 방향은 Z축 +방향으로 설정합니다.


	// Initialize the light object.
	m_Light->SetDiffuseColor(1.0f, 0.0f, 1.0f, 1.0f);
	m_Light->SetDirection(0.0f, 0.0f, 1.0f);

	return true;
}


void GraphicsClass::Shutdown()
{


Shutdown() 함수는 라이트, 라이트 쉐이더 객체를 해제합니다.


	// Release the light object.
	if(m_Light)
	{
		delete m_Light;
		m_Light = 0;
	}

	// Release the light shader object.
	if(m_LightShader)
	{
		m_LightShader->Shutdown();
		delete m_LightShader;
		m_LightShader = 0;
	}

	// Release the model object.
	if(m_Model)
	{
		m_Model->Shutdown();
		delete m_Model;
		m_Model = 0;
	}

	// Release the camera object.
	if(m_Camera)
	{
		delete m_Camera;
		m_Camera = 0;
	}

	// Release the D3D object.
	if(m_D3D)
	{
		m_D3D->Shutdown();
		delete m_D3D;
		m_D3D = 0;
	}

	return;
}


bool GraphicsClass::Frame()
{
	bool result;


매 프레임마다 Render() 함수로 넘길 회전값을 유지할 새로운 정적 변수를 추가합니다.


	static float rotation = 0.0f;


	// Update the rotation variable each frame.
	rotation += (float)D3DX_PI * 0.01f;
	if(rotation > 360.0f)
	{
		rotation -= 360.0f;
	}
	
	// Render the graphics scene.
	result = Render(rotation);
	if(!result)
	{
		return false;
	}

	return true;
}


bool GraphicsClass::Render(float rotation)
{
	D3DXMATRIX worldMatrix, viewMatrix, projectionMatrix;
	bool result;


	// Clear the buffers to begin the scene.
	m_D3D->BeginScene(0.0f, 0.0f, 0.0f, 1.0f);

	// Generate the view matrix based on the camera's position.
	m_Camera->Render();

	// Get the world, view, and projection matrices from the camera and d3d objects.
	m_Camera->GetViewMatrix(viewMatrix);
	m_D3D->GetWorldMatrix(worldMatrix);
	m_D3D->GetProjectionMatrix(projectionMatrix);


여기서 위에서 설정한 회전값으로 월드 행렬을 회전함으로 삼각하여 렌더링시 회전값에 따라 돌아가는 삼각형을 보실 수 있습니다.


	// Rotate the world matrix by the rotation value so that the triangle will spin.
	D3DXMatrixRotationY(&worldMatrix, rotation);

	// Put the model vertex and index buffers on the graphics pipeline to prepare them for drawing.
	m_Model->Render(m_D3D->GetDeviceContext());


라이트 쉐이더는 삼각형 렌더링을 위해 여기서 호출됩니다. 라이트 객체는 라이트 쉐이더의 Render() 함수로 빛 색상과 방향을 보내어 쉐이더가 값을 접근할 수 있게 합니다.


	// Render the model using the light shader.
	result = m_LightShader->Render(m_D3D->GetDeviceContext(), m_Model->GetIndexCount(), worldMatrix, viewMatrix, projectionMatrix, 
				       m_Model->GetTexture(), m_Light->GetDirection(), m_Light->GetDiffuseColor());
	if(!result)
	{
		return false;
	}

	// Present the rendered scene to the screen.
	m_D3D->EndScene();

	return true;
}


요약


코드 수정은 별로 하지 않았지만 기본 방향 조명을 적용할 수 있게 되었습니다. (짝짝짝!) 법선 벡터가 어떻게 동작하고 조명 계산시 왜 중요한지 확실히 이해하시기 바랍니다. 돌아가는 삼각형은 뒷면은 D3DClass에서 back face culling(뒷면 제거)를 하여 비춰지지 않는 것을 기억하시기 바랍니다.


연습하기


1. 프로젝트를 재컴파일하고 보라색광에 텍스쳐가 적용된 회전하는 삼각형이 보이는지 확인하시고 Esc버튼으로 종료시키세요.


2. shaderTexture를 더이상 사용하지않고 텍스쳐 없이 조명효과를 보기위해 픽셀 쉐이더에 "color = color * textureColor;" 부분을 주석처리 하세요.


3. GraphicsClass의 m_Light->SetDiffuseColor 라인에서 빛 색상을 초록색으로 바꾸세요.


4. 빛 방향을 X축의 -방향, +방향으로 바꾸어보세요. 또 회전 속도도 올려보세요.


728x90
728x90

원문 : http://www.rastertek.com/dx11tut05.htmld


Tutorial 5: Texturing


이번 강좌는 DirectX 11에서 텍스쳐링을 어떻게 사용하지 설명할 것입니다. 텍스쳐링은 사진이나 이미지를 폴리곤의 면에 적용하여 씬에 실사적으로 묘사해 줍니다. 예를들어 이번 강좌에서는 다음 이미지를 사용할 것입니다.


그리고 저번 강좌의 폴리곤에 다음과 같이 적용할 것입니다.


우리가 사용할 텍스쳐의 포맷은 .dds 파일입니다. 이는 Direct Draw Surface 포맷으로 DirectX에서 사용합니다. .dds 파일을 생성하는데 사용하는 툴은 DIrectX SDK에 포함되어 있습니다. DirectX Utilities에 속하고 DirectX Texture Tool 이라고 부릅니다. 여러분은 어떤 사이즈나 포맷이든 텍스쳐를 만들 수 있으며 다른 텍스쳐를 잘라서 붙이고 .dds 파일로 저장할 수도 있습니다. 사용하기 매우 간단합니다.


코드를 살펴보기 전에 먼저 텍스쳐 맵핑이 어떻게 동작하는지에 대해 논의하여야 합니다. .dds 파일 이미지에서 폴리곤으로 픽셀을 맵핑하기 위해 '텍셀(texel = texture + pixel) 좌표계'라고 부르는 것을 사용합니다. 이 좌표계는 픽셀의 정수값을 0.0f ~ 1.0f사이의 실수값으로 변환합니다. 예를들어 텍스쳐의 너비가 256픽셀 일때 첫번째 픽셀은 0.0f 으로 맵핑되고 256번째 픽셀은 1.0f로 맵핑되고 128번째인 중간 픽셀은 0.5f로 맵핑됩니다.


텍셀 좌표계에서 너비값을 "U", 높이값을 "V"라고 부릅니다. 너비는 왼쪽부터 0.0, 오른쪽 끝이 1.0이고 높이는 위쪽부터 0.0, 맨 아래가 1.0입니다. 예를 들어 좌상단은 U 0.0, V 0.0 을 우하단은 U 1.0, V 1.0 을 나타냅니다. 아래 텍셀 좌표계를 설명하기 위해 그림을 만들었습니다.


이제 텍스쳐를 폴리곤에 어떻게 맵핑하는지 기본은 알았음으로 이번 강좌에 새로 업데이트된 프레임워크를 보겠습니다.


이전 강좌 이후 프레임워크의 새로운 변화는 ModelClass안에 TextureClass가 추가된 것과 새로운 TextureShaderClass가 ColorShaderClass를 대체한 것입니다. 먼저 HLSL 텍스쳐 쉐이더를 보는 것으로 코드탐방을 시작합니다.


Texture.vs


텍스쳐 버텍스 쉐이더는 텍스쳐링을 위한 부분을 제외하고 이전 color 쉐이더와 매우 비슷합니다.


////////////////////////////////////////////////////////////////////////////////
// Filename: texture.vs
////////////////////////////////////////////////////////////////////////////////


/////////////
// GLOBALS //
/////////////
cbuffer MatrixBuffer
{
    matrix worldMatrix;
    matrix viewMatrix;
    matrix projectionMatrix;
};


더이상 버텍스 타입에서 색상을 사용하지 않고 대신에 텍스쳐 좌표를 사용합니다. 텍스쳐 좌표는 실수인 U, V 두개를 가지기 때문에 float2형을 사용합니다. 버텍스, 픽셀 쉐이더를 위한 텍스쳐 좌표의 의미(예약어?)는 TEXCOORD0입니다. 0부터 어떤숫자든 필요한 텍스쳐 좌표만큼 만들 수 있습니다.

////////////// // TYPEDEFS // ////////////// struct VertexInputType { float4 position : POSITION; float2 tex : TEXCOORD0; }; struct PixelInputType { float4 position : SV_POSITION; float2 tex : TEXCOORD0; }; //////////////////////////////////////////////////////////////////////////////// // Vertex Shader //////////////////////////////////////////////////////////////////////////////// PixelInputType TextureVertexShader(VertexInputType input) { PixelInputType output; // 행렬연산을 위해 위치벡터 4번째 요소에 1을 대입합니다. input.position.w = 1.0f; // 월드, 뷰, 투영 행렬에 대해 정점의 좌표를 계산합니다. output.position = mul(input.position, worldMatrix); output.position = mul(output.position, viewMatrix); output.position = mul(output.position, projectionMatrix);

이번 강좌의 color 버텍스 쉐이더와 비교하여 텍스쳐 버텍스 쉐이더의 다른점은 입력 버텍스로부터 색상의 복사를 취하는 대신 텍스쳐 좌표를 복사하여 픽셀 쉐이더로 넘깁니다.

// 픽셀 쉐이더를 위해 텍스쳐 좌표를 저장합니다. output.tex = input.tex; return output; }


Texture.ps


////////////////////////////////////////////////////////////////////////////////
// Filename: texture.ps
////////////////////////////////////////////////////////////////////////////////


텍스쳐 픽셀 쉐이더는 2개의 전역 변수를 가집닏. 하나는 텍스쳐 리소스인 Texture2D shaderTexture 입니다. 이것은 모델에 텍스쳐를 렌더링할때 사용될 텍스쳐 리소스가 될 것입니다. 두번째는 SamplerState SampleType 입니다. sampler state는 픽셀이 폴리곤의 면에 어떻게 쓰여질지를 바꾸도록 해줍니다. 예를 들어 폴리곤이 엄청 멀리 있어서 화면상에 8픽셀로만 구성될 때 sample state을 사용하여 원래 텍스쳐의 어떤 픽셀 혹은 픽셀 결합이 실제로 그려질지를 알아냅니다. 본래 텍스쳐가 256x256 이라면 어떤 픽셀이 실제로 그려질지를 결정하는 것은 해당 텍스쳐가 멀어서 작게보일때 여전히 같은 물체로 보여야 하므로 매우 중요합니다. TextureShaderClass에 sampler state를 설정하고 리소스 포인터에 붙여 픽셀셀 쉐이더가 그릴 픽셀의 샘플을 결정하는데 사용하도록 할 것입니다.


/////////////
// GLOBALS //
/////////////
Texture2D shaderTexture;
SamplerState SampleType;


텍스처 픽셀 쉐이더의 PixelInputType은 색상값 대신에 텍스쳐 좌표를 사용하는 것으로 바뀌었습니다.


//////////////
// TYPEDEFS //
//////////////
struct PixelInputType
{
    float4 position : SV_POSITION;
    float2 tex : TEXCOORD0;
};


픽셀 쉐이더는 HLSL sample 함수를 사용하는 것으로 바뀌었습니다. sample 함수는 우리가 위에서 정의한 sample state와 픽셀을 위한 텍스쳐 좌표를 사용합니다. 이 두 변수를 폴리곤 면의 UV 위치에 대한 픽셀값을 결정하고 반환하는데 사용합니다.

//////////////////////////////////////////////////////////////////////////////// // Pixel Shader //////////////////////////////////////////////////////////////////////////////// float4 TexturePixelShader(PixelInputType input) : SV_TARGET { float4 textureColor; // 텍스쳐 좌표 위치에서 sampler를 사용하여 텍스쳐로부터 픽셀 색상을 적용합니다. textureColor = shaderTexture.Sample(SampleType, input.tex); return textureColor; }


Textureclass.h


TextureClass는 텍스처 리소스에 대한 로딩, 언로딩, 접근을 캡슐화 합니다. 각 텍스쳐는 반드시 이 실체화된 클래스 객체를 필요로 합니다.


////////////////////////////////////////////////////////////////////////////////
// Filename: textureclass.h
////////////////////////////////////////////////////////////////////////////////
#ifndef _TEXTURECLASS_H_
#define _TEXTURECLASS_H_


//////////////
// INCLUDES //
//////////////
#include <d3d11.h>
#include <d3dx11tex.h>


////////////////////////////////////////////////////////////////////////////////
// Class name: TextureClass
////////////////////////////////////////////////////////////////////////////////
class TextureClass
{
public:
	TextureClass();
	TextureClass(const TextureClass&);
	~TextureClass();


첫 2개의 함수는 넘겨 받은 파일이름의 파일로부터 텍스쳐를 로딩하고 더이상 필요 없을때 언로딩합니다.


	bool Initialize(ID3D11Device*, WCHAR*);
	void Shutdown();


GetTexture() 함수는 쉐이더가 렌더링하는데 사용할 수 있도록 텍스쳐 리소스에 대한 포인터를 반환합니다.


	ID3D11ShaderResourceView* GetTexture();

private:


이것은 private속성의 텍스쳐 리소스입니다.


	ID3D11ShaderResourceView* m_texture;
};

#endif


Textureclass.cpp


////////////////////////////////////////////////////////////////////////////////
// Filename: textureclass.cpp
////////////////////////////////////////////////////////////////////////////////
#include "textureclass.h"


클래스 생성자는 텍스쳐 리소스 포인터를 null로 초기화합니다.


TextureClass::TextureClass()
{
	m_texture = 0;
}


TextureClass::TextureClass(const TextureClass& other)
{
}


TextureClass::~TextureClass()
{
}


Initialize() 함수는 Direct3D 디바이스아 텍스쳐 파일이름을 가지고 m_texture라 부르는 쉐이더 리소스 변수에 텍스쳐 파일을 로딩합니다. 그럼 텍스쳐는 렌더링하는데 사용될 수 있습니다.

bool TextureClass::Initialize(ID3D11Device* device, WCHAR* filename) { HRESULT result; // 텍스쳐 로딩 result = D3DX11CreateShaderResourceViewFromFile(device, filename, NULL, NULL, &m_texture, NULL); if(FAILED(result)) { return false; } return true; }

Shutdown() 함수는 텍스쳐 리소스가 로딩되어있으면 해제하고 포인터를 null로 설정합니다.

void TextureClass::Shutdown() { // 텍스처 리소스 해제. if(m_texture) { m_texture->Release(); m_texture = 0; } return; }

GetTexture() 다른 객체에서 텍스쳐를 렌더링에 사용하기 위해 텍스쳐 쉐이더 리소스로 접근할때 사용하는 함수입니다.


ID3D11ShaderResourceView* TextureClass::GetTexture()
{
	return m_texture;
}


Modelclass.h


ModelClass는 이전 강좌 이후 텍스쳐링을 수용하기 위해 바뀌었습니다.


////////////////////////////////////////////////////////////////////////////////
// Filename: modelclass.h
////////////////////////////////////////////////////////////////////////////////
#ifndef _MODELCLASS_H_
#define _MODELCLASS_H_


//////////////
// INCLUDES //
//////////////
#include <d3d11.h>
#include <d3dx10math.h>


TextureClass 헤더는 ModelClass헤더에 인클루드 되었습니다.


///////////////////////
// MY CLASS INCLUDES //
///////////////////////
#include "textureclass.h"


////////////////////////////////////////////////////////////////////////////////
// Class name: ModelClass
////////////////////////////////////////////////////////////////////////////////
class ModelClass
{
private:


VertexType은 색상 요소를 텍스쳐 좌표 요소로 대체되었습니다. 텍스쳐 좌표는 이전 강좌에서 쓰인 초록색을 대신합니다.


	struct VertexType
	{
		D3DXVECTOR3 position;
		D3DXVECTOR2 texture;
	};

public:
	ModelClass();
	ModelClass(const ModelClass&);
	~ModelClass();

	bool Initialize(ID3D11Device*, WCHAR*);
	void Shutdown();
	void Render(ID3D11DeviceContext*);

	int GetIndexCount();


ModelClass도 GetTexture() 함수를 가짐으로 텍스쳐 리소스를 모델을 그릴 쉐이더로 보낼 수 있습니다.


	ID3D11ShaderResourceView* GetTexture();

private:
	bool InitializeBuffers(ID3D11Device*);
	void ShutdownBuffers();
	void RenderBuffers(ID3D11DeviceContext*);


ModelClass는 모델을 렌더링하는데 쓰일 텍스쳐를 로딩하고 언로딩하는 private속성의 LoadTexture()와 ReleaseTexture()를 가집니다.


	bool LoadTexture(ID3D11Device*, WCHAR*);
	void ReleaseTexture();

private:
	ID3D11Buffer *m_vertexBuffer, *m_indexBuffer;
	int m_vertexCount, m_indexCount;


m_Texture 변수는 모델을 위한 텍스쳐 리소스를 로딩하고 해제하고 접근하는데 사용됩니다.


	TextureClass* m_Texture;
};

#endif


Modelclass.cpp


////////////////////////////////////////////////////////////////////////////////
// Filename: modelclass.cpp
////////////////////////////////////////////////////////////////////////////////
#include "modelclass.h"


ModelClass::ModelClass()
{
	m_vertexBuffer = 0;
	m_indexBuffer = 0;


생성자는 새 텍스쳐 객체를 null로 초기화합니다.


	m_Texture = 0;
}


ModelClass::ModelClass(const ModelClass& other)
{
}


ModelClass::~ModelClass()
{
}


Initialize() 함수는 입력으로 모델이 사용할 .dds 텍스쳐 파일 이름도 필요합니다.


bool ModelClass::Initialize(ID3D11Device* device, WCHAR* textureFilename) { bool result; // 삼각형의 기하정보를 가지고 있는 버텍스, 인덱스 버퍼를 초기화합니다. result = InitializeBuffers(device); if(!result) { return false; }


이제 Initialize() 함수는 텍스쳐를 로딩할 새 private 함수를 호출합니다.

// 현재 모델을 위한 텍스쳐를 로딩합니다. result = LoadTexture(device, textureFilename); if(!result) { return false; } return true; } void ModelClass::Shutdown() {

이제 Shutdown() 함수는 초기화에서 로딩했던 텍스쳐 객체를 해제하기 위해 새 private 함수를 호출합니다.

// 모델 텍스쳐를 해제합니다. ReleaseTexture(); // 버텍스, 인덱스 버퍼를 해제합니다. ShutdownBuffers(); return; } void ModelClass::Render(ID3D11DeviceContext* deviceContext) { // 그리기 위해 버텍스, 인덱스 버퍼를 준비하도록 그래픽 파이프라인에 넣습니다. RenderBuffers(deviceContext); return; } int ModelClass::GetIndexCount() { return m_indexCount; }

GetTexture() 함수는 모델 텍스쳐 리소스를 반환합니다. 텍스쳐 쉐이더는 모델을 렌더링하기 위해 이 텍스쳐에 접근해야 합니다.

ID3D11ShaderResourceView* ModelClass::GetTexture() { return m_Texture->GetTexture(); } bool ModelClass::InitializeBuffers(ID3D11Device* device) { VertexType* vertices; unsigned long* indices; D3D11_BUFFER_DESC vertexBufferDesc, indexBufferDesc; D3D11_SUBRESOURCE_DATA vertexData, indexData; HRESULT result; // 버텍스 배열에 정점 개수 설정. m_vertexCount = 3; // 인덱스 배열에 인덱스 개수 설정. m_indexCount = 3; // 버텍스 배열 생성. vertices = new VertexType[m_vertexCount]; if(!vertices) { return false; } // 인덱스 배열 설정. indices = new unsigned long[m_indexCount]; if(!indices) { return false; }

버텍스 배열은 이제 색상 요소 대신 텍스쳐 요소를 가집니다. 텍스쳐 벡터는 항상 첫번쨰는 U이고 2번째는 V입니다. 예를 들어 텍스쳐 좌표가 삼각형의 왼쪽 아래이면 U 0.0, V 1.0에 상응합니다. 헷갈리시는 분들은 이 강좌 맨 위에 UV좌표 그림을 보시면 이해가 가실 겁니다.(U는 가장 왼쪽이 0.0, V는 가장 위쪽이 0.0) 텍스쳐의 어느 부분에서 폴리곤 면의 어느 부분으로 맵핑하기 위해 좌표계를 바꿀 수 있어야 하는 것을 기억하시기 바랍니다. 이번 강좌에서는 맵핑을 간단하게 직접 넣었습니다.


	// Load the vertex array with data.
	vertices[0].position = D3DXVECTOR3(-1.0f, -1.0f, 0.0f);  // Bottom left.
	vertices[0].texture = D3DXVECTOR2(0.0f, 1.0f);

	vertices[1].position = D3DXVECTOR3(0.0f, 1.0f, 0.0f);  // Top middle.
	vertices[1].texture = D3DXVECTOR2(0.5f, 0.0f);

	vertices[2].position = D3DXVECTOR3(1.0f, -1.0f, 0.0f);  // Bottom right.
	vertices[2].texture = D3DXVECTOR2(1.0f, 1.0f);

	// Load the index array with data.
	indices[0] = 0;  // Bottom left.
	indices[1] = 1;  // Top middle.
	indices[2] = 2;  // Bottom right.

	// Set up the description of the vertex buffer.
	vertexBufferDesc.Usage = D3D11_USAGE_DEFAULT;
	vertexBufferDesc.ByteWidth = sizeof(VertexType) * m_vertexCount;
	vertexBufferDesc.BindFlags = D3D11_BIND_VERTEX_BUFFER;
	vertexBufferDesc.CPUAccessFlags = 0;
	vertexBufferDesc.MiscFlags = 0;
	vertexBufferDesc.StructureByteStride = 0;

	// Give the subresource structure a pointer to the vertex data.
	vertexData.pSysMem = vertices;
	vertexData.SysMemPitch = 0;
	vertexData.SysMemSlicePitch = 0;

	// Now create the vertex buffer.
	result = device->CreateBuffer(&vertexBufferDesc, &vertexData, &m_vertexBuffer);
	if(FAILED(result))
	{
		return false;
	}

	// Set up the description of the static index buffer.
	indexBufferDesc.Usage = D3D11_USAGE_DEFAULT;
	indexBufferDesc.ByteWidth = sizeof(unsigned long) * m_indexCount;
	indexBufferDesc.BindFlags = D3D11_BIND_INDEX_BUFFER;
	indexBufferDesc.CPUAccessFlags = 0;
	indexBufferDesc.MiscFlags = 0;
	indexBufferDesc.StructureByteStride = 0;

	// Give the subresource structure a pointer to the index data.
	indexData.pSysMem = indices;

	// Create the index buffer.
	result = device->CreateBuffer(&indexBufferDesc, &indexData, &m_indexBuffer);
	if(FAILED(result))
	{
		return false;
	}

	// Release the arrays now that the vertex and index buffers have been created and loaded.
	delete [] vertices;
	vertices = 0;

	delete [] indices;
	indices = 0;

	return true;
}


void ModelClass::ShutdownBuffers()
{
	// Release the index buffer.
	if(m_indexBuffer)
	{
		m_indexBuffer->Release();
		m_indexBuffer = 0;
	}

	// Release the vertex buffer.
	if(m_vertexBuffer)
	{
		m_vertexBuffer->Release();
		m_vertexBuffer = 0;
	}

	return;
}


void ModelClass::RenderBuffers(ID3D11DeviceContext* deviceContext)
{
	unsigned int stride;
	unsigned int offset;


	// Set vertex buffer stride and offset.
	stride = sizeof(VertexType); 
	offset = 0;
    
	// Set the vertex buffer to active in the input assembler so it can be rendered.
	deviceContext->IASetVertexBuffers(0, 1, &m_vertexBuffer, &stride, &offset);

	// Set the index buffer to active in the input assembler so it can be rendered.
	deviceContext->IASetIndexBuffer(m_indexBuffer, DXGI_FORMAT_R32_UINT, 0);

	// Set the type of primitive that should be rendered from this vertex buffer, in this case triangles.
	deviceContext->IASetPrimitiveTopology(D3D11_PRIMITIVE_TOPOLOGY_TRIANGLELIST);

	return;
}


LoadTexture() 함수는 텍스쳐 객체를 생성하고 입력으로 들어온 파일 이름과 디바이스로 초기화하는 새 private 함수입니다. 이 함수는 초기화시 호출됩니다.

bool ModelClass::LoadTexture(ID3D11Device* device, WCHAR* filename) { bool result; // 텍스쳐 객체 생성. m_Texture = new TextureClass; if(!m_Texture) { return false; } // 텍스쳐 객체 초기화. result = m_Texture->Initialize(device, filename); if(!result) { return false; } return true; }

ReleaseTexture() 함수는 LoadTexture() 함수에서 생성되고 로딩된 텍스쳐 객체를 해제할 것입니다.

void ModelClass::ReleaseTexture() { // 텍스쳐 객체 해제. if(m_Texture) { m_Texture->Shutdown(); delete m_Texture; m_Texture = 0; } return; }


Textureshaderclass.h


TextureShaderClass는 이전 강좌의 ColorShaderClass의 업데이트된 버전입니다. 이 클래스는 버텍스, 픽셀 쉐이더를 이용하여 3D 모델을 그리는데 사용될 것입니다.


////////////////////////////////////////////////////////////////////////////////
// Filename: textureshaderclass.h
////////////////////////////////////////////////////////////////////////////////
#ifndef _TEXTURESHADERCLASS_H_
#define _TEXTURESHADERCLASS_H_


//////////////
// INCLUDES //
//////////////
#include <d3d11.h>
#include <d3dx10math.h>
#include <d3dx11async.h>
#include <fstream>
using namespace std;


////////////////////////////////////////////////////////////////////////////////
// Class name: TextureShaderClass
////////////////////////////////////////////////////////////////////////////////
class TextureShaderClass
{
private:
	struct MatrixBufferType
	{
		D3DXMATRIX world;
		D3DXMATRIX view;
		D3DXMATRIX projection;
	};

public:
	TextureShaderClass();
	TextureShaderClass(const TextureShaderClass&);
	~TextureShaderClass();

	bool Initialize(ID3D11Device*, HWND);
	void Shutdown();
	bool Render(ID3D11DeviceContext*, int, D3DXMATRIX,
                                       D3DXMATRIX, D3DXMATRIX, ID3D11ShaderResourceView*);

private: bool InitializeShader(ID3D11Device*, HWND, WCHAR*, WCHAR*); void ShutdownShader(); void OutputShaderErrorMessage(ID3D10Blob*, HWND, WCHAR*); bool SetShaderParameters(ID3D11DeviceContext*, D3DXMATRIX,

D3DXMATRIX, D3DXMATRIX, ID3D11ShaderResourceView*); void RenderShader(ID3D11DeviceContext*, int); private: ID3D11VertexShader* m_vertexShader; ID3D11PixelShader* m_pixelShader; ID3D11InputLayout* m_layout; ID3D11Buffer* m_matrixBuffer;


sampler state에 대한 새 private 포인터 변수가 있습니다. 이 포인터는 텍스쳐 쉐이더에 대한 인터페이스로 사용될 것입니다.


	ID3D11SamplerState* m_sampleState;
};

#endif


Textureshaderclass.cpp


////////////////////////////////////////////////////////////////////////////////
// Filename: textureshaderclass.cpp
////////////////////////////////////////////////////////////////////////////////
#include "textureshaderclass.h"


TextureShaderClass::TextureShaderClass()
{
	m_vertexShader = 0;
	m_pixelShader = 0;
	m_layout = 0;
	m_matrixBuffer = 0;


새 sampler 변수는 생성자에서 null로 설정됩니다.


	m_sampleState = 0;
}


TextureShaderClass::TextureShaderClass(const TextureShaderClass& other)
{
}


TextureShaderClass::~TextureShaderClass()
{
}


bool TextureShaderClass::Initialize(ID3D11Device* device, HWND hwnd)
{
	bool result;


새 texture.vs 와 texture.ps HLSL 파일은 이 쉐이더를 위해 로딩됩니다.

// 버텍스, 픽셀 쉐이더를 초기화합니다. result = InitializeShader(device, hwnd, L"../Engine/texture.vs", L"../Engine/texture.ps"); if(!result) { return false; } return true; }

Shutdown() 함수는 쉐이더를 해제하는 함수를 호출합니다.

void TextureShaderClass::Shutdown() { // 버텍스, 픽셀 쉐이더와 관련 객체들을 정리합니다. ShutdownShader(); return; }

Render() 함수는 텍스처 리소스에 대한 포인터인 texture라 부르는 파라미터가 늘었습니다. SetShaderParameters() 함수로 보내져서 쉐이더에서 설정되어 렌더링에 사용됩니다.

bool TextureShaderClass::Render(ID3D11DeviceContext* deviceContext, int indexCount,

D3DXMATRIX worldMatrix, D3DXMATRIX viewMatrix,

D3DXMATRIX projectionMatrix, ID3D11ShaderResourceView* texture)

{ bool result; // 렌더링에 사용할 쉐이더 파라미터를 설정합니다. result = SetShaderParameters(deviceContext, worldMatrix, viewMatrix, projectionMatrix, texture); if(!result) { return false; } // 준비된 버퍼를 쉐이더로 렌더링합니다. RenderShader(deviceContext, indexCount); return true; }

InitializeShader() 함수는 텍스쳐 쉐이더를 설정합니다.


bool TextureShaderClass::InitializeShader(ID3D11Device* device, HWND hwnd,
                                                             WCHAR* vsFilename, WCHAR* psFilename)
{
	HRESULT result;
	ID3D10Blob* errorMessage;
	ID3D10Blob* vertexShaderBuffer;
	ID3D10Blob* pixelShaderBuffer;
	D3D11_INPUT_ELEMENT_DESC polygonLayout[2];
	unsigned int numElements;
	D3D11_BUFFER_DESC matrixBufferDesc;


이 함수에서 설정될 텍스쳐 sampler의 description을 가지는 변수가 새로 생겼습니다.

D3D11_SAMPLER_DESC samplerDesc; // 이 함수에서 사용할 포인터를 null로 초기화합니다. errorMessage = 0; vertexShaderBuffer = 0; pixelShaderBuffer = 0;

새 텍스쳐를 버텍스, 픽셀 쉐이더에 로딩합니다.


	// Compile the vertex shader code.
	result = D3DX11CompileFromFile(vsFilename, NULL, NULL, "TextureVertexShader", "vs_5_0",
                                                         D3D10_SHADER_ENABLE_STRICTNESS, 0, NULL, 
                         			       &vertexShaderBuffer, &errorMessage, NULL);
	if(FAILED(result))
	{
		// If the shader failed to compile it should have writen something to the error message.
		if(errorMessage)
		{
			OutputShaderErrorMessage(errorMessage, hwnd, vsFilename);
		}
		// If there was nothing in the error message then it simply could not find the shader file itself.
		else
		{
			MessageBox(hwnd, vsFilename, L"Missing Shader File", MB_OK);
		}

		return false;
	}

	// Compile the pixel shader code.
	result = D3DX11CompileFromFile(psFilename, NULL, NULL, "TexturePixelShader",

"ps_5_0", D3D10_SHADER_ENABLE_STRICTNESS, 0, NULL, &pixelShaderBuffer, &errorMessage, NULL); if(FAILED(result)) { // If the shader failed to compile it should have writen something to the error message. if(errorMessage) { OutputShaderErrorMessage(errorMessage, hwnd, psFilename); } // If there was nothing in the error message then it simply could not find the file itself. else { MessageBox(hwnd, psFilename, L"Missing Shader File", MB_OK); } return false; } // Create the vertex shader from the buffer. result = device->CreateVertexShader(vertexShaderBuffer->GetBufferPointer(),

vertexShaderBuffer->GetBufferSize(), NULL, &m_vertexShader); if(FAILED(result)) { return false; } // Create the pixel shader from the buffer. result = device->CreatePixelShader(pixelShaderBuffer->GetBufferPointer(),

pixelShaderBuffer->GetBufferSize(), NULL, &m_pixelShader); if(FAILED(result)) { return false; }


입력 레이아웃은 색상대신 텍스쳐 요소를 가짐으로 바뀌어졌습니다. 첫번째 포지션 부분은 바뀌지 않았지만 두번째 부분의 SemanticName과 Format은 TEXCOORD 과 DXGI_FORMAT_R32G32_FLOAT으로 바뀌었습니다. 이 두 변화는 ModelClass 정의와 쉐이더 파일에 있는 새 VertexType에 따라 조정되는 것입니다.


	// Create the vertex input layout description.
	// This setup needs to match the VertexType stucture in the ModelClass and in the shader.
	polygonLayout[0].SemanticName = "POSITION";
	polygonLayout[0].SemanticIndex = 0;
	polygonLayout[0].Format = DXGI_FORMAT_R32G32B32_FLOAT;
	polygonLayout[0].InputSlot = 0;
	polygonLayout[0].AlignedByteOffset = 0;
	polygonLayout[0].InputSlotClass = D3D11_INPUT_PER_VERTEX_DATA;
	polygonLayout[0].InstanceDataStepRate = 0;

	polygonLayout[1].SemanticName = "TEXCOORD";
	polygonLayout[1].SemanticIndex = 0;
	polygonLayout[1].Format = DXGI_FORMAT_R32G32_FLOAT;
	polygonLayout[1].InputSlot = 0;
	polygonLayout[1].AlignedByteOffset = D3D11_APPEND_ALIGNED_ELEMENT;
	polygonLayout[1].InputSlotClass = D3D11_INPUT_PER_VERTEX_DATA;
	polygonLayout[1].InstanceDataStepRate = 0;

	// Get a count of the elements in the layout.
	numElements = sizeof(polygonLayout) / sizeof(polygonLayout[0]);

	// Create the vertex input layout.
	result = device->CreateInputLayout(polygonLayout, numElements, vertexShaderBuffer->GetBufferPointer(),

vertexShaderBuffer->GetBufferSize(), &m_layout);

if(FAILED(result)) { return false; } // Release the vertex shader buffer and pixel shader buffer since they are no longer needed. vertexShaderBuffer->Release(); vertexShaderBuffer = 0; pixelShaderBuffer->Release(); pixelShaderBuffer = 0; // Setup the description of the dynamic matrix constant buffer that is in the vertex shader. matrixBufferDesc.Usage = D3D11_USAGE_DYNAMIC; matrixBufferDesc.ByteWidth = sizeof(MatrixBufferType); matrixBufferDesc.BindFlags = D3D11_BIND_CONSTANT_BUFFER; matrixBufferDesc.CPUAccessFlags = D3D11_CPU_ACCESS_WRITE; matrixBufferDesc.MiscFlags = 0; matrixBufferDesc.StructureByteStride = 0; // Create the constant buffer pointer so we can access the vertex shader constant buffer from within this class. result = device->CreateBuffer(&matrixBufferDesc, NULL, &m_matrixBuffer); if(FAILED(result)) { return false; }


sampler state description은 여기서 설정하고 나중에 쉐이더로 보냅니다. 텍스쳐 sampler description의 가장 중요한 요소는 바로 Filter 입니다. Filter는 폴리곤 면 위 텍스쳐의 최종 결과를 만들기 위해 사용되거나 결합되는 픽셀을 어떻게 결정할지를 판단합니다. 예를 들어 여기서 저는 D3D11_FILTER_MIN_MAG_MIP_LINEAR를 사용했는데 계산비용은 비싸지만 최고의 결과물을 보여줍니다. 이 필터는 sampler에게 확대, 축소, 밉맵핑에 선형보간법을 사용한다고 알려줍니다.


AddressU 와 AddressV는 좌표를 0.0f ~ 1.0f로 고정시킵니다. 그 이상, 이하의 좌표들도 0.0f ~ 1.0f으로 맞춥니다. 다른 sampler state description 설정은 기본으로 합니다.


	// Create a texture sampler state description.
	samplerDesc.Filter = D3D11_FILTER_MIN_MAG_MIP_LINEAR;
	samplerDesc.AddressU = D3D11_TEXTURE_ADDRESS_WRAP;
	samplerDesc.AddressV = D3D11_TEXTURE_ADDRESS_WRAP;
	samplerDesc.AddressW = D3D11_TEXTURE_ADDRESS_WRAP;
	samplerDesc.MipLODBias = 0.0f;
	samplerDesc.MaxAnisotropy = 1;
	samplerDesc.ComparisonFunc = D3D11_COMPARISON_ALWAYS;
	samplerDesc.BorderColor[0] = 0;
	samplerDesc.BorderColor[1] = 0;
	samplerDesc.BorderColor[2] = 0;
	samplerDesc.BorderColor[3] = 0;
	samplerDesc.MinLOD = 0;
	samplerDesc.MaxLOD = D3D11_FLOAT32_MAX;

	// Create the texture sampler state.
	result = device->CreateSamplerState(&samplerDesc, &m_sampleState);
	if(FAILED(result))
	{
		return false;
	}

	return true;
}


ShutdownShader() 함수는 TextureShaderClass에서 사용된 모든 변수를 해제합니다. 이제 초기화에서 생성된 sampler state도 해제합니다.


void TextureShaderClass::ShutdownShader()
{

// Release the sampler state. if(m_sampleState) { m_sampleState->Release(); m_sampleState = 0; } // Release the matrix constant buffer. if(m_matrixBuffer) { m_matrixBuffer->Release(); m_matrixBuffer = 0; } // Release the layout. if(m_layout) { m_layout->Release(); m_layout = 0; } // Release the pixel shader. if(m_pixelShader) { m_pixelShader->Release(); m_pixelShader = 0; } // Release the vertex shader. if(m_vertexShader) { m_vertexShader->Release(); m_vertexShader = 0; } return; }


OutputShaderErrorMessage() 함수는 HLSL 쉐이더가 로딩되지 않으면 텍스트 파일에 에러메시지를 씁니다.


void TextureShaderClass::OutputShaderErrorMessage(ID3D10Blob* errorMessage, HWND hwnd, 
                                                                                                                       WCHAR* shaderFilename)

{ char* compileErrors; unsigned long bufferSize, i; ofstream fout; // Get a pointer to the error message text buffer. compileErrors = (char*)(errorMessage->GetBufferPointer()); // Get the length of the message. bufferSize = errorMessage->GetBufferSize(); // Open a file to write the error message to. fout.open("shader-error.txt"); // Write out the error message. for(i=0; i<bufferSize; i++) { fout << compileErrors[i]; } // Close the file. fout.close(); // Release the error message. errorMessage->Release(); errorMessage = 0; // Pop a message up on the screen to notify the user to check the text file for compile errors. MessageBox(hwnd, L"Error compiling shader. Check shader-error.txt for message.", shaderFilename, MB_OK); return; }


SetShaderParameters() 함수는 텍스쳐 리소스의 포인터를 받아서 쉐이더에게 맡깁니다. 텍스쳐는 버퍼가 렌더링 되기전에 설정되어야 하는것을 주의하시기 바랍니다.


bool TextureShaderClass::SetShaderParameters(ID3D11DeviceContext* deviceContext, D3DXMATRIX worldMatrix,

D3DXMATRIX viewMatrix, D3DXMATRIX projectionMatrix, ID3D11ShaderResourceView* texture) { HRESULT result; D3D11_MAPPED_SUBRESOURCE mappedResource; MatrixBufferType* dataPtr; unsigned int bufferNumber; // Transpose the matrices to prepare them for the shader. D3DXMatrixTranspose(&worldMatrix, &worldMatrix); D3DXMatrixTranspose(&viewMatrix, &viewMatrix); D3DXMatrixTranspose(&projectionMatrix, &projectionMatrix); // Lock the constant buffer so it can be written to. result = deviceContext->Map(m_matrixBuffer, 0, D3D11_MAP_WRITE_DISCARD, 0, &mappedResource); if(FAILED(result)) { return false; } // Get a pointer to the data in the constant buffer. dataPtr = (MatrixBufferType*)mappedResource.pData; // Copy the matrices into the constant buffer. dataPtr->world = worldMatrix; dataPtr->view = viewMatrix; dataPtr->projection = projectionMatrix; // Unlock the constant buffer. deviceContext->Unmap(m_matrixBuffer, 0); // Set the position of the constant buffer in the vertex shader. bufferNumber = 0; // Now set the constant buffer in the vertex shader with the updated values. deviceContext->VSSetConstantBuffers(bufferNumber, 1, &m_matrixBuffer);


SetShaderParameters() 함수는 픽셀 쉐이더의 텍스쳐 설정 포함하도록 수정되었습니다.


	// Set shader texture resource in the pixel shader.
	deviceContext->PSSetShaderResources(0, 1, &texture);

	return true;
}


RenderShader() 함수는 폴리곤을 렌더링하기위해 쉐이더를 호출합니다.


void TextureShaderClass::RenderShader(ID3D11DeviceContext* deviceContext, int indexCount)
{
	// Set the vertex input layout.
	deviceContext->IASetInputLayout(m_layout);

	// Set the vertex and pixel shaders that will be used to render this triangle.
	deviceContext->VSSetShader(m_vertexShader, NULL, 0);
	deviceContext->PSSetShader(m_pixelShader, NULL, 0);


RenderShader() 함수는 렌더링전에 픽셀 쉐이더에 sample state설정을 포함하도록 바뀌었습니다.


	// Set the sampler state in the pixel shader.
	deviceContext->PSSetSamplers(0, 1, &m_sampleState);

	// Render the triangle.
	deviceContext->DrawIndexed(indexCount, 0, 0);

	return;
}


Graphicsclass.h


////////////////////////////////////////////////////////////////////////////////
// Filename: graphicsclass.h
////////////////////////////////////////////////////////////////////////////////
#ifndef _GRAPHICSCLASS_H_
#define _GRAPHICSCLASS_H_


///////////////////////
// MY CLASS INCLUDES //
///////////////////////
#include "d3dclass.h"
#include "cameraclass.h"
#include "modelclass.h"


GraphicsClass는 ColorShaderClass가 지워지고 대신에 TextureShaderClass 헤더를 인클루드 합니다.


#include "textureshaderclass.h"


/////////////
// GLOBALS //
/////////////
const bool FULL_SCREEN = true;
const bool VSYNC_ENABLED = true;
const float SCREEN_DEPTH = 1000.0f;
const float SCREEN_NEAR = 0.1f;


////////////////////////////////////////////////////////////////////////////////
// Class name: GraphicsClass
////////////////////////////////////////////////////////////////////////////////
class GraphicsClass
{
public:
	GraphicsClass();
	GraphicsClass(const GraphicsClass&);
	~GraphicsClass();

	bool Initialize(int, int, HWND);
	void Shutdown();
	bool Frame();

private:
	bool Render();

private:
	D3DClass* m_D3D;
	CameraClass* m_Camera;
	ModelClass* m_Model;


TextureShaderClass private 객체 변수가 추가되었습니다.


	TextureShaderClass* m_TextureShader;
};

#endif


Graphicsclass.cpp


////////////////////////////////////////////////////////////////////////////////
// Filename: graphicsclass.cpp
////////////////////////////////////////////////////////////////////////////////
#include "graphicsclass.h"


m_TextureShader 변수는 생성자에서 null로 초기화 합니다.


GraphicsClass::GraphicsClass()
{
	m_D3D = 0;
	m_Camera = 0;
	m_Model = 0;
	m_TextureShader = 0;
}


GraphicsClass::GraphicsClass(const GraphicsClass& other)
{
}


GraphicsClass::~GraphicsClass()
{
}


bool GraphicsClass::Initialize(int screenWidth, int screenHeight, HWND hwnd)
{
	bool result;

		
	// Create the Direct3D object.
	m_D3D = new D3DClass;
	if(!m_D3D)
	{
		return false;
	}

	// Initialize the Direct3D object.
	result = m_D3D->Initialize(screenWidth, screenHeight, VSYNC_ENABLED, hwnd, FULL_SCREEN,
                                                                                                     SCREEN_DEPTH, SCREEN_NEAR);
	if(!result)
	{
		MessageBox(hwnd, L"Could not initialize Direct3D.", L"Error", MB_OK);
		return false;
	}

	// Create the camera object.
	m_Camera = new CameraClass;
	if(!m_Camera)
	{
		return false;
	}

	// Create the model object.
	m_Model = new ModelClass;
	if(!m_Model)
	{
		return false;
	}


ModelClass::Initialize() 함수는 이제 텍스처의 모델을 렌더링하는데 사용될 텍스쳐의 이름을 받습니다.


	// Initialize the model object.
	result = m_Model->Initialize(m_D3D->GetDevice(), L"../Engine/data/seafloor.dds");
	if(!result)
	{
		MessageBox(hwnd, L"Could not initialize the model object.", L"Error", MB_OK);
		return false;
	}


새로운 TextureShaderClass 객체를 생성하고 초기화하는 코드도 추가되었습니다.


	// Create the texture shader object.
	m_TextureShader = new TextureShaderClass;
	if(!m_TextureShader)
	{
		return false;
	}

	// Initialize the texture shader object.
	result = m_TextureShader->Initialize(m_D3D->GetDevice(), hwnd);
	if(!result)
	{
		MessageBox(hwnd, L"Could not initialize the texture shader object.", L"Error", MB_OK);
		return false;
	}

	return true;
}


void GraphicsClass::Shutdown()
{


TextureShaderClass 객체는 Shutdown() 함수에서 역시 해제됩니다.


	// Release the texture shader object.
	if(m_TextureShader)
	{
		m_TextureShader->Shutdown();
		delete m_TextureShader;
		m_TextureShader = 0;
	}

	// Release the model object.
	if(m_Model)
	{
		m_Model->Shutdown();
		delete m_Model;
		m_Model = 0;
	}

	// Release the camera object.
	if(m_Camera)
	{
		delete m_Camera;
		m_Camera = 0;
	}

	// Release the Direct3D object.
	if(m_D3D)
	{
		m_D3D->Shutdown();
		delete m_D3D;
		m_D3D = 0;
	}

	return;
}


bool GraphicsClass::Frame()
{
	bool result;


	// Render the graphics scene.
	result = Render();
	if(!result)
	{
		return false;
	}

	return true;
}


bool GraphicsClass::Render()
{
	D3DXMATRIX viewMatrix, projectionMatrix, worldMatrix;
	bool result;


	// Clear the buffers to begin the scene.
	m_D3D->BeginScene(0.0f, 0.0f, 0.0f, 1.0f);

	// Generate the view matrix based on the camera's position.
	m_Camera->Render();

	// Get the view, projection, and world matrices from the camera and d3d objects.
	m_Camera->GetViewMatrix(viewMatrix);
	m_D3D->GetProjectionMatrix(projectionMatrix);
	m_D3D->GetWorldMatrix(worldMatrix);

	// Put the model vertex and index buffers on the graphics pipeline to prepare them for drawing.
	m_Model->Render(m_D3D->GetDevice());


텍스쳐 쉐이더는 이제 모델을 렌더링하기 위해 컬러 쉐이더 대신에 호출됩니다. 또 쉐이더에서 텍스쳐에 접근하기 위해 모델 객체에서 텍스쳐 리소스 포인터를 받는것을 기억하시기 바랍니다.


	// Render the model using the texture shader.
	result = m_TextureShader->Render(m_D3D->GetDeviceContext(), m_Model->GetIndexCount(),

worldMatrix, viewMatrix, projectionMatrix, m_Model->GetTexture()); if(!result) { return false; } // Present the rendered scene to the screen. m_D3D->EndScene(); return true; }


요약


여러분은 이제 텍스쳐를 로딩하고 폴리곤 면에 맵핑한 뒤 쉐이더로 렌더링을 하는 기본을 이해하셨을 것입니다.


연습하기


1. 재컴파일하고 텍스쳐가 맵핑된 삼각형이 잘 보이는지 확인하시기 바랍니다. 그리고 esc버튼으로 종료하시면 됩니다.


2. 여러분만의 .dds 텍스쳐를 생성하여 같은 디렉토리에 위치시키고 GraphicsClass::Initialize() 함수에 텍스쳐 이름을 변경하여 재컴파일후 확인해보세요.


3. 삼각형 두개로 사각형을 만들도록 코드를 바꾸세요. 이 사각형에 텍스쳐를 맵핑하여 잘 나오는지 확인해 보세요.


4. MIN_MAG_MIP_LINEAR 필터의 효과를 확인해 보기 위해 카메라 거리를 이동해 보세요.


5. 다른 필터를 적용해 보고 카메라 거리를 움직여 보고 다른 결과를 확인해 보세요.


소스 only


dx11src05.zip


728x90
728x90

원문 : http://www.rastertek.com/dx11tut04.html


Tutorial 4: Buffers, Shaders, and HLSL


이번 강좌는 DirectX 11에서 버텍스 쉐이더와 픽셀 쉐이더를 작성해 볼 것입니다. 또 DirectX 11에서 버텍스 버퍼와 인덱스 버퍼도 사용해 볼 것입니다. 방금 얘기한 것들은 여러분이 3D 그래픽을 렌더링하는 것을 이해하고 활용하는데 매우 기본적인  개념들 입니다.


Vertex Buffers


이해해야 할 첫번째 개념은 바로 버텍스 버퍼입니다. 이 개념을 설명하기 위해 구의 3D 모델을 예시로 살펴 보도록 하겠습니다.


이 3D 구는 실제로는 수백개의 삼각형으로 구성되어 있습니다.


이 구 모델의 각 삼각형들은 삼각형을 이루는 3개의 점을 가지며 우리는 이것을 "정점"이라고 부릅니다. 그래서 우리가 구 모델을 렌더링하기 위해 구를 이루는 모든 정점들을 "버텍스 버퍼"라고 부르는 특별한 배열에 넣어야 합니다. 구 모델의 모든 점들을 버텍스 버퍼에 넣으면 GPU에 버텍스 버퍼를 전달하여 모델을 렌더링 할 수 있습니다.


Index Buffers


인덱스 버퍼는 버텍스 버퍼와 연관이 있습니다. 인덱스 버퍼는 버텍스 버퍼에 있는 각 정점의 위치를 기록하기 위함입니다. 그러면 GPU는 버텍스 버퍼의 특정 정점들을 빠르게 찾는데에 인덱스 버퍼를 사용합니다. 인덱스 버퍼의 개념은 책에서 "색인"(혹은 찾아보기)을 사용하는 개념과 비슷해서 여러분이 찾고 있는 주제를 더 빠르게 찾도록 돕습니다. DirectX SDK 공식문서에서 말하기를 인덱스 버퍼를 사용하는 것은 비디오 메모리에서 정점 데이터의 캐싱의 가능성을 높인다고 

합니다. 그래서 인덱스 버퍼의 사용은 성능 향상의 측면에서도 매우 권고됩니다.


Vertex Shaders


버텍스 쉐이더는 주로 버텍스 버퍼의 정점들을 3D 공간으로 변형시키도록 작성된 작은 프로그램입니다. 각 정점에 대한 법선을 계산하는 것과 같은 다른 연산들도 들어갑니다. 처리해야할 각 정점에 대해 GPU가 버텍스 쉐이더를 호출 할 것입니다. 예를들어 5,000개의 폴리곤으로 이루어진 모델 하나를 그리기 위해 매 프레임마다 15,000번의 버텍스 쉐이더 프로그램이 실행 될 것입니다. 또 만약 여러분의 그래픽 프로그램을 60 fps로 고정한다면 5,000개의 삼각형을 그리기 위해 버텍스 쉐이더를 초당 900,000번 호출 할 것입니다. 여러분도 알듯이 효율적인 버텍스 쉐이더를 작성하는 것은 매우 중요합니다.


Pixel Shaders


픽셀 쉐이더는 우리가 그리는 폴리곤들의 색상을 입히는 것이 작성되는 작은 프로그램입니다. 화면에 그려질 모든 볼 수 있는 픽셀들에 대해 GPU에서 동작합니다. 색상 입히기, 텍스쳐 입히기, 빛 처리 그리고 대부분의 여러분의 폴리곤의 면에 보여 지게 될 모든 효과들은 픽셀 쉐이더 프로그램에 의해 처리됩니다. 픽셀 쉐이더는 GPU에 의해 호출되는 횟수 때문에 반드시 효율적으로 작성되어야 합니다.


HLSL


HLSL은 우리가 DirectX 11에서 버텍스 쉐이더, 픽셀 쉐이더를 작성하기위해 사용하는 언어입니다. 문법은 미리 정의된 타입들과 함께 C 언어와 거의 같습니다. HLSL 프로그램은 전역 변수, 타입 정의, 버텍스 쉐이더, 픽셀 쉐이더 그리고 지오메트리 쉐이더로 구성되어 있습니다. 이번 강좌는 HLSL은 처음이기 때문에 DirectX 11을 이용하여 매우 간단한 HLSL프로그램을 만들어 볼 것입니다.


Updated Framework


이번 강좌를 위해 프레임워크를 업데이트 하였습니다. GraphicsClass 밑에 CameraClass, ModelClass 그리고 ColorShaderClass 3개를 추가하였습니다. CameraClass는 전에 얘기했던 뷰 행렬을 다룰 것입니다. 월드 좌표상의 카메라 위치를 처리하고 그래픽을 그릴때 쉐이더에 넘겨서 우리가 씬을 어디서 보고있는지 알아 낼 것입니다. ModelClass는 우리의 3D 모델의 기하학적인 것을 다룰 것 인데 이번 강좌에서 3D 모델은 간단하게 삼각형 하나가 다 입니다. 그리고 마지막으로 ColorShaderClass는 HLSL을 호출하여 모델을 화면상에 렌더링하는데 사용 될 것입니다.


먼저 HLSL 쉐이더 프로그램을 보며 이번 강좌 코드 리뷰를 시작하겠습니다.


Color.vs


Color.vs는 우리의 첫 쉐이더 프로그램이 될 것입니다. 쉐ㅣ더는 모델들의 실제적인 렌더링을 하는 작은 프로그램입니다. 이 쉐이더는 HLSL로 작성되며 소스파일 color.vs와 color.ps에 저장됩니다. 저는 이 파일을 지금은 엔진의 .h와 .cpp과 함께 두었습니다. 이번 쉐이더의 목적은 이번 첫 HLSL 강좌에서 가능한 간단하게 하기 위해 원색의 삼각형을 그리는 것이 다 입니다. 먼저 버텍스 쉐이더 코드입니다.

////////////////////////////////////////////////////////////////////////////////
// Filename: color.vs
////////////////////////////////////////////////////////////////////////////////


먼저 전역 변수로 시작합니다. 이 전역변수들은 여러분의 C++코드에서 수정될 수 있습니다. 여러분은 int, float과 같은 많은 변수형을 사용할 수 있고 쉐이더 프로그램이 사용하도록 외부에서 설정할 수 있습니다. 일반적으로 cbuffer라 부르는 버퍼 오브젝트 형에 대부분의 전역변수들을 넣을 것이며 한개일 때도 마찬가지입니다. 논리적으로 이러한 버퍼들을 만드는 거슨 쉐이더의 효출적인 실행뿐만 아니라 그래픽 카드가 버퍼들을 어떻게 저장할지에 대해서도 중요합니다. 이번 예제에서는 같은 버퍼에 3개의 행렬 변수를 넣었습니다. 매 프레임마다 동시에 업데이트 되기 때문입니다.

/////////////
// GLOBALS //
/////////////
cbuffer MatrixBuffer
{
    matrix worldMatrix;
    matrix viewMatrix;
    matrix projectionMatrix;
};


C언어와 같이 우리가 원하는 자료형을 정의할 수 있습니다. 우리는 float4와 같이 쉐이더 작성을 쉽고 가독성이 좋게하고 HLSL에 사용가능한 다른 자료형들을 사용할 것입니다. 이번 예제에서는 x, y, z, w 값을 가지는 position 벡터와 빛의 삼원색(RGB)과 알파값을 가지는 color로 이루어진 자료형을 만들 것입니다. POSITION, COLOR 그리고 SV_POSITION 은 GPU에게 변수의 사용을 전달하는 의미입니다. 두 구조체가 동일하지만 버텍스, 픽셀 쉐이더에게 의미가 다르기 때문에 구조체를 두개로 만들어야 합니다. COLOR 는 두 쉐이더에 대해 동일하게 동작하지만 POSITION 은 버텍스 쉐이더에 대해 동작하고 SV_POSITION 은 픽셀 쉐이더에 대해 동작합니다. 만야 같은 자료형을 더 추가하고 싶으면 COLOR0, COLOR1 등등과 같이 뒤에 숫자를 추가하면 됩니다.

//////////////
// TYPEDEFS //
//////////////
struct VertexInputType
{
    float4 position : POSITION;
    float4 color : COLOR;
};

struct PixelInputType
{
    float4 position : SV_POSITION;
    float4 color : COLOR;
};


버텍스 쉐이더는 쉐이더 안으로 보내진 버텍스 버퍼의 데이터를 처리할 때 GPU에서 호출됩니다. ColorVertexShader 라고 이름 붙인 버텍스 쉐이더는 버텍스 버퍼안의 모든 정점 하나하나에 대해 호출 될 것입니다. 버텍스 쉐이더로의 입력은 반드시 버텍스 버퍼 내부 데이터의 형식과 쉐이더 소스 파일 이번 경우 VertexInputType 내에 자료형 정의와도 일치해야 합니다. 버텍스 쉐이더의 출력은 픽셀 쉐이더로 보내져 픽셀 쉐이더의 입력이 됩니다. 이번 경우에는 반환 형식은 위에서 정의된 PixelInputType 입니다.


방금 말했던 것처럼 버텍스 쉐이더가 PixelInputType 형 변수를 만드는 것이 보이실 것입니다. 그리곤 입력 정점의 위치를 취하고 월드, 뷰, 투영 행렬에 차례로 곱해집니다. 정점은 3D 공간에서 뷰에 따라 렌더링하여 2D 화면 위 맞는 위치로 바뀔 것입니다. output 변수가 input의 color의 카피를 취하고 픽셀 쉐이더에 input으로 사용 될 output을 반환합니다. 또 input.position의 W값을 1.0으로 설정한 것을 주의하세요. 그렇지 않으면 위치를 계산하느데 XYZ만 읽기 때문에 W값이 정의되지 않습니다.

//////////////////////////////////////////////////////////////////////////////// // Vertex Shader //////////////////////////////////////////////////////////////////////////////// PixelInputType ColorVertexShader(VertexInputType input) { PixelInputType output; // 적절한 행렬 연산을 위해 벡터의 4번째 요소를 추가(? 원래 있었지만) 합니다. input.position.w = 1.0f; // 정점의 위치를 월드, 뷰, 투영 행렬에 대해 계산합니다. output.position = mul(input.position, worldMatrix); output.position = mul(output.position, viewMatrix); output.position = mul(output.position, projectionMatrix); // 입력 색상을 픽셀 쉐이더가 사용하도록 저장합니다. output.color = input.color; return output; }


Color.ps


픽셀 쉐이더는 화면상에 렌더링 될 폴리곤의 각 픽셀들을 그립니다. 픽셀 쉐이더에서 PixelInputType을 입력으로 사용하고 최종 픽샐 색상으로 표현 될 출력으로 'float4' 변수 하나를 반환합니다. 이 픽셀 쉐이더 프로그램은 입력으로 들어온 색상 값을 그대로 반환합니다. 픽셀 쉐이더의 입력은 버텍스 쉐이더의 출력에서 얻는 것을 주시하시기 바랍니다.

////////////////////////////////////////////////////////////////////////////////
// Filename: color.ps
////////////////////////////////////////////////////////////////////////////////


//////////////
// TYPEDEFS //
//////////////
struct PixelInputType
{
    float4 position : SV_POSITION;
    float4 color : COLOR;
};


////////////////////////////////////////////////////////////////////////////////
// Pixel Shader
////////////////////////////////////////////////////////////////////////////////
float4 ColorPixelShader(PixelInputType input) : SV_TARGET
{
    return input.color;
}


Modelclass.h


앞에서 언급했듯이 ModelClass은 3D 모델의 기하학적 부분을 캡슐화 해야 합니다. 이번 강좌에서는 직접 초록색 삼각형 하나의 데이터를 설정하도록 하겠습니다. 또 삼각형이 렌더링될 수 있도록 인덱스, 버텍스 버퍼를 만들도록 하겠습니다.

////////////////////////////////////////////////////////////////////////////////
// Filename: modelclass.h
////////////////////////////////////////////////////////////////////////////////
#ifndef _MODELCLASS_H_
#define _MODELCLASS_H_


//////////////
// INCLUDES //
//////////////
#include <d3d11.h>
#include <d3dx10math.h>


////////////////////////////////////////////////////////////////////////////////
// Class name: ModelClass
////////////////////////////////////////////////////////////////////////////////
class ModelClass
{
private:


ModelClass에서 버텍스 버퍼와 같이 사용 될 정점 타입의 정의가 있습니다. 여기서 typedef는 나중 강좌에서 살펴 볼 ColorShaderClass 안의 형식과 일치해야 합니다.

	struct VertexType
	{
		D3DXVECTOR3 position;
		D3DXVECTOR4 color;
	};

public:
	ModelClass();
	ModelClass(const ModelClass&);
	~ModelClass();


이 함수들은 모델의 버텍스, 인덱스 버퍼의 초기화와 정리를 처리합니다. Render() 함수는 쉐이더로 그리는 것을 준비하기 위해 비디오 카드에 모델 기하 정보를 넣습니다.

	bool Initialize(ID3D11Device*);
	void Shutdown();
	void Render(ID3D11DeviceContext*);

	int GetIndexCount();

private:
	bool InitializeBuffers(ID3D11Device*);
	void ShutdownBuffers();
	void RenderBuffers(ID3D11DeviceContext*);


ModelClass의 private 변수는 버텍스, 인덱스 버퍼와 각 버퍼 사이즈의 길이를 유지하는 두 정수 변수가 있습니다. 모든 DirectX 11 버퍼는 보통 ID3D11Buffer 형을 사용하며 만들어질때 버퍼 description으로 구별됩니다.

private:
	ID3D11Buffer *m_vertexBuffer, *m_indexBuffer;
	int m_vertexCount, m_indexCount;
};

#endif


Modelclass.cpp


////////////////////////////////////////////////////////////////////////////////
// Filename: modelclass.cpp
////////////////////////////////////////////////////////////////////////////////
#include "modelclass.h"


클래스 생성자는 버텍스, 인덱스 버퍼의 포인터를 null로 초기화합니다.

ModelClass::ModelClass()
{
	m_vertexBuffer = 0;
	m_indexBuffer = 0;
}


ModelClass::ModelClass(const ModelClass& other)
{
}


ModelClass::~ModelClass()
{
}


Initialize() 함수는 버텍스, 인덱스 버퍼를 초기화 하는 함수를 호출합니다.

bool ModelClass::Initialize(ID3D11Device* device) { bool result; // 삼각형의 기하 정보를 가지고 있는 버텍스, 인덱스 버퍼를 초기화 한다. result = InitializeBuffers(device); if(!result) { return false; } return true; }


Shutdown() 함수는 버텍스, 인덱스 버퍼를 정리하는 함수를 호출합니다.

void ModelClass::Shutdown() { // 버텍스, 인덱스 버퍼 해제. ShutdownBuffers(); return; }


Render() 함수는 GraphicsClass::Render() 함수에서 호출 됩니다. 이 함수가 버텍스, 인덱스 버퍼를 그래픽 파이프라인에 넣는 RenderBuffers() 함수를 호출하여 color 쉐이더가 렌더링 할 수 있도록 합니다.

void ModelClass::Render(ID3D11DeviceContext* deviceContext) { // 버텍스, 인덱스 버퍼를 그려질 수 있도록 그래픽 파이프라인에 넣습니다. RenderBuffers(deviceContext); return; }


GetIndexCount() 함수는 모델의 인덱스의 수를 리턴합니다. color 쉐이더는 해당 모델을 그리는데 이 정보가 필요할 것입니다.

int ModelClass::GetIndexCount()
{
	return m_indexCount;
}


InitializeBuffers() 함수는 버텍스, 인덱스 버퍼를 생성하는 것을 처리하는 곳입니다. 주로 모델에서 읽어서 그 데이터 파일로 버퍼를 생성했을 것입니다. 그러나 이번 강좌에서는 삼각형 하나라서 직접 버텍스, 인덱스 버퍼에 점을 설정할 것입니다.

bool ModelClass::InitializeBuffers(ID3D11Device* device)
{
	VertexType* vertices;
	unsigned long* indices;
	D3D11_BUFFER_DESC vertexBufferDesc, indexBufferDesc;
	D3D11_SUBRESOURCE_DATA vertexData, indexData;
	HRESULT result;


먼저 나중에 최종버퍼에 들어갈 버텍스, 인덱스 데이터를 가지는 임시 배열 두개를 만듭니다.

// 버텍스 배열의 정점 갯수를 설정. m_vertexCount = 3; // 인덱스 배열의 인덱스 수를 설정. m_indexCount = 3; // 버텍스 배열 생성. vertices = new VertexType[m_vertexCount]; if(!vertices) { return false; } // 인덱스 배열 생성. indices = new unsigned long[m_indexCount]; if(!indices) { return false; }


이제 버텍스, 인덱스 버퍼를 삼각형의 세 점과 그 각각의 점에 대한 인덱스로 채웁니다. 여기서 주의할 점은 삼각형의 점들을 시계방향으로 넣은 것입니다. 만약 시계 반대방향으로 넣을 경우 삼각형의 앞면이 원래 그리려던 반대 방향으로 보게 되어 back face culling(뒷면을 그리지 않음)때문에 그리지 않습니다. GPU에게 정점들을 보낼 때 이것을 기억하는게 매우 중요합니다. 이 부분도 버텍스 description의 일부이기 때문에 색상도 여기서 지정됩니다. 색상은 회색으로 설정하였습니다.

// 버텍스 배열에 데이터를 넣습니다. vertices[0].position = D3DXVECTOR3(-1.0f, -1.0f, 0.0f); // 왼쪽 아래 vertices[0].color = D3DXVECTOR4(0.0f, 1.0f, 0.0f, 1.0f); vertices[1].position = D3DXVECTOR3(0.0f, 1.0f, 0.0f); // 가운데 위 vertices[1].color = D3DXVECTOR4(0.0f, 1.0f, 0.0f, 1.0f); vertices[2].position = D3DXVECTOR3(1.0f, -1.0f, 0.0f); // 오른쪽 아래 vertices[2].color = D3DXVECTOR4(0.0f, 1.0f, 0.0f, 1.0f); // 인덱스 배열에 데이터를 넣습니다. indices[0] = 0; // 왼쪽 아래 indices[1] = 1; // 가운데 위 indices[2] = 2; // 오른쪽 아래


버텍스, 인덱스 버퍼를 채움으로 이제 버텍스, 인덱스 버프를 생성하는데 사용할 수 있게 되었습니다. 같은 방식으로 두 버퍼를 만듭니다. 먼저 버퍼의 description을 채웁니다. description에서 ByteWidth (버퍼의 바이트 크기)와 BindFlags (버퍼의 타입)은 정확히 입력되었는지 확실히 해야하는 것들입니다. description을 다 채우고 전에 만든 버텍스, 인덱스 배열을 가리키는 subresource 포인터도 채워야 합니다. description과 subresource 포인터가 있으면 D3D 디바이스를 이용하여 CreateBuffer() 함수를 호출합니다. 그리고 여러분의 새 버퍼에 포인터를 리턴할 것입니다.

// 정적 정점 버퍼의 description을 작성합니다. vertexBufferDesc.Usage = D3D11_USAGE_DEFAULT; vertexBufferDesc.ByteWidth = sizeof(VertexType) * m_vertexCount; vertexBufferDesc.BindFlags = D3D11_BIND_VERTEX_BUFFER; vertexBufferDesc.CPUAccessFlags = 0; vertexBufferDesc.MiscFlags = 0; vertexBufferDesc.StructureByteStride = 0; // 버텍스 데이터(버텍스 배열)의 포인터를 subresource 구조체에 넣습니다. vertexData.pSysMem = vertices; vertexData.SysMemPitch = 0; vertexData.SysMemSlicePitch = 0; // 버텍스 버퍼를 생성합니다. result = device->CreateBuffer(&vertexBufferDesc, &vertexData, &m_vertexBuffer); if(FAILED(result)) { return false; } // 정적 인덱스 버퍼의 description을 작성합니다. indexBufferDesc.Usage = D3D11_USAGE_DEFAULT; indexBufferDesc.ByteWidth = sizeof(unsigned long) * m_indexCount; indexBufferDesc.BindFlags = D3D11_BIND_INDEX_BUFFER; indexBufferDesc.CPUAccessFlags = 0; indexBufferDesc.MiscFlags = 0; indexBufferDesc.StructureByteStride = 0; // 인덱스 데이터의 포인터를 subresource 구조체에 넣습니다. indexData.pSysMem = indices; indexData.SysMemPitch = 0; indexData.SysMemSlicePitch = 0; // 인덱스 버퍼 생성. result = device->CreateBuffer(&indexBufferDesc, &indexData, &m_indexBuffer); if(FAILED(result)) { return false; }


버텍스, 인덱스 버퍼를 생성된 이후 데이터가 버퍼로 복사되었으므로 더 이상 필요가 없어진 버텍스, 인덱스 배열을 지웁니다.

// 버텍스, 인덱스 버퍼가 생성되었으므로 배열을 해제합니다. delete [] vertices; vertices = 0; delete [] indices; indices = 0; return true; }


ShutdownBuffers() 함수는 InitializeBuffers() 함수에서 만들어진 버텍스, 인덱스 버퍼를 해제합니다.

void ModelClass::ShutdownBuffers() { // 인덱스 버퍼 해제. if(m_indexBuffer) { m_indexBuffer->Release(); m_indexBuffer = 0; } // 버텍스 버퍼 해제. if(m_vertexBuffer) { m_vertexBuffer->Release(); m_vertexBuffer = 0; } return; }


RenderBuffers() 함수는 Render() 함수에서 호출됩니다. 이 함수의 목적은 버텍스, 인덱스 버퍼를 GPU의 어셈블러 입력에 활성화 시키는 것입니다. GPU가 활성화된 버텍스 버퍼를 가지면 쉐이더를 사용할 수 있습니다. 이 함수는 또 버퍼가 어떻게 그려질지 삼각형인지 선인지 부채꼴 등등인지를 정의합니다. 이번 강좌에서 어셈블러 입력에 버텍스, 인덱스 버퍼를 활성화시키고 IASetPrimitiveTopology() DirectX함수를 사용하여 GPU에게 해당 버퍼는 삼각형으로 그려질 거라고 알려줍니다.

void ModelClass::RenderBuffers(ID3D11DeviceContext* deviceContext) { unsigned int stride; unsigned int offset; // 버텍스 버퍼 걸음(단위)와 오프셋을 설정합니다. stride = sizeof(VertexType); offset = 0; // 어셈블러 입력에 버텍스 버퍼를 활성화 시켜 렌더링 될 수 있습니다. deviceContext->IASetVertexBuffers(0, 1, &m_vertexBuffer, &stride, &offset); // 어셈블러 입력에 인덱스 버퍼를 활성화 시켜 렌더링 될 수 있습니다. deviceContext->IASetIndexBuffer(m_indexBuffer, DXGI_FORMAT_R32_UINT, 0); // 이 버텍스 버퍼로부터 그릴 기본 자료형을 설정합니다. 이 경우 삼각형입니다. deviceContext->IASetPrimitiveTopology(D3D11_PRIMITIVE_TOPOLOGY_TRIANGLELIST); return; }


Colorshaderclass.h


ColorShaderClass은 GPU위 3D 모델을 그리는 것에 대해 HLSL 쉐이더를 호출할 것입니다.

////////////////////////////////////////////////////////////////////////////////
// Filename: colorshaderclass.h
////////////////////////////////////////////////////////////////////////////////
#ifndef _COLORSHADERCLASS_H_
#define _COLORSHADERCLASS_H_


//////////////
// INCLUDES //
//////////////
#include <d3d11.h>
#include <d3dx10math.h>
#include <d3dx11async.h>
#include <fstream>
using namespace std;


////////////////////////////////////////////////////////////////////////////////
// Class name: ColorShaderClass
////////////////////////////////////////////////////////////////////////////////
class ColorShaderClass
{
private:


버텍스 쉐이더에서도 사용되는 cBuffer 타입의 정의입니다. 이 typedef는 올바른 렌더링을 위해 modelclass에서 VertexType이 일치하였던 것처럼 쉐이더의 cBuffer와 일치해야 합니다.

	struct MatrixBufferType
	{
		D3DXMATRIX world;
		D3DXMATRIX view;
		D3DXMATRIX projection;
	};

public:
	ColorShaderClass();
	ColorShaderClass(const ColorShaderClass&);
	~ColorShaderClass();


여기 함수들은 쉐이더의 초기화와 정리를 담당합니다. Render() 함수는 쉐이더의 매개변수를 설정하고 준비된 모델 정점들을 쉐이더를 이용하여 그립니다.

	bool Initialize(ID3D11Device*, HWND);
	void Shutdown();
	bool Render(ID3D11DeviceContext*, int, D3DXMATRIX, D3DXMATRIX, D3DXMATRIX);

private:
	bool InitializeShader(ID3D11Device*, HWND, WCHAR*, WCHAR*);
	void ShutdownShader();
	void OutputShaderErrorMessage(ID3D10Blob*, HWND, WCHAR*);

	bool SetShaderParameters(ID3D11DeviceContext*, D3DXMATRIX, D3DXMATRIX, D3DXMATRIX);
	void RenderShader(ID3D11DeviceContext*, int);

private:
	ID3D11VertexShader* m_vertexShader;
	ID3D11PixelShader* m_pixelShader;
	ID3D11InputLayout* m_layout;
	ID3D11Buffer* m_matrixBuffer;
};

#endif


Colorshaderclass.cpp

////////////////////////////////////////////////////////////////////////////////
// Filename: colorshaderclass.cpp
////////////////////////////////////////////////////////////////////////////////
#include "colorshaderclass.h"


늘 그렇듯이 생성자는 private 포인터들을 null로 초기화 합니다.

ColorShaderClass::ColorShaderClass()
{
	m_vertexShader = 0;
	m_pixelShader = 0;
	m_layout = 0;
	m_matrixBuffer = 0;
}


ColorShaderClass::ColorShaderClass(const ColorShaderClass& other)
{
}


ColorShaderClass::~ColorShaderClass()
{
}


Initialize() 함수는 쉐이더를 위한 초기화 함수를 호출합니다. HLSL 쉐이더 파일의 이름을 넘기는데 이번 강좌에서 color.vs와 color.ps파일 입니다.

bool ColorShaderClass::Initialize(ID3D11Device* device, HWND hwnd) { bool result; // 버텍스, 픽셀 쉐이더를 초기화합니다. result = InitializeShader(device, hwnd, L"../Engine/color.vs", L"../Engine/color.ps"); if(!result) { return false; } return true; }


Shutdown() 함수는 쉐이더의 정리 함수를 호출합니다.

void ColorShaderClass::Shutdown() { // 버텍스, 픽셀 쉐이더와 관련 오브젝트들을 정리합니다. ShutdownShader(); return; }


Render() 함수는 먼저 SetShaderParameters() 함수를 이용하여 쉐이더 내부로 파라미터들을 설정합니다. 파라미터가 한번 설정되고 나면 RenderShader() 함수를 호출하여 HLSL 쉐이더를 이용하여 녹색 삼각형을 그립니다.

bool ColorShaderClass::Render(ID3D11DeviceContext* deviceContext, int indexCount, D3DXMATRIX worldMatrix, D3DXMATRIX viewMatrix, D3DXMATRIX projectionMatrix) { bool result; // 렌더링하는데 사용할 쉐이더 파라미터들을 설정합니다. result = SetShaderParameters(deviceContext, worldMatrix, viewMatrix, projectionMatrix); if(!result) { return false; } // 이제 준비된 버퍼를 쉐이더로 렌더링합니다. RenderShader(deviceContext, indexCount); return true; }


이번 강좌에서 매우 중요한 함수중 하나인 InitializeShader() 함수를 살펴 볼 것입니다. 이 함수는 쉐이더 파일들이 실제 로로드되고 DirectX와 GPU가 사용할 수 있게끔 합니다. 레이아웃의 설정과 버텍스 버퍼 데이터가 어떻게 GPU안의 그래픽 파이프라인을 확인할지(사용될지?) 볼 것입니다. 레이아웃은 modelclass.h 파일 안의 VertexType과 color.vs 파일 안에 정의된 것과 일치를 필요로 합니다.

bool ColorShaderClass::InitializeShader(ID3D11Device* device, HWND hwnd, WCHAR* vsFilename, WCHAR* psFilename) { HRESULT result; ID3D10Blob* errorMessage; ID3D10Blob* vertexShaderBuffer; ID3D10Blob* pixelShaderBuffer; D3D11_INPUT_ELEMENT_DESC polygonLayout[2]; unsigned int numElements; D3D11_BUFFER_DESC matrixBufferDesc; // 이 함수에서 사용할 포인터를 null로 초기화 합니다. errorMessage = 0; vertexShaderBuffer = 0; pixelShaderBuffer = 0;


여기는 버퍼에 쉐이더 프로그램을 컴파일 하는 곳입니다. 쉐이더 파일 이름, 쉐이더의 이름, 쉐이더 버전(DirectX 11 에서는 5.0), 쉐이더가 컴파일될 버퍼를 파라미터로 넘깁니다. 만약 쉐이더 컴파일을 실패할 경우 다른 함수에서 출력하도록 보낼 errorMessage라는 문자열에 에러메시지를 담습니다. 여전히 실패에 에러메시지도 없을 경우 쉐이더 파일을 찾을 수 없다는 것을 의미하여 이 경우 메시지박스 하나를 띄워 "찾을 수 없다"고 출력해줍니다.

// 버텍스 쉐이더 코드를 컴파일 합니다. result = D3DX11CompileFromFile(vsFilename, NULL, NULL, "ColorVertexShader", "vs_5_0",

D3D10_SHADER_ENABLE_STRICTNESS, 0, NULL, &vertexShaderBuffer, &errorMessage, NULL);

if(FAILED(result)) { // 만약 쉐이더 컴파일을 실패할 경우 에러메시지에 뭔가가 쓰여져 있습니다. if(errorMessage) { OutputShaderErrorMessage(errorMessage, hwnd, vsFilename); } // 에러메시지가 없을 경우 간단하게 직접 쉐이파일 찾을 수 없다고 메시지박스로 출력합니다. else { MessageBox(hwnd, vsFilename, L"Missing Shader File", MB_OK); } return false; } // 필셀 쉐이더 코드를 컴파일 합니다. result = D3DX11CompileFromFile(psFilename, NULL, NULL, "ColorPixelShader", "ps_5_0",

D3D10_SHADER_ENABLE_STRICTNESS, 0, NULL, &pixelShaderBuffer, &errorMessage, NULL);

if(FAILED(result)) { // 만약 쉐이더 컴파일을 실패할 경우 에러메시지에 뭔가가 쓰여져 있습니다. if(errorMessage) { OutputShaderErrorMessage(errorMessage, hwnd, psFilename); } // 에러메시지가 없을 경우 간단하게 직접 쉐이파일 찾을 수 없다고 메시지박스로 출력합니다. else { MessageBox(hwnd, psFilename, L"Missing Shader File", MB_OK); } return false; }


버텍스 쉐이더와 픽셀 쉐이더가 성공적으로 버퍼 안으로 컴파일 되면 해당 버퍼를 쉐이더 오브젝트를 만드는데 사용합니다. 이제부터 앞으로 이 포인터를 버텍스, 픽셀 쉐이더에 대한 인터페이스로 사용할 것입니다.

// 버퍼로부터 버텍스 쉐이더 생성. result = device->CreateVertexShader(vertexShaderBuffer->GetBufferPointer(),

vertexShaderBuffer->GetBufferSize(), NULL, &m_vertexShader); if(FAILED(result)) { return false; } // 버퍼로부터 픽셀 쉐이더 생성.Create the pixel shader from the buffer. result = device->CreatePixelShader(pixelShaderBuffer->GetBufferPointer(),

pixelShaderBuffer->GetBufferSize(), NULL, &m_pixelShader); if(FAILED(result)) { return false; }


다음은 쉐이더가 처리할 정점 데이터의 레이아웃을 만들어야 합니다. 이 쉐이더가 위치, 색상 벡터를 사용하기 때문에 둘의 사이즈를 명시하는 레이아웃 2개를 만들어야 합니다. semantic name 은 레이아웃에서 첫번째로 채우는데 레이아웃 요소의 용법을 쉐이더가 결정하게 해줍니다. 두 개의 다른 요소를 가지는데 첫번째로 POSITION을 사용하고 두번째로 COLOR를 사용합니다. 다음으로 레이아웃의 중요한 부분은 Format입니다. 위치벡터를 위해 DXGI_FORMAT_R32G32B32_FLOAT을 사용하고 색상을 위해 DXGI_FORMAT_R32G32B32A32_FLOAT을 사용합니다. 마지막으로 주의해야 하는 것은 버퍼에 데이터가 어떻게 되는지를 나타내는 AlignedByteOffset 입니다. 레이아웃에에게 position은 12 바이트 이며 color는 16바이트 이라고 알려줘야하는데 AlignedByteOffset는 각 요소의 시작을 나타냅니다. AlignedByteOffset에 특정 값을 넣는 대신에 D3D11_APPEND_ALIGNED_ELEMENT을 사용하여 위치를 알 수 있습니다. 나머지 다른 설정은 현재 이번 강좌에서 필요치 않아 기본설저으로 하였습니다.

// 쉐이더로 전달할 데이터의 레이아웃을 설정합닌다. // 이 설정은 쉐이더와 ModelClass에 있는 VertexType 구조체의 일치가 필요합니다. polygonLayout[0].SemanticName = "POSITION"; polygonLayout[0].SemanticIndex = 0; polygonLayout[0].Format = DXGI_FORMAT_R32G32B32_FLOAT; polygonLayout[0].InputSlot = 0; polygonLayout[0].AlignedByteOffset = 0; polygonLayout[0].InputSlotClass = D3D11_INPUT_PER_VERTEX_DATA; polygonLayout[0].InstanceDataStepRate = 0; polygonLayout[1].SemanticName = "COLOR"; polygonLayout[1].SemanticIndex = 0; polygonLayout[1].Format = DXGI_FORMAT_R32G32B32A32_FLOAT; polygonLayout[1].InputSlot = 0; polygonLayout[1].AlignedByteOffset = D3D11_APPEND_ALIGNED_ELEMENT; polygonLayout[1].InputSlotClass = D3D11_INPUT_PER_VERTEX_DATA; polygonLayout[1].InstanceDataStepRate = 0;


한번 레이아웃 description이 설정되고 나면 사이즈를 얻을 수 있고 D3D 장치를 이용하여 입력 레이아웃을 생성할 수 있습니다. 레이아웃이 만들어지면 버텍스, 픽셀 쉐이더 버퍼는 더 이상 필요 없기 때문에 해제합니다.

// 레이아웃 요소 갯수를 얻습니다. (여기서는 2개) numElements = sizeof(polygonLayout) / sizeof(polygonLayout[0]); // 버텍스 입력 레이아웃 생성. result = device->CreateInputLayout(polygonLayout, numElements, vertexShaderBuffer->GetBufferPointer(), vertexShaderBuffer->GetBufferSize(), &m_layout); if(FAILED(result)) { return false; } // 더 이상 필요 없는 버텍스, 픽셀 쉐이더 버퍼를 해제합니다. vertexShaderBuffer->Release(); vertexShaderBuffer = 0; pixelShaderBuffer->Release(); pixelShaderBuffer = 0;


마지막으로 쉐이더를 사용하는데 필요한 설정은 상수 버퍼 입니다. 버텍스 쉐이더에서 봤듯이 우리는 상수버퍼를 하나만 가지며 여기서 하나만 설정하여 쉐이더에 대한 인터페이스로 사용합니다. 상수 버퍼는 매 프레임마다 업데이트 됨으로(행렬값이다.) 버퍼 사용법은 동적(dynamic)으로 설정합니다. bind flags 는 현재 이 버퍼가 상수 버퍼가 될 것이라는 것을 나타냅니다. cpu access flags 는 위 용법(usage)와 맞춰야하기 때문에 D3D11_CPU_ACCESS_WRITE로 설정합니다. description이 작성되면 상수버퍼 인터페이스를 만들 수 있고 SetShaderParameters() 함수를 이용하여 쉐이더 내부 변수에 접근 할 수 있습니다.

// 버텍스 쉐이더에 있는 동적 행렬 상수 버퍼의 description을 작성합니다. matrixBufferDesc.Usage = D3D11_USAGE_DYNAMIC; matrixBufferDesc.ByteWidth = sizeof(MatrixBufferType); matrixBufferDesc.BindFlags = D3D11_BIND_CONSTANT_BUFFER; matrixBufferDesc.CPUAccessFlags = D3D11_CPU_ACCESS_WRITE; matrixBufferDesc.MiscFlags = 0; matrixBufferDesc.StructureByteStride = 0; // 상수 버퍼 포인터를 만듭니다. 이제 이 클래스에서 버텍스 쉐이더 상수 버퍼에 접근할 수 있습니다. result = device->CreateBuffer(&matrixBufferDesc, NULL, &m_matrixBuffer); if(FAILED(result)) { return false; } return true; }


ShutdownShader() 함수는 InitializeShader() 함수에서 설정했던 4개의 인터페이스를 해제합니다.

void ColorShaderClass::ShutdownShader() { // 행렬 상수 버퍼 해제. if(m_matrixBuffer) { m_matrixBuffer->Release(); m_matrixBuffer = 0; } // 레이아웃 해제. if(m_layout) { m_layout->Release(); m_layout = 0; } // 픽셀 쉐이더 해제. if(m_pixelShader) { m_pixelShader->Release(); m_pixelShader = 0; } // 버텍스 쉐이더 해제. if(m_vertexShader) { m_vertexShader->Release(); m_vertexShader = 0; } return; }


OutputShaderErrorMessage() 함수는 버텍스 혹은 픽셀 쉐이더를 컴파일 할때 발생하는 에러메시지를 기록합니다.

void ColorShaderClass::OutputShaderErrorMessage(ID3D10Blob* errorMessage, HWND hwnd, WCHAR* shaderFilename) { char* compileErrors; unsigned long bufferSize, i; ofstream fout; // 에러 메시지 텍스트 버퍼의 포인터를 얻습니다. compileErrors = (char*)(errorMessage->GetBufferPointer()); // 메시지의 길이를 얻습니다. bufferSize = errorMessage->GetBufferSize(); // 에러메시지를 기록할 파일을 엽니다. fout.open("shader-error.txt"); // 에러 메시지를 기록합니다. for(i=0; i<bufferSize; i++) { fout << compileErrors[i]; } // 파일을 닫습니다. fout.close(); // 에러메시지 해제. errorMessage->Release(); errorMessage = 0; // 컴파일 에러 텍스트 파일을 유저가 확인하도록 메시지 팝업창을 띄웁니다. MessageBox(hwnd, L"Error compiling shader. Check shader-error.txt for message.", shaderFilename, MB_OK); return; }


SetShaderVariables() 함수는 쉐이더의 전역 변수에 더 쉽게 설정하기 위해 존재합니다. 이 함수에 사용된 행렬들은 GraphicsClass안에서 만들어 졌으며 이 함수가 종료된 이후 Render() 함수가 호출되는 동안 버텍스 쉐이더로 보내집니다.

bool ColorShaderClass::SetShaderParameters(ID3D11DeviceContext* deviceContext, D3DXMATRIX worldMatrix, 
					   D3DXMATRIX viewMatrix, D3DXMATRIX projectionMatrix)
{
	HRESULT result;
	D3D11_MAPPED_SUBRESOURCE mappedResource;
	MatrixBufferType* dataPtr;
	unsigned int bufferNumber;


행렬들이 쉐이더로 보내지기 전 전치행렬로 바꾸는데 DirectX(행우선)와 쉐이더(열우선)가 행렬을 다루는 방식이 다르기 때문에 맞추어주기 위해 전체행렬을 취한다.

// 쉐이더가 사용할 수 있게 전치행렬로 바꿉니다. D3DXMatrixTranspose(&worldMatrix, &worldMatrix); D3DXMatrixTranspose(&viewMatrix, &viewMatrix); D3DXMatrixTranspose(&projectionMatrix, &projectionMatrix);


m_matrixBuffer 잠그고 안에다가 새 행렬을 설정하고 다시 풉니다.

// 상수 버퍼를 잠급니다. 이제 수정될 수 있습니다. result = deviceContext->Map(m_matrixBuffer, 0, D3D11_MAP_WRITE_DISCARD, 0, &mappedResource); if(FAILED(result)) { return false; } // 상수버퍼 내부 데이터에 대한 포인터를 얻습니다. dataPtr = (MatrixBufferType*)mappedResource.pData; // 상수버퍼 안으로 행렬들을 복사합니다. dataPtr->world = worldMatrix; dataPtr->view = viewMatrix; dataPtr->projection = projectionMatrix; // 상수버퍼에 대한 잠금을 풉니다. deviceContext->Unmap(m_matrixBuffer, 0);


이제 HLSL 버텍스 쉐이더에 업데이트된 행렬 버퍼를 설정합니다.

// 버텍스 쉐이더의 상수 버퍼 위치 설정. bufferNumber = 0; // 마지막으로 업데이트된 값과 함께 버텍스 쉐이더의 상수 버퍼를 설정합니다. deviceContext->VSSetConstantBuffers(bufferNumber, 1, &m_matrixBuffer); return true; }


RenderShader() 함수는 Render() 함수에서 두번째로 호출되는 함수입니다. SetShaderParameters() 함수는 쉐이더 파라미터가 제대로 설정되었지는 확인하기 전에 호출됩니다.


이 함수에서 처음으로 할 것은 우리의 입력 레이아웃을 입력 어셈블러에 활성화 시키는 것입니다. 이는 GPU가 버텍스 버퍼의 데이터의 포맷을 알게 합니다. 두번째는 이 버텍스 버퍼를 렌더링하는데 사용할 버텍스, 픽셀 쉐이더를 설정하는 것입니다. 쉐이더가 설정되면 D3D device context를 이용하여 DrawIndexed DirectX 11 함수를 호출하여 삼각형을 렌더링합니다. 이 함수가 호출되고 나면 초록 삼각형이 렌더링 될 것입니다.

void ColorShaderClass::RenderShader(ID3D11DeviceContext* deviceContext, int indexCount) { // 버텍스 입력 레이아웃을 설정. deviceContext->IASetInputLayout(m_layout); // 삼각형 렌더링에 사용할 버텍스, 픽셀 쉐이더 설정. deviceContext->VSSetShader(m_vertexShader, NULL, 0); deviceContext->PSSetShader(m_pixelShader, NULL, 0); // 삼각형 렌더링. deviceContext->DrawIndexed(indexCount, 0, 0); return; }


Cameraclass.h


지금까지 우리는 어떻게 HLSL 쉐이더를 작성하며 버텍스, 인덱스 버퍼를 설정하고 ColorShaderClass를 이용하여 버퍼를 호출하기 위해 HLSL 쉐이더를 어떻게 호출하는지에 대해 살펴보았습니다. 그러나 우리가 놓치고 있는 하나는 그래픽이 그려질 뷰포인트 입니다. 이것을 위해 우리는 DirectX 11이 우리가 씬을 어디서 어떻게 보고있는지를 알도록 camera 클래스가 필요합니다. camera 클래스는 카메라 위치와 회전상태를 기록할 것입니다. 렌더링을 위해 HLSL 쉐이더에 넘길 뷰 행렬을 만드는데 필요한 위치, 회전 정보를 사용할 것입니다.

////////////////////////////////////////////////////////////////////////////////
// Filename: cameraclass.h
////////////////////////////////////////////////////////////////////////////////
#ifndef _CAMERACLASS_H_
#define _CAMERACLASS_H_


//////////////
// INCLUDES //
//////////////
#include <d3dx10math.h>


////////////////////////////////////////////////////////////////////////////////
// Class name: CameraClass
////////////////////////////////////////////////////////////////////////////////
class CameraClass
{
public:
	CameraClass();
	CameraClass(const CameraClass&);
	~CameraClass();

	void SetPosition(float, float, float);
	void SetRotation(float, float, float);

	D3DXVECTOR3 GetPosition();
	D3DXVECTOR3 GetRotation();

	void Render();
	void GetViewMatrix(D3DXMATRIX&);

private:
	float m_positionX, m_positionY, m_positionZ;
	float m_rotationX, m_rotationY, m_rotationZ;
	D3DXMATRIX m_viewMatrix;
};

#endif


CameraClass 헤더는 사용할 4개의 함수와 함께 상당히 간단합니다. SetPosition(), SetRotation() 함수는 카메라 오브젝트의 위치와 회전을 설정하는데 사용할 것입니다. Render() 함수는 카메라 위치와 회전을 기초로한 뷰 행렬을 생성하는데 사용할 것입니다. 그리고 마지막으로 GetViewMatrix() 함수는 쉐이더가 렌더링시 사용할 수 있도록 카메라 오브젝트로부터 뷰 행렬을 얻는데 사용할 것입니다.


Cameraclass.cpp


////////////////////////////////////////////////////////////////////////////////
// Filename: cameraclass.cpp
////////////////////////////////////////////////////////////////////////////////
#include "cameraclass.h"


클래스 생성자는 카메라가 원점에 위치하도록 위치와 회전을 초기화합니다.

CameraClass::CameraClass()
{
	m_positionX = 0.0f;
	m_positionY = 0.0f;
	m_positionZ = 0.0f;

	m_rotationX = 0.0f;
	m_rotationY = 0.0f;
	m_rotationZ = 0.0f;
}


CameraClass::CameraClass(const CameraClass& other)
{
}


CameraClass::~CameraClass()
{
}


SetPosition(), SetRotation() 는 카메라의 위치와 회전을 설정하는데 사용됩니다.

void CameraClass::SetPosition(float x, float y, float z)
{
	m_positionX = x;
	m_positionY = y;
	m_positionZ = z;
	return;
}


void CameraClass::SetRotation(float x, float y, float z)
{
	m_rotationX = x;
	m_rotationY = y;
	m_rotationZ = z;
	return;
}


GetPosition(), GetRotation() 은 호출한 함수에게 카메라의 위치와 회전값을 반환합니다.

D3DXVECTOR3 CameraClass::GetPosition()
{
	return D3DXVECTOR3(m_positionX, m_positionY, m_positionZ);
}


D3DXVECTOR3 CameraClass::GetRotation()
{
	return D3DXVECTOR3(m_rotationX, m_rotationY, m_rotationZ);
}


Render() 함수는 뷰 행렬을 만들고 업데이트 하기위해 카메라의 위치와 회전값을 사용합니다. 먼저 up 벡터, 위치, 회전 등등의 변수를 설정합니다. 그리곤 씬의 원위치(원점에서 +z 방향. 참고로 DirectX 수학과 달리 z축 방향이 다르다.) 에서 카메라를 카메라의 x, y, z 회전 값에 따라 회전시킵니다. 회전후에 카메라의 위치를 3D 공간으로 옮깁니다. 맞게 설정된 position, lookAt, up 값으로 D3DXMatrixLookAtLH() 함수를 호출하여 카메라 회전과 변환을 표현하는 뷰 행렬을 만들 수 있습니다.

void CameraClass::Render() { D3DXVECTOR3 up, position, lookAt; float yaw, pitch, roll; D3DXMATRIX rotationMatrix; // up 벡터를 설정합니다. up.x = 0.0f; up.y = 1.0f; up.z = 0.0f; // 월드좌표에서 카메라 위치를 설정합니다. position.x = m_positionX; position.y = m_positionY; position.z = m_positionZ; // 카메라가 보는 곳을 기본으로 설정합니다. lookAt.x = 0.0f; lookAt.y = 0.0f; lookAt.z = 1.0f; // yaw (Y축), pitch (X축), roll (Z축) 회전 값을 라디안값으로 설정합니다. pitch = m_rotationX * 0.0174532925f; yaw = m_rotationY * 0.0174532925f; roll = m_rotationZ * 0.0174532925f; // yaw, pitch, roll 값으로 회전 행렬을 만듭니다. D3DXMatrixRotationYawPitchRoll(&rotationMatrix, yaw, pitch, roll); // lookAt, up 벡터를 회전 행렬로 회전 변환합니다. 이제 뷰가 원점에서 회전되었습니다. D3DXVec3TransformCoord(&lookAt, &lookAt, &rotationMatrix); D3DXVec3TransformCoord(&up, &up, &rotationMatrix); // 회전된 카메라 위치가 적용된 lookAt을 얻습니다. lookAt = position + lookAt; // 마지막으로 세개의 설정된 벡터로 뷰 행렬을 생성합니다. D3DXMatrixLookAtLH(&m_viewMatrix, &position, &lookAt, &up); return; }


Render() 함수가 뷰 행렬을 생성하기 위해 호출 된 후 GetViewMatrix() 함수를 이용하여 호출하는 함수에게 업데이트된 뷰 행렬을 제공할 수 있습니다. 뷰 행렬은 HLSL 버텍스 쉐이더에서 세개의 주요 행렬중 하나가 될 것입니다.

void CameraClass::GetViewMatrix(D3DXMATRIX& viewMatrix)
{
	viewMatrix = m_viewMatrix;
	return;
}


Graphicsclass.h


이제 GraphicsClass는 새로운 클래스 3개가 추가되었습니다. CameraClass, ModelClass, 그리고 ColorShaderClass 의 헤더파일이 여기에 인클루드되었고 private속성에 각 객체 포인터도 추가되었습니다. GraphicsClass 는 이 프로젝트를 위해 필요한 모든 클래스 객체를 호출하여 씬을 렌더링하는데 사용되는 메인 클래스인 것을 꼭 기억하시기 바랍니다.

////////////////////////////////////////////////////////////////////////////////

// Filename: graphicsclass.h //////////////////////////////////////////////////////////////////////////////// #ifndef _GRAPHICSCLASS_H_ #define _GRAPHICSCLASS_H_ /////////////////////// // MY CLASS INCLUDES // /////////////////////// #include "d3dclass.h" #include "cameraclass.h" #include "modelclass.h" #include "colorshaderclass.h" ///////////// // GLOBALS // ///////////// const bool FULL_SCREEN = true; const bool VSYNC_ENABLED = true; const float SCREEN_DEPTH = 1000.0f; const float SCREEN_NEAR = 0.1f; //////////////////////////////////////////////////////////////////////////////// // Class name: GraphicsClass //////////////////////////////////////////////////////////////////////////////// class GraphicsClass { public: GraphicsClass(); GraphicsClass(const GraphicsClass&); ~GraphicsClass(); bool Initialize(int, int, HWND); void Shutdown(); bool Frame(); private: bool Render(); private: D3DClass* m_D3D; CameraClass* m_Camera; ModelClass* m_Model; ColorShaderClass* m_ColorShader; }; #endif


Graphicsclass.cpp


////////////////////////////////////////////////////////////////////////////////
// Filename: graphicsclass.cpp
////////////////////////////////////////////////////////////////////////////////
#include "graphicsclass.h"


GraphicsClass의 첫번째 변화는 클래스 생성자에서 camera, model, color shader 객체포인터를 null로 초기화하는 것입니다.

GraphicsClass::GraphicsClass()
{
	m_D3D = 0;
	m_Camera = 0;
	m_Model = 0;
	m_ColorShader = 0;
}


Initialize() 함수는 새로운 객체 3개를 생성하고 초기화하는 코드가 업데이트 되었습니다.

bool GraphicsClass::Initialize(int screenWidth, int screenHeight, HWND hwnd) { bool result; // Direct3D 객체 생성. m_D3D = new D3DClass; if(!m_D3D) { return false; } // Direct3D 객체 초기화. result = m_D3D->Initialize(screenWidth, screenHeight, VSYNC_ENABLED, hwnd, FULL_SCREEN, SCREEN_DEPTH, SCREEN_NEAR); if(!result) { MessageBox(hwnd, L"Could not initialize Direct3D.", L"Error", MB_OK); return false; } // 카메라 객체 생성. m_Camera = new CameraClass; if(!m_Camera) { return false; } // 카메라 기본 위치 설정. m_Camera->SetPosition(0.0f, 0.0f, -10.0f); // 모델 객체 생성. m_Model = new ModelClass; if(!m_Model) { return false; } // 모델 객체 초기화. result = m_Model->Initialize(m_D3D->GetDevice()); if(!result) { MessageBox(hwnd, L"Could not initialize the model object.", L"Error", MB_OK); return false; } // color shader 객체 생성. m_ColorShader = new ColorShaderClass; if(!m_ColorShader) { return false; } // color shader 객체 초기화. result = m_ColorShader->Initialize(m_D3D->GetDevice(), hwnd); if(!result) { MessageBox(hwnd, L"Could not initialize the color shader object.", L"Error", MB_OK); return false; } return true; }


Shutdown() 함수도 역시 새 객체 3개를 정리하고 해제하는 코드가 업데이트 되었습니다.

void GraphicsClass::Shutdown() { // color shader 객체 해제. if(m_ColorShader) { m_ColorShader->Shutdown(); delete m_ColorShader; m_ColorShader = 0; } // 모델 객체 해제. if(m_Model) { m_Model->Shutdown(); delete m_Model; m_Model = 0; } // 카메라 객체 해제. if(m_Camera) { delete m_Camera; m_Camera = 0; } // Direct3D 객체 해제. if(m_D3D) { m_D3D->Shutdown(); delete m_D3D; m_D3D = 0; } return; }


Frame() 함수는 이전 강좌와 동일하게 그대로입니다.

bool GraphicsClass::Frame()
{
	bool result;


	// 그래픽 씬을 렌더링 한다.
	result = Render();
	if(!result)
	{
		return false;
	}

	return true;
}


여러분이 예상하다시피 Render() 함수는 매우 많이 바뀌었습니다. 그래도 여전히 씬을 검정색으로 지우는 것으로 시작합니다. 그 후에 Initialize() 함수에서 설정한 카메라 위치를 기반으로 한 뷰 행렬 생성하기 위해 카메라 객체의 Render() 함수를 호출합니다. 뷰 행렬이 생성된 이후 카메라 클래스로부터 뷰 행렬을 복사합니다. 또 D3DClass 객체로부터 월드 행렬과 투영 행렬도 복사합니다. 그래픽파이프라인에 초록색 삼각형 모델을 기하 정보를 넣기 위해 ModelClass::Render() 함수를 호출합니다. 준비된 정점들로 각 정점들을 맞게 위치시키는 행렬 3개와 모델 정보를 이용하여 정점들을 그리는 color 쉐이더를 호출합니다. 이제 초록색 삼각형이 후면 버퍼에 그려집니다. 이것으로 씬을 완료하고 EndScene() 함수를 호출하여 화면상에 출력합니다.

bool GraphicsClass::Render() { D3DXMATRIX viewMatrix, projectionMatrix, worldMatrix; bool result; // 씬을 시작하기 위해 버퍼를 비웁니다. m_D3D->BeginScene(0.0f, 0.0f, 0.0f, 1.0f); // 카메라 위치해 기반한 뷰 행렬을 생성합니다. m_Camera->Render(); // 월드, 뷰, 투영 행렬을 카메라, d3d 객체로부터 얻습니다. m_Camera->GetViewMatrix(viewMatrix); m_D3D->GetWorldMatrix(worldMatrix); m_D3D->GetProjectionMatrix(projectionMatrix); // 모델 정점과 인덱스 버퍼를 그리기위해 그래픽 파이프라인에 넣습니다. m_Model->Render(m_D3D->GetDeviceContext()); // color 쉐이더를 이용하여 모델을 렌더링 합니다. result = m_ColorShader->Render(m_D3D->GetDeviceContext(), m_Model->GetIndexCount(), worldMatrix, viewMatrix, projectionMatrix); if(!result) { return false; } // 렌더링된 씬을 화면으로 출력합니다. m_D3D->EndScene(); return true; }


요약


요약하면 여러분은 버텍스, 인덱스 버퍼가 어떻게 동작하는지에 대한 기본을 익히셨을 것입니다. 또 버텍스, 픽셀 쉐이더의 기본과 어떻게 HLSL을 이용하여 작성하지에 대해서도 익히셨을 것입니다. 그리고 마지막으로 화면상에 추력된 초록색 삼각형을 생성하기 위해 어떻게 새로운 개념들을 우리의 프레임워크에 녹여냈는지를 이해하셨을 것입니다. 제가 또 말하고 싶은 것은 단순히 삼각형 하나를 그리는데 비해 코드가 상당히 길고 아마도 main() 함수에 모든 코드를 다 넣어 버릴 수 있을 겁니다. 그러나 제가 이런 방식의 프레임워크를 취한 것은 앞으로의 강좌에서는 훨씬 더 복잡한 그래픽을 위한 코드변화가 크기 않기 때문에 이런 방식으로 코드를 작성하였습니다.


연습하기


1. 컴파일 후 실행해 보세요. 초록색 삼각형이 그려지는지 확인하고 esc키를 누러 종료시키세요.


2. 삼각형 색상을 빨간색으로 바꿔보세요.


3. 삼각형을 사각형으로 바꿔보세요.


4. 카메라를 뒤로 10칸정도 이동해 보세요.


5. 밝기가 반이 되도록 픽셀 쉐이더를 수정하세요.

    (결정적 힌트! ColorPixelShader의 뭔가에 0.5f를 곱하세요.)

728x90
728x90

원문 : http://www.rastertek.com/dx11tut03.html


Tutorial 3: Initializing DirectX 11

이번 강좌는 DirectX 11로 작업의 첫 도입이 될 것입니다. Direct3D를 어떻게 초기화하며 내릴것 인지 또 화면에 어떻게 그릴것 인지를 다루어 볼 겁니다.


업데이트된 프레임워크


모든 Direct3D 시스템 함수를 다루는 새로운 클래스를 프레임워크에 추가할 것입니다. 우리는 이 클래스를 "D3DClass"라고 부를겁니다. 밑에 프레임워크 다이어그램을 업데이트하였습니다.

보다시피 D3DClass는 GraphicsClass안에 위치 될 것입니다. 이전 강좌에서 모든 graphics관련 클래스들은 GraphicsClass안에 캡슐화될 것이고 왜 D3DClass를 위한 최적의 장소인지를 언급하였습니다. 이제 GraphicsClass의 변화들을 보도록 하겠습니다.


Graphicsclass.h

////////////////////////////////////////////////////////////////////////////////
// Filename: graphicsclass.h
////////////////////////////////////////////////////////////////////////////////
#ifndef _GRAPHICSCLASS_H_
#define _GRAPHICSCLASS_H_

첫 변화는 windows.h를 include한 것을 제거하고 대신에 d3dclass.h를 include하였습니다.

///////////////////////
// MY CLASS INCLUDES //
///////////////////////
#include "d3dclass.h"
/////////////
// GLOBALS //
/////////////
const bool FULL_SCREEN = false;
const bool VSYNC_ENABLED = true;
const float SCREEN_DEPTH = 1000.0f;
const float SCREEN_NEAR = 0.1f;


////////////////////////////////////////////////////////////////////////////////
// Class name: GraphicsClass
////////////////////////////////////////////////////////////////////////////////
class GraphicsClass
{
public:
	GraphicsClass();
	GraphicsClass(const GraphicsClass&);
	~GraphicsClass();

	bool Initialize(int, int, HWND);
	void Shutdown();
	bool Frame();

private:
	bool Render();

private:

그리고 두번째 변화는 m_D3D라 부르는 private속성 D3DClass 포인터 변수 입니다. 이때 여러분들은 제가 모든 클래스변수에 접두사로 "m_"사용을 궁금해하실 겁니다. 이 방법으로 저는 코딩할때 변수가 클래스의 멤버변수인지 아닌지를 빠르게 기억할 수 있습니다.

	D3DClass* m_D3D;
};

#endif


Graphicsclass.cpp


이전 강좌를 기억하고 있으시면 이 클래스는 코드없이 비어있다는 것을 기억하실 겁니다. 이제는 D3DClass를 가지기 때문에 GraphicsClass에 D3DClass 객체를 초기화하고 중단하는 코드를 채워넣을 것입니다. Direct3D를 이용하여 화면을 그리기위해 Render() 함수에 BeginScene()와 EndScene()의 호출을 추가할 것입니다.

첫 변화는 클래스 생성자에 있습니다. 모든 클래스 포인터에 하듯이 안정성의 이유로 포인터를 null값으로 초기화를 합니다.

GraphicsClass::GraphicsClass()
{
	m_D3D = 0;
}

두번째는 Initialize() 함수에 있습니다. 여기에 D3DClass 객체를 만들고 D3DClass의 Initialize() 함수를 호출합니다. 이 함수에 화면 너비, 높이, 윈도우 핸들과 Graphicsclass.h파일의 네 전역변수를 전달합니다. D3DClass는 이 모든 변수들을 Driect3D 시스템을 설정하는데 사용할 것입니다. d3dclass.cpp파일을 보며 더 자세하게 다루도록 하겠습니다.

bool GraphicsClass::Initialize(int screenWidth, int screenHeight, HWND hwnd) { bool result; // Direct3D 객체 생성. m_D3D = new D3DClass; if(!m_D3D) { return false; } // Direct3D 객체 초기화. result = m_D3D->Initialize(screenWidth, screenHeight, VSYNC_ENABLED, hwnd, FULL_SCREEN, SCREEN_DEPTH, SCREEN_NEAR); if(!result) { MessageBox(hwnd, L"Could not initialize Direct3D", L"Error", MB_OK); return false; } return true; }

다음은 Shutdown() 함수에 있습니다. 모든 그래픽스 객체의 중단은 여기서 발생하기 때문에 D3DClass의 Shutdown() 함수도 여기에 위치하였습니다. 포인터가 초기화되어있는지 확인하는것을 기억하시기 바랍니다.. 만약 초기화되지 않았다면 객체가 할당되지 않은 것을 추정할 수 있어 정리를 하지 않습니다. 이것이 왜 클래스 생성자에서 모든 포인터 변수들을 null 값으로 설정하는게 중요한지에 이유입니다. 포인터가 초기화되어 있다면 D3DClass를 중단한 후에 포인터를 정리할 것입니다.

void GraphicsClass::Shutdown()
{
	if(m_D3D)
	{
		m_D3D->Shutdown();
		delete m_D3D;
		m_D3D = 0;
	}

	return;
}

Frame() 함수는 매 프레임마다 Render() 함수를 호출하기 위해 업데이트 되었습니다.

bool GraphicsClass::Frame() { bool result; // 그래픽스 장면을 그린다. result = Render(); if(!result) { return false; } return true; }

이 클래스에 대한 마지막은 Render() 함수에 있습니다. 화면을 회색으로 하기위해 D3D 객체를 호출합니다. 그 후에 회색이 화면에 나타내기위해 EndScene() 함수를 호출합니다.

bool GraphicsClass::Render() { // 장면을 시작하기 위해 버퍼를 비운다. m_D3D->BeginScene(0.5f, 0.5f, 0.5f, 1.0f); // 그려진 장면을 화면에 표현한다. m_D3D->EndScene(); return true; } 

D3DClass 헤더를 살펴보도록 하겠습니다.


D3dclass.h

////////////////////////////////////////////////////////////////////////////////
// Filename: d3dclass.h
////////////////////////////////////////////////////////////////////////////////
#ifndef _D3DCLASS_H_
#define _D3DCLASS_H_

가장 먼저 객체 모듈을 사용하기 위한 라이브러리를 연결을 명시합니다. 이 라이브러리들은 DirectX에서 3D 그래픽을 설정하고 그리기 위한 모든 Direct3D 기능뿐만 아니라 모니터 재생률, 사용되는 그래픽카드 등등에 관한 정보를 얻기 위한 하드웨어 인터페이스들을 포함합니다. 일부 DirectX 10라이브러리가 사용된 것을 알아차리셨을 텐데 해당 라이브러리들은 기능이 바뀌지 않아 DirectX 11에 업그레이드 되지 않았기 때문입니다.

/////////////
// LINKING //
/////////////
#pragma comment(lib, "dxgi.lib")
#pragma comment(lib, "d3d11.lib")
#pragma comment(lib, "d3dx11.lib")
#pragma comment(lib, "d3dx10.lib")

다음 할 일은 저 라이브러리들과 DirectX 자료형 정의를 위한 헤더를 포함시키는 것입니다.

//////////////
// INCLUDES //
//////////////
#include <dxgi.h>
#include <d3dcommon.h>
#include <d3d11.h>
#include <d3dx10math.h>

여기에서는 D3DClass의 클래스 정의는 가능한 간단하게 유지됩니다. 역기 생성자, 복사생성자, 소멸자를 가집니다. 그리고 더 중요한 Initialize() 함수와 Shutdown() 함수를 가집니다. 이들은 이번 강좌에서 우리가 집중적으로 초점을 맞출 것입니다. 그 외에는 이번 강좌에 중요치 않은 여러 도우미 함수와 d3dclass.cpp파일을 볼때 보게될 private속성 멤버변수들이 있습니다. 지금은 Shutdown(), Initialize() 함수가 우리에게 관련이 있음을 아시기 바랍니다.

////////////////////////////////////////////////////////////////////////////////
// Class name: D3DClass
////////////////////////////////////////////////////////////////////////////////
class D3DClass
{
public:
	D3DClass();
	D3DClass(const D3DClass&);
	~D3DClass();

	bool Initialize(int, int, bool, HWND, bool, float, float);
	void Shutdown();
	
	void BeginScene(float, float, float, float);
	void EndScene();

	ID3D11Device* GetDevice();
	ID3D11DeviceContext* GetDeviceContext();

	void GetProjectionMatrix(D3DXMATRIX&);
	void GetWorldMatrix(D3DXMATRIX&);
	void GetOrthoMatrix(D3DXMATRIX&);

	void GetVideoCardInfo(char*, int&);

private:
	bool m_vsync_enabled;
	int m_videoCardMemory;
	char m_videoCardDescription[128];
	IDXGISwapChain* m_swapChain;
	ID3D11Device* m_device;
	ID3D11DeviceContext* m_deviceContext;
	ID3D11RenderTargetView* m_renderTargetView;
	ID3D11Texture2D* m_depthStencilBuffer;
	ID3D11DepthStencilState* m_depthStencilState;
	ID3D11DepthStencilView* m_depthStencilView;
	ID3D11RasterizerState* m_rasterState;
	D3DXMATRIX m_projectionMatrix;
	D3DXMATRIX m_worldMatrix;
	D3DXMATRIX m_orthoMatrix;
};

#endif

Direct3D에 이미 익숙한 분들은 뷰 행렬 변수가 없는 것을 아셨을 겁니다. 그 이유는 후에 보게될 카메라 클래스에 둘 것이기 때문입니다.


D3dclass.cpp

////////////////////////////////////////////////////////////////////////////////
// Filename: d3dclass.cpp
////////////////////////////////////////////////////////////////////////////////
#include "d3dclass.h"

모든 클래스와 같이 생성자에서 포인터를 null로 초기화하는 것으로 시작합니다. 헤더파일 내 모든 포인터들은 여기에 있습니다.

D3DClass::D3DClass()
{
	m_swapChain = 0;
	m_device = 0;
	m_deviceContext = 0;
	m_renderTargetView = 0;
	m_depthStencilBuffer = 0;
	m_depthStencilState = 0;
	m_depthStencilView = 0;
	m_rasterState = 0;
}


D3DClass::D3DClass(const D3DClass& other)
{
}


D3DClass::~D3DClass()
{
}

Initialize() 함수는 DirectX 11에 대한 Direct3D의 모든 설정을 합니다. 필요한 모든 코드와 나중 강좌를 가능케 하는 부수적인 것들도 두었습니다. 몇몇 항목들을 제거하고 간단하게 할 수 있었지만 한 강좌에서 모두 두는 것이 좋아보여서 두었습니다.

이 함수에 주어진 screenWidth, screenHeight 변수들은 SystemClass에서 만든 윈도우의 너비와 높이입니다. Direct3D는 이 값들을 같은 윈도우 크기를 초기화하고 사용하는데 쓸 것입니다. hwnd 변수는 윈도우에 대한 핸들입니다. Direct3D는 이전에 만든 윈도우에 접근하는데 이 핸들이 필요할 것입니다. fullscreen 변수는 창모드인지 전체 화면인지 입니다. Direct3D는 설정에 맞는 윈도우를 만들기 위해 필요할 거입니다. screenDepth, screenNear 변수들은 윈도우에서 그려질 3D 환경을 위한 화면깊이 설정입니다. vsync 변수는 Direct3D가 모니터 재생률에 맞거나 가능한 빨르게 그려지기를 원하는지 나타냅니다.

bool D3DClass::Initialize(int screenWidth, int screenHeight, bool vsync, HWND hwnd, bool fullscreen, float screenDepth, float screenNear) { HRESULT result; IDXGIFactory* factory; IDXGIAdapter* adapter; IDXGIOutput* adapterOutput; unsigned int numModes, i, numerator, denominator, stringLength; DXGI_MODE_DESC* displayModeList; DXGI_ADAPTER_DESC adapterDesc; int error; DXGI_SWAP_CHAIN_DESC swapChainDesc; D3D_FEATURE_LEVEL featureLevel; ID3D11Texture2D* backBufferPtr; D3D11_TEXTURE2D_DESC depthBufferDesc; D3D11_DEPTH_STENCIL_DESC depthStencilDesc; D3D11_DEPTH_STENCIL_VIEW_DESC depthStencilViewDesc; D3D11_RASTERIZER_DESC rasterDesc; D3D11_VIEWPORT viewport; float fieldOfView, screenAspect; // vsync 설정 저장. m_vsync_enabled = vsync;

Direct3D를 초기화하기 전에 비디오카드와 모니터에서 재생률을 얻어야 합니다. 각 컴퓨터는 미세하게 다르기 때문에 그 정보를 요청해야합니다.  재생률의 분자, 분모값을 요청하고 그 받은 값을 설정하는 동안 DirectX에게 넘겨줍니다. 그럼 적절한 재생률을 계산 할 겁니다. 그렇지 않고 재생률을 모든 컴퓨터에 있을지 모를 기본값으로 하면 DirectX은 buffer flip대신 성능이 저하되는 blit으로 수행할 것이며 짜증나는 디버그 에러를 발생할 것입니다. 

// DirectX 그래픽스 인터페이스 팩토리 생성. result = CreateDXGIFactory(__uuidof(IDXGIFactory), (void**)&factory); if(FAILED(result)) { return false; } // 비디오 카드로 적용할 adapter 생성을 위해 팩토리 사용. result = factory->EnumAdapters(0, &adapter); if(FAILED(result)) { return false; } // 기본 adapter 출력(모니터) 열거. result = adapter->EnumOutputs(0, &adapterOutput); if(FAILED(result)) { return false; } // adapter에 대한DXGI_FORMAT_R8G8B8A8_UNORM 출력 형식을 맞추는 출력 모드 개수를 얻는다. result = adapterOutput->GetDisplayModeList(DXGI_FORMAT_R8G8B8A8_UNORM, DXGI_ENUM_MODES_INTERLACED, &numModes, NULL); if(FAILED(result)) { return false; } // 모니터/비디오 카드 둘 다 가능한 모든 출력 모드를 가지는 리스트 생성. displayModeList = new DXGI_MODE_DESC[numModes]; if(!displayModeList) { return false; } // 리스트에 앞서 구한 출력 모드를 채운다. result = adapterOutput->GetDisplayModeList(DXGI_FORMAT_R8G8B8A8_UNORM, DXGI_ENUM_MODES_INTERLACED, &numModes, displayModeList); if(FAILED(result)) { return false; } // 모든 출력모드를 확인하여 화면 너비, 화면 높이와 일치하는 하나를 찾는다. // 만약 찾으면 해당 모니터의 재생률의 분자, 분모를 저장한다. for(i=0; i<numModes; i++) { if(displayModeList[i].Width == (unsigned int)screenWidth) { if(displayModeList[i].Height == (unsigned int)screenHeight) { numerator = displayModeList[i].RefreshRate.Numerator; denominator = displayModeList[i].RefreshRate.Denominator; } } }

이제 재생률의 분자, 분모를 알고 있습니다. 마지막으로 adapter를 사용하여 검색할 것은 비디오 카드의 이름과 비디오 카드의 메모리 크기입니다.

// adapter (비디오 카드) 설명은 얻는다. result = adapter->GetDesc(&adapterDesc); if(FAILED(result)) { return false; } // 비디오 카드 전용 메모리를 메가바이트(MB) 단위로 저장한다. m_videoCardMemory = (int)(adapterDesc.DedicatedVideoMemory / 1024 / 1024); // 비디오 카드 이름을 문자열로 바꾸고 저장. error = wcstombs_s(&stringLength, m_videoCardDescription, 128, adapterDesc.Description, 128); if(error != 0) { return false; }

이제 재생률의 분자, 분모와 비디오 카드 정보를 저장했기 때문에 저 정보들을 얻는데 사용한 구조체들과 인터페이스들을 해제 할 수 있습니다.

// 화면 모드 리스트 해제. delete [] displayModeList; displayModeList = 0; // adapter output 해제. adapterOutput->Release(); adapterOutput = 0; // adapter 해제. adapter->Release(); adapter = 0; // 팩토리 해제. factory->Release(); factory = 0;

필요한 정보들을 갖추었고 드디어 DirectX를 초기화 할 수 있습니다. 첫번째로 할 일은 스왑 체인 description을 채우는 것입니다. 스왑 체인은 그래픽이 그려질 전면 버퍼와 후면 버퍼의 전환입니다. 일반적으로 단일 후면 버퍼를 사용하여 여기에 모든 것을 그린 다음 사용자 화면위에 출력되는 전면 버퍼와 "스왑"을 합니다. 이게 스왑체인이라고 부르는 이유입니다.

// 스왑 체인 description을 초기화한다. ZeroMemory(&swapChainDesc, sizeof(swapChainDesc)); // 단일 후면 버퍼 설정. swapChainDesc.BufferCount = 1; // 후면 버퍼의 너비와 높이 설정. swapChainDesc.BufferDesc.Width = screenWidth; swapChainDesc.BufferDesc.Height = screenHeight; // 후면 버퍼에 일반적인 32비트 표면 설정. swapChainDesc.BufferDesc.Format = DXGI_FORMAT_R8G8B8A8_UNORM;

스왑 체인 description의 다음 부분은 재생률입니다. 재생률은 1초에 몇 번을 후면 버퍼에 그려 전면 버퍼와 스왑하는지에 대한 비율입니다. 만약 graphicsclass.h 헤더에서 vsync가 true로 설정되면 재생률을 시스템 설정에 맞춥니다. (예를 들어 60hz) 이는 초당 60번을 화면에 그리는 것을 의미합니다. (혹은 시스템 재생률이 60보다 클 경우 그 이상) 그러나 vsync를 false로 설정할 경우 가능한 많이 화면을 그리게 될 것입니다. 하지만 약간의 시각적 오류(잔상 등)를 낳을 수 있습니다.

// 후면 버퍼의 재생률 설정. if(m_vsync_enabled) { swapChainDesc.BufferDesc.RefreshRate.Numerator = numerator; swapChainDesc.BufferDesc.RefreshRate.Denominator = denominator; } else { swapChainDesc.BufferDesc.RefreshRate.Numerator = 0; swapChainDesc.BufferDesc.RefreshRate.Denominator = 1; } // 후면 버퍼의 용도 설정. swapChainDesc.BufferUsage = DXGI_USAGE_RENDER_TARGET_OUTPUT; // 렌더링할 윈도우 핸들 설정. swapChainDesc.OutputWindow = hwnd; // multisampling은 끈다. swapChainDesc.SampleDesc.Count = 1; swapChainDesc.SampleDesc.Quality = 0; // 풀스크린 or 창 모든 설정. if(fullscreen) { swapChainDesc.Windowed = false; } else { swapChainDesc.Windowed = true; } // 스캔 라인과 스캐일링을 unspecified로 설정. swapChainDesc.BufferDesc.ScanlineOrdering = DXGI_MODE_SCANLINE_ORDER_UNSPECIFIED; swapChainDesc.BufferDesc.Scaling = DXGI_MODE_SCALING_UNSPECIFIED; // 출력된 이후 후면 버퍼를 비운다. swapChainDesc.SwapEffect = DXGI_SWAP_EFFECT_DISCARD; // 추가 플래그 사용하지 않음. swapChainDesc.Flags = 0;

스왑 체인 description 설정 후 feature 레벨이라는 변수도 설정해야 합니다. 이 변수는 DirectX에게 우리가 사용할 버전이 무엇인 지를 알려줍니다. feature 레벨을 DirectX 11을 사용하므로 11.0으로 설정합니다. 만약 예전 하드웨어에서 실행시키거나 여러 버전을 지원할 예정이면 낮은 DirectX 버전을 사용하기 위해 10이나 9를 설정할 수 있습니다.

// feature 레벨을 DirectX 11로 설정. featureLevel = D3D_FEATURE_LEVEL_11_0;

스왑 체인 description과 feature 레벨이 설정되었으니 스왑 체인과 Direct3D device, Direct3D device context를 만들 수 있습니다. Direct3D device와 Direct3D device context 는 매우 중요한데, 모든 Direct3D 함수들의 인터페이스 이기 때문입니다. 앞으로 거의 모든 것에 device와 device context를 사용할 것입니다.


이 글을 읽는 사람 중 DirectX의 이전 버전에 친숙한 분들은 Direct3D device는 알고 계실 겁니다. 그러나 새로운 Direct3D device context는 다소 생소하실 겁니다. 기본적으로 예전 Direct3D device의 기능을 가지고 두개의 다른 device들로 쪼개었습니다. 그래서 이제 둘 다 사용해야 합니다.


만약 사용자의 비디오카드가 DIrectX 11을 지원하지 않을 경우 이 함수는 device와 device context 생성을 실패 한다는 것을 아셔야 합니다. 또 여러분이 DirectX 11 기능을 테스트 중인데 DirectX 11을 지원하는 비디오 카드가 없을 경우 D3D_DRIVER_TYPE_HARDWARE을 D3D_DRIVER_TYPE_REFERENCE로 대체할 수 있습니다. 그러면 DirectX가 그릴때 비디오카드 대신에 여러분의 CPU를 사용할 것입니다. 비록 1/1000의 속도로 돌지만 아직 DirectX 11이 지원되는 비디오카드가 없는 분들에게는 충분합니다.

// 스왑 체인, Direct3D device, Direct3D device context 생성. result = D3D11CreateDeviceAndSwapChain(NULL, D3D_DRIVER_TYPE_HARDWARE, NULL, 0, &featureLevel, 1, D3D11_SDK_VERSION, &swapChainDesc, &m_swapChain, &m_device, NULL, &m_deviceContext); if(FAILED(result)) { return false; }

가끔 메인 비디오카드가 DirectX 11이 호환되지 않으면 device 생성을 실패할 수 있습니다. 어떤 컴퓨터는 메인 비디오카드로 DirectX 10지원 비디오카드를 가지며 서브 비디오카드로 DirectX 11 비디오카드일 수도 있습니다. 또 일부 하이브리드 그래픽 카드는 저전력의 인텔 카드를 메인으로 고전력의 엔비디아 카드를 서브로 두고 작동합니다. 이런 것들을 잡기 위해 기본 장치를 사용하는 것이 아니라 대신에 컴퓨터에 모든 비디오카드를 열거하고 사용자가 하나를 선택하게 하여 device 생성시 명시하도록 해야 합니다.


이제 스왑 체인을 만들었으므로 후면 버퍼의 포인터를 얻어서 스왑 체인에 붙여야 합니다. 후면 버퍼를 우리의 스왑 체인에 붙이기 위해 CreateRenderTargetView() 함수를 사용할 것입니다.

// 후면 버퍼의 포인터를 얻는다. result = m_swapChain->GetBuffer(0, __uuidof(ID3D11Texture2D), (LPVOID*)&backBufferPtr); if(FAILED(result)) { return false; } // 후면 버퍼 포인터로 렌더 타겟 뷰 생성. result = m_device->CreateRenderTargetView(backBufferPtr, NULL, &m_renderTargetView); if(FAILED(result)) { return false; } // 후면 버퍼 포인터 해제. 더 이상 필요하지 않다. backBufferPtr->Release(); backBufferPtr = 0;

깊이 버퍼 description의 설정도 필요합니다. 깊이 버퍼를 만드는데 사용할 것인데 그러면 3차원 공간에서 여러 다각형이 적절히 그려질 수 있습니다. 동시에 깊이 버퍼에 스텐실 버퍼를 붙일 것입니다. 스텐실 버퍼는 모션 블러, volumetric 그림자 등등의 효과를 내는데 사용될 수 있습니다.

// 깊이 버퍼의 description을 초기화 한다. ZeroMemory(&depthBufferDesc, sizeof(depthBufferDesc)); // 깊이 버퍼의 description에 각 값들을 설정. depthBufferDesc.Width = screenWidth; depthBufferDesc.Height = screenHeight; depthBufferDesc.MipLevels = 1; depthBufferDesc.ArraySize = 1; depthBufferDesc.Format = DXGI_FORMAT_D24_UNORM_S8_UINT; depthBufferDesc.SampleDesc.Count = 1; depthBufferDesc.SampleDesc.Quality = 0; depthBufferDesc.Usage = D3D11_USAGE_DEFAULT; depthBufferDesc.BindFlags = D3D11_BIND_DEPTH_STENCIL; depthBufferDesc.CPUAccessFlags = 0; depthBufferDesc.MiscFlags = 0;

이제 저 description으로 깊이, 스텐실 버퍼를 만듭니다. 두 버퍼를 만들기 위해 CreateTexture2D() 함수를 사용한 것을 아실 텐데, 버퍼는 단지 2D 텍스쳐이기 때문입니다. 그 이유는 다각형들이 일단 정렬되고 래스터라이즈되면 단지 2D 버퍼에 픽셀들에 지나지 않기 때문입니다. 그리고 이 2D 버퍼는 화면에 그려집니다.

// 만들어진 description을 이용하여 깊이 버퍼에 대한 텍스쳐 생성. result = m_device->CreateTexture2D(&depthBufferDesc, NULL, &m_depthStencilBuffer); if(FAILED(result)) { return false; }

이제 깊이 스텐실 description을 설정을 해야 합니다. 이는 Direct3D가 각 픽셀에 행할 여러 깊이 테스트를 조정 하게 해 줄 것입니다.

// 스텐실 상태 description 초기화. ZeroMemory(&depthStencilDesc, sizeof(depthStencilDesc)); // 스텐실 상태 description 설정. depthStencilDesc.DepthEnable = true; depthStencilDesc.DepthWriteMask = D3D11_DEPTH_WRITE_MASK_ALL; depthStencilDesc.DepthFunc = D3D11_COMPARISON_LESS; depthStencilDesc.StencilEnable = true; depthStencilDesc.StencilReadMask = 0xFF; depthStencilDesc.StencilWriteMask = 0xFF; // 픽셀이 앞면(3차원 공간에서 다각형은 앞면, 뒷면의 그려짐이 다르다.)

// 일 경우 스텐실 동작. depthStencilDesc.FrontFace.StencilFailOp = D3D11_STENCIL_OP_KEEP; depthStencilDesc.FrontFace.StencilDepthFailOp = D3D11_STENCIL_OP_INCR; depthStencilDesc.FrontFace.StencilPassOp = D3D11_STENCIL_OP_KEEP; depthStencilDesc.FrontFace.StencilFunc = D3D11_COMPARISON_ALWAYS; // 픽셀이 뒷면일 경우 스텐실 동작. depthStencilDesc.BackFace.StencilFailOp = D3D11_STENCIL_OP_KEEP; depthStencilDesc.BackFace.StencilDepthFailOp = D3D11_STENCIL_OP_DECR; depthStencilDesc.BackFace.StencilPassOp = D3D11_STENCIL_OP_KEEP; depthStencilDesc.BackFace.StencilFunc = D3D11_COMPARISON_ALWAYS;

description이 채워짐으로 이제 깊이 스텐실 상태를 만들 수 있습니다.

// 깊이 스텐실 상태 생성. result = m_device->CreateDepthStencilState(&depthStencilDesc, &m_depthStencilState); if(FAILED(result)) { return false; }

만들어진 깊이 스텐실 상태로 이제 효과들을 갖도록 설정 할 수 있습니다. device context를 사용해서 설정해야 합니다.

// 깊이 스텐실 상태 설정. m_deviceContext->OMSetDepthStencilState(m_depthStencilState, 1);

다음으로 만들 것은 깊이 스텐실 버퍼의 뷰의 description입니다. Direct3D가 깊이 버퍼를 깊이 스텐실 텍스쳐로 사용하기 위해 알도록 해주어야 합니다. description을 채운 이후 CreateDepthStencilView() 함수를 호출하여 만들 것입니다.

// 깊이 스텐실 뷰 초기화. ZeroMemory(&depthStencilViewDesc, sizeof(depthStencilViewDesc)); // 깊이 스텐실 뷰 description 설정. depthStencilViewDesc.Format = DXGI_FORMAT_D24_UNORM_S8_UINT; depthStencilViewDesc.ViewDimension = D3D11_DSV_DIMENSION_TEXTURE2D; depthStencilViewDesc.Texture2D.MipSlice = 0; // 깊이 스텐실 뷰 생성. result = m_device->CreateDepthStencilView(m_depthStencilBuffer, &depthStencilViewDesc, &m_depthStencilView); if(FAILED(result)) { return false; }

만들어 지면 이제 OMSetRenderTargets() 함수를 호출 할 수 있습니다. 렌더 타겟 뷰와 깊이 스텐실 버퍼를 출력 렌더 파이프라인에 바인딩 할 수 있습니다. 이 방식으로 파이프라인이 렌더링하는 그래픽은 전에 만들었던 후면 버퍼에 그려 질 것입니다. 그래픽이 후면 버퍼에 쓰여짐으로 전면 버퍼에 스왑하고 사용자의 화면에 그래픽을 출력할 수 있습니다.

// 렌더 타겟 뷰와 깊이 스텐실 버퍼를 출력 렌더 파이프라인에 바인딩 한다. m_deviceContext->OMSetRenderTargets(1, &m_renderTargetView, m_depthStencilView);

렌더 타겟을 설정함으로 나중 강좌에서 우리의 씬 전체에 많은 조정을 할 수 있는 추가 함수들을 설정 할 수 있습니다. 먼저 래스터라이저 상태를 만들 것입니다. 래스터라이저 상태는 다각형들이 어떻게 렌더링되는지에 관한 설정을 할 수 있습니다. 그렇게 함으로 와이어 프레임 모드에서 렌더링 하거나 다각형의 앞뒷면을 그리도록 할 수 있습니다. DirectX는 기본적으로 설정된 래스터라이저 상태를 가지며 밑에 코드랑 완전히 똑같이 동작하지만 직접 설정 없이는 조절할 수 없습니다.

// 어떻게 그리고 어떤 다각형들이 그려질 지를 결정하는 래스터 description 설정. rasterDesc.AntialiasedLineEnable = false; rasterDesc.CullMode = D3D11_CULL_BACK; rasterDesc.DepthBias = 0; rasterDesc.DepthBiasClamp = 0.0f; rasterDesc.DepthClipEnable = true; rasterDesc.FillMode = D3D11_FILL_SOLID; rasterDesc.FrontCounterClockwise = false; rasterDesc.MultisampleEnable = false; rasterDesc.ScissorEnable = false; rasterDesc.SlopeScaledDepthBias = 0.0f; // 채워진 description로부터 래스터라이저 상태 생성. result = m_device->CreateRasterizerState(&rasterDesc, &m_rasterState); if(FAILED(result)) { return false; } // 래스터라이저 설정. m_deviceContext->RSSetState(m_rasterState);

Direct3D가 클립 좌표계를 렌더 타겟 공간으로 맵핑하기 위해 뷰포트도 설정되어야 합니다. 윈도우 전체 크기로 설정합니다.

// 렌더링을 위한 뷰포트 설정. viewport.Width = (float)screenWidth; viewport.Height = (float)screenHeight; viewport.MinDepth = 0.0f; viewport.MaxDepth = 1.0f; viewport.TopLeftX = 0.0f; viewport.TopLeftY = 0.0f; // 뷰포트 생성 m_deviceContext->RSSetViewports(1, &viewport);

이제 투영 행렬을 만들 것입니다. 투영 행렬은 3D 씬을 방금 전에 만든 2D 뷰포트로 바꾸는데 사용됩니다. 우리의 씬을 렌더링 하는데 사용할 "쉐이더"에 투영 행렬을 넘기기 위해 투영 행렬을 복사하여 유지해야 합니다.


        // 투영 행렬 설정.

fieldOfView = (float)D3DX_PI / 4.0f; screenAspect = (float)screenWidth / (float)screenHeight; // 3D 렌더링을 위한 투영 행렬 생성. D3DXMatrixPerspectiveFovLH(&m_projectionMatrix, fieldOfView, screenAspect, screenNear, screenDepth);

또 월드 행렬이 부르는 행렬도 만들 것입니다. 이 매트릭스는 화면상의 오브젝트의 정점들을 3D 씬의 정점들로 변환하는데 사용할 것입니다. 이 행렬은 또 3D 공간에서 오브젝트를 회전, 이동, 확대 및 축소 하는데 사용될 것입니다. 먼저 행렬을 단위행렬로 초기화 하고 현재 객체에 복사본을 유지할 것입니다. 행렬의 복사본은 렌더링을 위해 쉐이더로 넘기는데 필요할 것입니다.

// 월드 행렬을 단위 행렬로 초기화 D3DXMatrixIdentity(&m_worldMatrix);

여기는 보통 뷰 행렬을 만드는 곳 입니다. 뷰 행렬은 씬을 바라보고 있는 위치는 계산할 때 쓰입니다. 이 것은 카메라 처럼 생각 할 수 있고 이 카메라를 통해 씬을 볼 수 있습니다. 이 목적으로 나중 강좌에서 카메라 클래스 내에 뷰 행렬을 만들 것입니다. 이게 논리적으로 더 잘 맞아떨어지기 때문에 지금은 넘어가시기 바랍니다.


Initialize() 함수에서 마지막으로 설정할 것은 직교 투영 행렬입니다. 이 행렬은 3D 렌더링은 넘기면서 화면에 UI같은 2D 요소들을 렌더링하는데 사용 됩니다. 나중에 2D 그래픽과 폰트를 화면에 렌더링하는 것을 볼때 사용되는 것을 보시게 될 것입니다.

// 2D 렌더링을 위한 직교 투영 행렬 생성. D3DXMatrixOrthoLH(&m_orthoMatrix, (float)screenWidth, (float)screenHeight, screenNear, screenDepth); return true; }

Shutdown() 함수는 Initialize() 함수에서 사용된 모든 포인터들을 해제하고 정리할 것이며 상당히 간단합니다. 그러나 그 전에 스왑 체인을 창 모드로 바꿉니다. 만약 바꾸지 않고 전체 화면 모드에서 스왑 체인을 해제하면 몇몇 예외를 발생시킵니다. 그것을 피하기 위해 Direct3D 를 정러하기 전에 창 모드로 바꿉니다.

void D3DClass::Shutdown() { // 정리하기 전에 창모드로 설정, 그렇지 않으면 스왑 체인 해제시 예외가 발생한다. if(m_swapChain) { m_swapChain->SetFullscreenState(false, NULL); } if(m_rasterState) { m_rasterState->Release(); m_rasterState = 0; } if(m_depthStencilView) { m_depthStencilView->Release(); m_depthStencilView = 0; } if(m_depthStencilState) { m_depthStencilState->Release(); m_depthStencilState = 0; } if(m_depthStencilBuffer) { m_depthStencilBuffer->Release(); m_depthStencilBuffer = 0; } if(m_renderTargetView) { m_renderTargetView->Release(); m_renderTargetView = 0; } if(m_deviceContext) { m_deviceContext->Release(); m_deviceContext = 0; } if(m_device) { m_device->Release(); m_device = 0; } if(m_swapChain) { m_swapChain->Release(); m_swapChain = 0; } return; }


D3DClass에서 몇 개의 도우미 함수들을 가집니다. 첫 두개는 BeginScene() 과 EndScene() 입니다. BeginScene() 은 각 프레임의 시작에서 3D 씬을 그릴때마다 호출됩니다. 매 프레임마다 버퍼들을 초기화하여 비워지고 그려질 준비가 됩니다. 다른 함수는 EndScene() 인데, 각 프레임의 끝에서 모든 그리기가 끝나면 스왑 체인에게 3D 씬을 출력하도록 말 해줍니다.

void D3DClass::BeginScene(float red, float green, float blue, float alpha) { float color[4]; // 버퍼를 비울 색상 지정. color[0] = red; color[1] = green; color[2] = blue; color[3] = alpha; // 후면 버퍼 비움. m_deviceContext->ClearRenderTargetView(m_renderTargetView, color); // 깊이 버퍼 비움. m_deviceContext->ClearDepthStencilView(m_depthStencilView, D3D11_CLEAR_DEPTH, 1.0f, 0); return; } void D3DClass::EndScene() { // 렌더링이 완료되면 후면 버퍼를 화면에 출력. if(m_vsync_enabled) { // 화면 재생률 고정. m_swapChain->Present(1, 0); } else { // 가능한 빠르게 출력. m_swapChain->Present(0, 0); } return; }

다음 함수들은 간단하게 Direct3D device와 device context의 포인터를 얻는다. 이 도우미 함수들은 프레임워크에서 자주자주 호출 될 것입니다.

ID3D11Device* D3DClass::GetDevice()
{
	return m_device;
}


ID3D11DeviceContext* D3DClass::GetDeviceContext()
{
	return m_deviceContext;
}

다음 도우미 함수들은 호출한 함수에게 투영 행렬, 월드 행렬, 직교 투영 행렬의 복사본을 줄 것입니다. 대부분의 쉐이더들이 렌더링하는데 행렬들을 필요할 것이기 때문에 행렬들의 복사를 외부 객체가 얻는 쉬운 방법이 필요합니다. 이번 강좌에서 이 함수들을 사용하지 않지만 왜 이 코드가 여기에 있느지를 설명하기 위해서 입니다.

void D3DClass::GetProjectionMatrix(D3DXMATRIX& projectionMatrix)
{
	projectionMatrix = m_projectionMatrix;
	return;
}


void D3DClass::GetWorldMatrix(D3DXMATRIX& worldMatrix)
{
	worldMatrix = m_worldMatrix;
	return;
}


void D3DClass::GetOrthoMatrix(D3DXMATRIX& orthoMatrix)
{
	orthoMatrix = m_orthoMatrix;
	return;
}

마지막 도우미 함수는 비디오카드의 이름과 전용 메모리의 크기를 반환합니다. 비디오카드 이름과 메모리 크기를 하는 것것은 다른 환경에서의 디버기을 도와줄 수 있습니다.

void D3DClass::GetVideoCardInfo(char* cardName, int& memory)
{
	strcpy_s(cardName, 128, m_videoCardDescription);
	memory = m_videoCardMemory;
	return;
}


요약

이제 Direct3D를 초기화 하고 정리할 뿐만 아니라 윈도우에 색상을 렌더링할 수 있습니다. 컴파일하고 실행하면 이전 강좌와 같은 윈도우를 만들지만 Direct3D가 초기화되면 윈도우는 회색으로 칠해 질 것입니다. 또한 DirectX에서 헤더와 라이브러리들이 잘 설정되었으며 컴파일러가 적절히 설정되었는지를 확인 할 수 있습니다.


연습하기

1. 코드를 재컴파일하고 실행 해 보십시오, 만약 이전 강좌를 보지 않았다면 Esc 버튼을 눌러 종료시키세요.

2. graphicsclass.h의 풀스크린 전역 변수를 바꾸고 다시 컴파일 후 실행 해 보세요.

3. GraphicsClass::Render()의 클리어 색상을 노랑으로 바꾸세요.

4. 비디오카드 이름과 메모리 크기를 외부 텍스트 파일에 쓰세요.

728x90
728x90

원문 : http://www.rastertek.com/dx11tut02.html


Tutorial 2: Creating a Framework and Window


DirectX 11코드를 작성하기 전에 간단한 프레임워크를 만들기를 권합니다. 이 프레임워크는 기본 윈도우 기능을 다루며 조직적이고 읽기 좋은 방식으로 코드를 확장하는데 용이할 것 입니다. 이 강좌들의 의도는 DirectX 11만의 특성들을 다루기 위함이기 때문에 가능한한 가볍게 프레임워크를 유지할 것 입니다. (변화가 많나?)


The Framework


프레임워크는 네가지 항목으로 시작할 것입니다. 어플리케이션의 진입점을 제어하기 위해 WinMain함수를 가질 것이며 또 WinMain함수 안에서 호출되어 전체 어플리케이션을 집약하는 system 클래스를 가질 것입니다. system 클래스 내부에는 사용자 입력을 처리하기 위한 input 클래스와 DirectX 그래픽스 코드 처리를 위한 graphics 클래스를 가질 것입니다. 프레임워크 설정의 다이어그램은 다음과 같습니다.

이제 프레임워크가 어떻게 설정이 될지를 보기위해 main.cpp파일 내부에 WinMain함수를 보도록 하겠습니다.


WinMain

//////////////////////////////////////////////////////////////////////////////// // Filename: main.cpp //////////////////////////////////////////////////////////////////////////////// #include "systemclass.h" int WINAPI WinMain(HINSTANCE hInstance, HINSTANCE hPrevInstance, PSTR pScmdline, int iCmdshow) { SystemClass* System; bool result; // 시스템 객체 생성 System = new SystemClass; if(!System) { return 0; } // 시스템 객체 초기화 후 Run()호출 result = System->Initialize(); if(result) { System->Run(); } // 시스템 객체 정리 후 할당 해제 System->Shutdown(); delete System; System = 0; return 0; }


보다시피 WinMain함수가 상당히 간단합니다. system 클래스를 만들고 초기화합니다. 만약 문제없이 초기화가 된다면 system 클래스의 Run()함수를 호출합니다. Run()함수는 내부 루프를 실행시켜 어플리케이션이 끝날때까지 동작합니다. Run()함수가 끝난 후에 Shutdown()함수를 호출하여 system 객체를 정리합니다. 그래서 system 클래스 내부에 간단하고 캡슐화된 전체 어플리케이션이 유지됩니다. 이제 system 클래스 헤더파일을 보도록 해 봅시다.


Systemclass.h

////////////////////////////////////////////////////////////////////////////////
// Filename: systemclass.h
////////////////////////////////////////////////////////////////////////////////
#ifndef _SYSTEMCLASS_H_
#define _SYSTEMCLASS_H_

여기 밑에 WIN32_LEAN_AND_MEAN를 정의하였습니다. 그로인해 사용되지 않는 API들을 제외함으로써 Win32 헤더파일들의 크기를 줄여 빌드 속도를 향상시킵니다.

///////////////////////////////
// PRE-PROCESSING DIRECTIVES //
///////////////////////////////
#define WIN32_LEAN_AND_MEAN

Win32 API들의 사용과 창을 생성/제거하는 함수들을 호출하기 위해 Windows.h를 include 합니다.

//////////////
// INCLUDES //
//////////////
#include <windows.h>

이번 프레임워크의 두 클래드들의 헤더파일을 include하였습니다. system 클래스에서 사용할 수 있습니다.

///////////////////////
// MY CLASS INCLUDES //
///////////////////////
#include "inputclass.h"
#include "graphicsclass.h"

system 클래스의 정의는 상당히 간단합니다. 위에 정의된 WinMain에서 호출되었던 Initialize(), Shutdowon(), Run()가 보입니다. 이들 함수들에서 호출될 몇몇 private속성의 함수들도 있습니다. 또한 어플리케이션이 실행되는 동안 윈도우 시스템 메시지를 처리할 MessageHandler가 있습니다. 그리고 마지막으로 그래픽스와 입력을 처리할 두 객체 포인터 m_Input와 m_Graphics를 private속성으로 가집니다.

////////////////////////////////////////////////////////////////////////////////
// Class name: SystemClass
////////////////////////////////////////////////////////////////////////////////
class SystemClass
{
public:
	SystemClass();
	SystemClass(const SystemClass&);
	~SystemClass();

	bool Initialize();
	void Shutdown();
	void Run();

	LRESULT CALLBACK MessageHandler(HWND, UINT, WPARAM, LPARAM);

private:
	bool Frame();
	void InitializeWindows(int&, int&);
	void ShutdownWindows();

private:
	LPCWSTR m_applicationName;
	HINSTANCE m_hinstance;
	HWND m_hwnd;

	InputClass* m_Input;
	GraphicsClass* m_Graphics;
};


/////////////////////////
// FUNCTION PROTOTYPES //
/////////////////////////
static LRESULT CALLBACK WndProc(HWND, UINT, WPARAM, LPARAM);


/////////////
// GLOBALS //
/////////////
static SystemClass* ApplicationHandle = 0;

#endif


WndProc 함수와 ApplicationHandle 포인터가 이 클래스에 포함됨으로 윈도우 시스템 메시지를 system 클래스 내부의 MessageHandler 함수로 리다이렉트 할 수 있습니다.

이제 system 클래스의 소스파일을 보도록 해 봅시다.


Systemclass.cpp

////////////////////////////////////////////////////////////////////////////////
// Filename: systemclass.cpp
////////////////////////////////////////////////////////////////////////////////
#include "systemclass.h"

클래스 생성자 함수에서 객체 포인터들을 null로 초기화 합니다. 만약 이 객체들의 초기화를 실패할 경우 Shutdown() 함수는 그 객체들을 정리하려 할 것입니다. 그런데 객체가 null이 아닐 경우 유효하게 생성된 객체로 추정하여 메모리가 할당되지 않았음에도 객체를 정리하고 해제하려 할 것입니다. 때문에 포인터를 null로 초기화하는 것은 중요합니다. 모든 변수와 포인터들을 초기화하는 것은 좋은 연습입니다. 그렇지 않으면 몇몇 release 빌드에서 실패할 수도 있습니다.

SystemClass::SystemClass()
{
	m_Input = 0;
	m_Graphics = 0;
}

빈 복사 생성자와 클래스 소멸자를 만들었습니다. 이번 클래스에는 필요하지 않지만 만약 정의되지않으면 몇몇 컴파일러들이 생성합니다. 그 경우 차라리 복사 생성자와 소멸자가 비어있는 것이 나아 만들어 두었습니다.


이 소멸자에서 아무것도 정리하지 않는것을 알아차리셨을 것입니다. 대신에 밑에서 살펴볼 Shutdown() 함수에서 모든 객체 정리를 수행합니다. 그 이유는 소멸자가 호출될 지를 신뢰하지 않기 때문입니다. 확실히 ExitThread()같은 몇몇 윈도우 함수들은 클래스 소멸자를 호출하지 않아 메모리 누수를 낳는 것으로 알려져 있습니다. 물론 더 안전한 버전의 윈도우 함수들을 호출 할 수 있지만 저는 윈도우에서 프로그래밍 할때 조심하고 있습니다.

SystemClass::SystemClass(const SystemClass& other)
{
}


SystemClass::~SystemClass()
{
}

이어서 Initialize() 함수는 어플리케이션에 대한 모든 설정을 수행합니다. 먼저 우리의 어플리케이션이 사용할 윈도우(창)을 생성하는 InitializeWindows() 함수를 호출합니다. 또 사용자 입력 처리와 화면상에 그래픽을 렌더링하는데 사용할 input객체와 graphics객체를 만들고 초기화합니다.

bool SystemClass::Initialize() { int screenWidth, screenHeight; bool result; // 함수안으로 변수를 전달하기전에 화면 너비와 높이를 0으로 초기화한다. screenWidth = 0; screenHeight = 0; // windows api를 초기화한다. InitializeWindows(screenWidth, screenHeight); // input 객체 생성. 이 객체는 사용자로부터 키보드를 읽는 것을 처리하는데 사용될 것이다. m_Input = new InputClass; if(!m_Input) { return false; } // input 객체 초기화. m_Input->Initialize(); // graphics 객체 생성. 어플리케이션을 위한 모든 그래픽을 렌더링하는 것을 처리한다. m_Graphics = new GraphicsClass; if(!m_Graphics) { return false; } // graphics 객체 초기화. result = m_Graphics->Initialize(screenWidth, screenHeight, m_hwnd); if(!result) { return false; } return true; }

Shutdown() 함수는 정리를 수행합니다. graphics, input 객체에 관련된 모든 것을 멈추고 해제합니다. 윈도우도 shutdown하고 관련 핸들들을 정리합니다.

void SystemClass::Shutdown() { // graphics 객체 해제. if(m_Graphics) { m_Graphics->Shutdown(); delete m_Graphics; m_Graphics = 0; } // input 해제. if(m_Input) { delete m_Input; m_Input = 0; } // 윈도우 shutdown. ShutdownWindows(); return; }

Run() 함수는 우리가 끝낼때까지 우리의 어플리케이션이 돌고 처리, 연산하는 곳 입니다. 어플리케이션 연산처리는 각 루프에서 호출되는 Frame() 함수에서 수행됩니다. 이는 Run() 함수와 반드시 작성되는 어플리케이션의 다른 부분을 깊이 이해하는데 중요한 개념입니다. 의사코드는 아래와 같이 봅니다.


while done이 0일때 윈도우 시스템 메시지 확인 시스템 메시지 처리 어플리케이션 루프 수행 frame처리동안 사용자가 종료하기를 원하는지 확인


void SystemClass::Run() { MSG msg; bool done, result; // 메시지 구조체 초기화. ZeroMemory(&msg, sizeof(MSG)); // 윈도우나 사용자로부터 종료 메시지가 있을때까지 돈다. done = false; while(!done) { // 윈도우 메시지를 처리한다. if(PeekMessage(&msg, NULL, 0, 0, PM_REMOVE)) { TranslateMessage(&msg); DispatchMessage(&msg); } // 윈도우가 어플리케이션 종료를 보내면 루프를 종료한다. if(msg.message == WM_QUIT) { done = true; } else { // 종료 메시지 외 에는 frame 처리를 한다. result = Frame(); if(!result) { done = true; } } } return; }

다음 Frame() 함수는 우리의 어플리케이션이 수행되는 것에 관한 모든 처리를 하는 곳 입니다. 상당히 간단한데 사용자가 Esc키를 눌렀고 프로그램을 종료하기를 원하는지를 보는 input 객체를 확인합니다. 만약 사용자가 종료를 원치 않을 경우 해당 프레임을 위한 그래픽 렌더링을 처리할 graphics 객체의 Frame() 함수를 호출합니다. 어플리케이션이 커짐에 따라 여기에 많은 코드를 작성할 것입니다.

bool SystemClass::Frame() { bool result; // 사용자가 Esc키를 눌렀고 프로그램을 종료하기를 원하는지 확인. if(m_Input->IsKeyDown(VK_ESCAPE)) { return false; } // graphics 객체의 Frame() 함수 호출. result = m_Graphics->Frame(); if(!result) { return false; } return true; }

MessageHandler() 함수는 윈도우 시스템 메시지가 바로 보내지는 곳 입니다. 이 방법으로 우리는 우리가 원하는 특정 정보를 들을 수 있습니다. 현재 우리는 키가 눌렸는지 떼어졌는지를 읽으며 그 정보를 input 객체에게 전달 할 것입니다. 다른 모든 정보는 윈도우 default 메시지 처리기로 돌려보낼 것입니다.

LRESULT CALLBACK SystemClass::MessageHandler(HWND hwnd, UINT umsg, WPARAM wparam, LPARAM lparam) { switch(umsg) { // 키보드상의 키가 눌렸는지를 확인한다. case WM_KEYDOWN: { // 만약 키가 눌렸다면 input객체에게 key를 전달한다. 그래서 상태를 기록한다. m_Input->KeyDown((unsigned int)wparam); return 0; } // 키보드상의 키가 떼어졌는지를 확인한다. case WM_KEYUP: { // 만약 키가 떼어졌다면 input객체에게 전달한다. 그래서 상태를 지운다. m_Input->KeyUp((unsigned int)wparam); return 0; } // 그 외 다른 모든 메시지는 우리의 어플리케이션은 사용하지 않기 때문에 default 메시지 처리기로 전달한다. default: { return DefWindowProc(hwnd, umsg, wparam, lparam); } } }


InitializeWindows() 함수는 우리가 렌더링하는데 사용할 윈도우(창)을 생성하는 코드가 위치할 곳입니다. screenWidth와 screenHeight를 호출한 함수로 반환하는데 어플리케이션 전반에 걸쳐 사용할 수 있습니다. 우리는 어떠한 테두리도 없는 평평한 검정 화면을 초기화하기 위한 기본 설정을 사용하여 윈도우를 만듭니다. 전역 변수 FULL_SCREEN에 따라 전체화면 혹은 작은 화면을 만들 것입니다. 만약 1로 설정되어있으면 사용자 모니터 화면 전체를 덮는 창을 만듭니다. 만약 0으로 설정되어 있으면 화면 중앙에 800x600크기의 창을 만듭니다. 여러분이 FULL_SCREEN을 수정하기 원하는 경우 graphicsclass.h파일 최상단에 위치하니 확인하시면 됩니다. 왜 systemclass.h파일이 아닌 graphicsclass.h파일에 위치하였는지는 훗날 알게 될 것입니다.

void SystemClass::InitializeWindows(int& screenWidth, int& screenHeight) { WNDCLASSEX wc; DEVMODE dmScreenSettings; int posX, posY; // 외부 포인터로 현재 객체의 주소를 담습니다. ApplicationHandle = this; // 현재 어플리케이션의 인스턴스를 얻습니다. m_hinstance = GetModuleHandle(NULL); // 어플리케이션 이름 설정. m_applicationName = L"Engine"; // 윈도우 클래스를 기본으로 설정. wc.style = CS_HREDRAW | CS_VREDRAW | CS_OWNDC; wc.lpfnWndProc = WndProc; wc.cbClsExtra = 0; wc.cbWndExtra = 0; wc.hInstance = m_hinstance; wc.hIcon = LoadIcon(NULL, IDI_WINLOGO); wc.hIconSm = wc.hIcon; wc.hCursor = LoadCursor(NULL, IDC_ARROW); wc.hbrBackground = (HBRUSH)GetStockObject(BLACK_BRUSH); wc.lpszMenuName = NULL; wc.lpszClassName = m_applicationName; wc.cbSize = sizeof(WNDCLASSEX); // 윈도우 클래스 등록. RegisterClassEx(&wc); // 사용자 환경에 맞춘 화면크기 결정. screenWidth = GetSystemMetrics(SM_CXSCREEN); screenHeight = GetSystemMetrics(SM_CYSCREEN); // 전체 화면 여부에 따른 화면 관련 설정. if(FULL_SCREEN) { // 만약 전체화면모드이면 화면을 최대사이즈로 하고 32비트 컬러로 한다. memset(&dmScreenSettings, 0, sizeof(dmScreenSettings)); dmScreenSettings.dmSize = sizeof(dmScreenSettings); dmScreenSettings.dmPelsWidth = (unsigned long)screenWidth; dmScreenSettings.dmPelsHeight = (unsigned long)screenHeight; dmScreenSettings.dmBitsPerPel = 32; dmScreenSettings.dmFields = DM_BITSPERPEL | DM_PELSWIDTH | DM_PELSHEIGHT; // 디스플레이 설정을 전체화면으로 변경. ChangeDisplaySettings(&dmScreenSettings, CDS_FULLSCREEN); // 창 위치를 왼쪽 최상단에 위치. posX = posY = 0; } else { // 창모드일 겨우 800x600으로 설정. screenWidth = 800; screenHeight = 600; // 창이 화면 중앙에 위치하도록 위치 설정. posX = (GetSystemMetrics(SM_CXSCREEN) - screenWidth) / 2; posY = (GetSystemMetrics(SM_CYSCREEN) - screenHeight) / 2; } // 윈도우(창)을 설정에 맞게 생성하고 해당 윈도우에 대한 핸들을 얻는다. m_hwnd = CreateWindowEx(WS_EX_APPWINDOW, m_applicationName, m_applicationName, WS_CLIPSIBLINGS | WS_CLIPCHILDREN | WS_POPUP, posX, posY, screenWidth, screenHeight, NULL, NULL, m_hinstance, NULL); // 윈도우(창)을 가장 위쪽(위일수록 보이며 아래일수록 다른 화면들에 가려진다.)에 둔다.

// 그리고 활성화시킨다. (현재 작업중인 윈도우로) ShowWindow(m_hwnd, SW_SHOW); SetForegroundWindow(m_hwnd); SetFocus(m_hwnd); // 마우스 커서를 숨긴다. ShowCursor(false); return; }

ShutdownWindows() 함수는 이게 다 입니다. 화면 설정을 원래대로 돌리고  윈도우와 관련 핸들을 해제합니다.

void SystemClass::ShutdownWindows() { // 마우스 커서를 보인다. ShowCursor(true); // 전체화면모드이면 화면 설정을 변경한다. if(FULL_SCREEN) { ChangeDisplaySettings(NULL, 0); } // 윈도우(창) 제거. DestroyWindow(m_hwnd); m_hwnd = NULL; // 어플리케이션 인스턴스 제거. UnregisterClass(m_applicationName, m_hinstance); m_hinstance = NULL; // 현재 객체로의 포인터 해제. ApplicationHandle = NULL; return; }

WndProc() 함수는 윈도우가 메시지를 보내는 곳입니다. 여러분들은 우리가 바로 위에 InitializeWindows() 함수에서 wc.lpfnWndProc = WndProc라고 함수이름을 윈도우에게 말해준 것을 알아차리셨을 겁니다. 저는 WndProc() 함수가 SystemClass안에 정의된 MessageHandler() 함수로 모든 메시지를 보내도록 system 클래스로 직접 묶기위해 여기에 포함하였습니다. 이렇게 함으로 메시지기능을 건져서 우리의 클래스로 바로 보낼수 있으며 코드를 깔끔하게 유지할 수 있습니다.

LRESULT CALLBACK WndProc(HWND hwnd, UINT umessage, WPARAM wparam, LPARAM lparam) { switch(umessage) { // 윈도우를 제거중인지 확인한다. case WM_DESTROY: { PostQuitMessage(0); return 0; } // 윈도우를 닫는중인지 확인한다. case WM_CLOSE: { PostQuitMessage(0); return 0; } // 그 외 모든 메시지는 system 클래스의 메시지처리기로 넘긴다. default: { return ApplicationHandle->MessageHandler(hwnd, umessage, wparam, lparam); } } }


Inputclass.h


강좌를 간단하게 유지하도록 DirectInput(엄청나다) 강좌를 할때까지 윈도우 입력을 사용했습니다. input 클래스는 키보드로부터 사용자 입력을 처리합니다. input 클래스는 SystemClass::MessageHandler() 함수로부터 입력을 전달받습니다. input 객체는 키보드배열에 각 키의 상태를 저장할 것입니다. 특정 키가 눌렸는지 질의를 하면 질의하는 함수들에게 그 여부를 알려줄 것입니다. 헤더파일은 다음과 같습니다.


////////////////////////////////////////////////////////////////////////////////
// Filename: inputclass.h
////////////////////////////////////////////////////////////////////////////////
#ifndef _INPUTCLASS_H_
#define _INPUTCLASS_H_


////////////////////////////////////////////////////////////////////////////////
// Class name: InputClass
////////////////////////////////////////////////////////////////////////////////
class InputClass
{
public:
	InputClass();
	InputClass(const InputClass&);
	~InputClass();

	void Initialize();

	void KeyDown(unsigned int);
	void KeyUp(unsigned int);

	bool IsKeyDown(unsigned int);

private:
	bool m_keys[256];
};

#endif


Inputclass.cpp

//////////////////////////////////////////////////////////////////////////////// // Filename: inputclass.cpp //////////////////////////////////////////////////////////////////////////////// #include "inputclass.h" InputClass::InputClass() { } InputClass::InputClass(const InputClass& other) { } InputClass::~InputClass() { } void InputClass::Initialize() { int i; // 모든 키들을 눌리지 않은 상태로 초기화한다. for(i=0; i<256; i++) { m_keys[i] = false; } return; } void InputClass::KeyDown(unsigned int input) { // 키가 눌릴 경우 키배열에 상태를 저장한다. m_keys[input] = true; return; } void InputClass::KeyUp(unsigned int input) { // 키가 떼어질 경우 키배열을 비활성으로 되돌린다. m_keys[input] = false; return; } bool InputClass::IsKeyDown(unsigned int key) { // 키의 상태가 눌렸는지 눌리지 않았는지를 반환한다.( 1:눌림, 0:안 눌림) return m_keys[key]; }


Graphicsclass.h


graphics 클래스는 system 클래스가 만든 또 다른 객체입니다. 모든 어플리케이션의 그래픽 기능은 이 클래스에 캡슐화 되어 있습니다. 저는 전체화면모드, 창모드 같은 변경하고 싶은 모든 그래픽 관련 전역 설정(변수)들에 대해 이 헤더를 사용할 것입니다. 현재 이 클래스는 비어있지만 나중 강좌에서는 모든 그래픽 객체들로 넘쳐날 것입니다.


////////////////////////////////////////////////////////////////////////////////
// Filename: graphicsclass.h
////////////////////////////////////////////////////////////////////////////////
#ifndef _GRAPHICSCLASS_H_
#define _GRAPHICSCLASS_H_


//////////////
// INCLUDES //
//////////////
#include <windows.h>


/////////////
// GLOBALS //
/////////////
const bool FULL_SCREEN = false;
const bool VSYNC_ENABLED = true;
const float SCREEN_DEPTH = 1000.0f;
const float SCREEN_NEAR = 0.1f;

위 4개의 전역변수들은 꼭 필요합니다.

////////////////////////////////////////////////////////////////////////////////
// Class name: GraphicsClass
////////////////////////////////////////////////////////////////////////////////
class GraphicsClass
{
public:
	GraphicsClass();
	GraphicsClass(const GraphicsClass&);
	~GraphicsClass();

	bool Initialize(int, int, HWND);
	void Shutdown();
	bool Frame();

private:
	bool Render();

private:

};

#endif


Graphicsclass.cpp


이번 강좌에서는 단순히 프레임워크를 만드는 중인기 때문에 이 클래스 전체를 빈 상태로 유지합니다.

////////////////////////////////////////////////////////////////////////////////
// Filename: graphicsclass.cpp
////////////////////////////////////////////////////////////////////////////////
#include "graphicsclass.h"


GraphicsClass::GraphicsClass()
{
}


GraphicsClass::GraphicsClass(const GraphicsClass& other)
{
}


GraphicsClass::~GraphicsClass()
{
}


bool GraphicsClass::Initialize(int screenWidth, int screenHeight, HWND hwnd)
{

	return true;
}


void GraphicsClass::Shutdown()
{

	return;
}


bool GraphicsClass::Frame()
{

	return true;
}


bool GraphicsClass::Render()
{

	return true;
}


요약


자 이제 우리는 프레임워크와 실행 시 화면이 튀오나오는 윈도우를 만들었습니다. 이 프레임워크는 나중 강좌들의 기본이 될 것으로 이를 이해하는 것은 매우 중요합니다. 다음 강좌로 가기전에 컴파일과 실행이 확실히 되는지 확인하기 위해 '연습하기'를 시도해보세요. 아직 이번 프레임워크를 이해하지 못했다면 괜찮으니 다음 강좌들로 가도 좋습니다. 후에 프레임워크가 여러가지 채워지면 이해할 수 있을겁니다.


연습하기

1. graphicsclass.h의 FULL_SCREEN을 true으로 설정하여 다시 컴파일 후 실행해 보십시오. 윈도우가 출력된 후 Esc버튼을 눌러 종료시키세요.

728x90

+ Recent posts